• Going Out
    • Phx Restaurants
    • How To Order At Starbucks
  • Running
    • My Running Story
    • Race Calendar
    • Race Recaps & Results
  • Blogroll
  • Bucket List
  • Video

Ari's Menu

Little changes making a big difference.

  • Home
  • Recipes
  • Weight Loss
    • My Story
    • Common Swaps
  • Who’s Who
  • Contact
    • Policies & Disclosure
  • Press

Turkey Pastrami Melt

June 13, 2013 · by Ari ·

Turkey Pastrami Melt

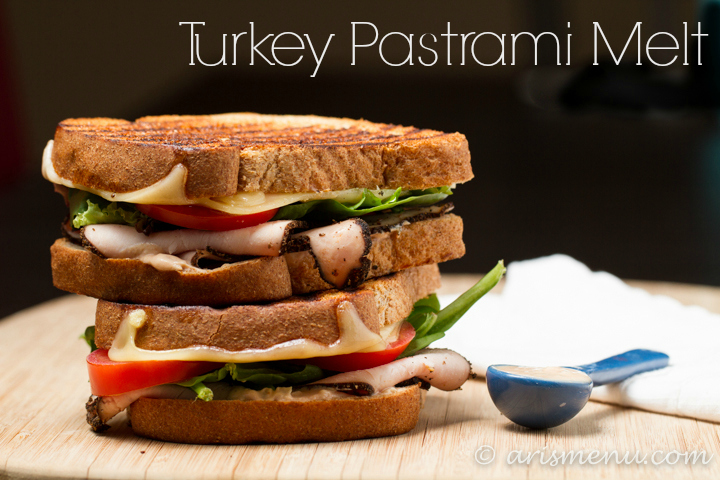
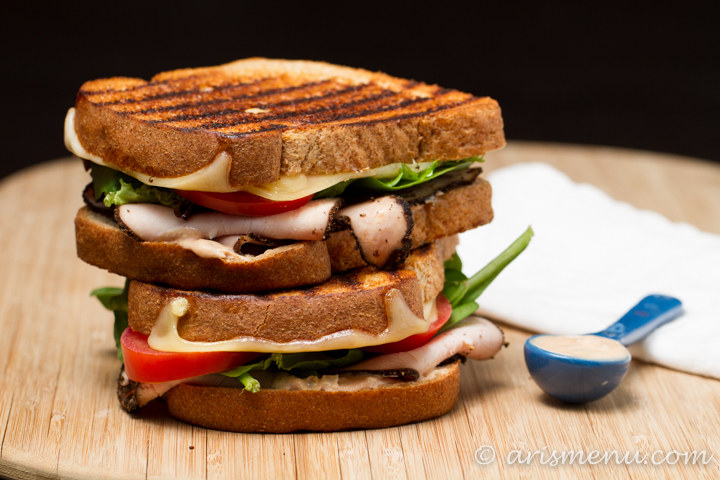
Helllloooo sandwich. Do you guys ever go to Schlotsky’s? When I was in high school, I would always drive over to my best friend’s house and pick up Schlotsky’s sandwiches for us. My staple? White bread, pastrami, swiss and thousand island. Kinda like a rueben, but with only the good parts.

Turkey Pastrami Melt

I have missed that sandwich. These days, I’m much more of a hummus, veggies and goat cheese sandwich girl, but every once in a while I crave that salty pastrami, melty cheese, and sweet and creamy thousand island. It’s like sandwich heaven.

Turkey Pastrami Melt

It’s one of those things that I just can’t seem to justify at a restaurant when I know I can make it 10x healthier myself. Not to mention, it takes about 15 minutes, including the time it took to make the dressing.

Turkey Pastrami Melt

I definitely don’t have the patience for anything time consuming around lunch time. I just want the quickest and most delicious way to get a sandwich to my face, and this baby tastes like the real deal–just like that big, juicy sandwich I remember, but with a list of healthy, protein-packed ingredients that will keep you full until dinner time!

Print
Turkey Pastrami Melt

Prep Time: 5 minutes

Cook Time: 10 minutes

Total Time: 15 minutes

Yield: 1 sandwich

Serving Size: 1 sandwich

Turkey Pastrami Melt

Ingredients

  • 2 slices whole grain bread (whole wheat, Ezekiel, brown rice, etc.)
  • 2 tsp dijon mustard
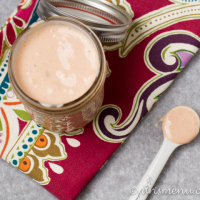
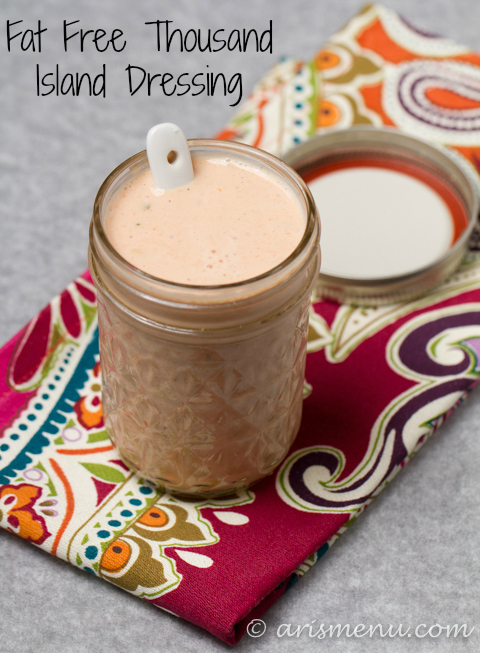
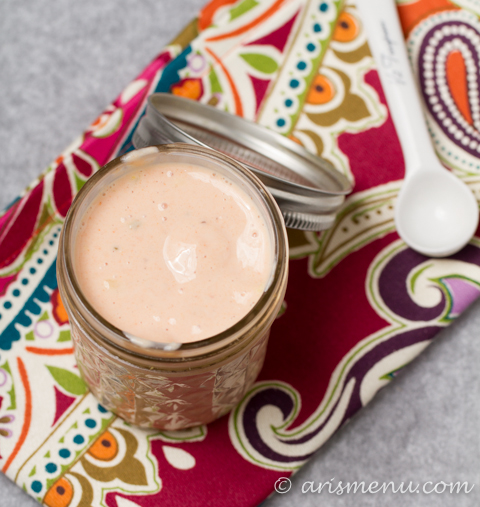
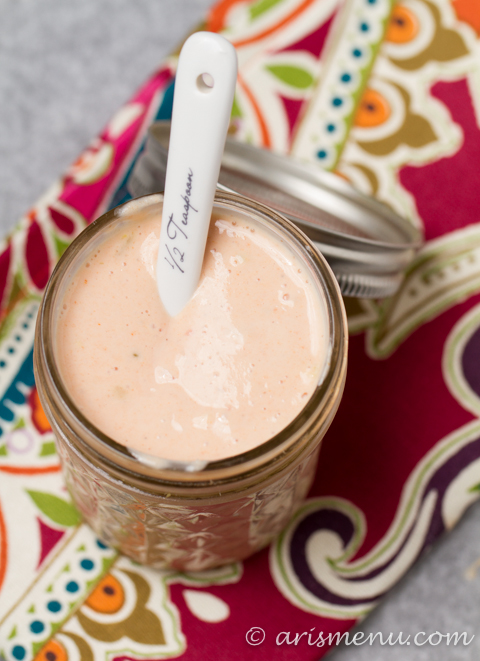
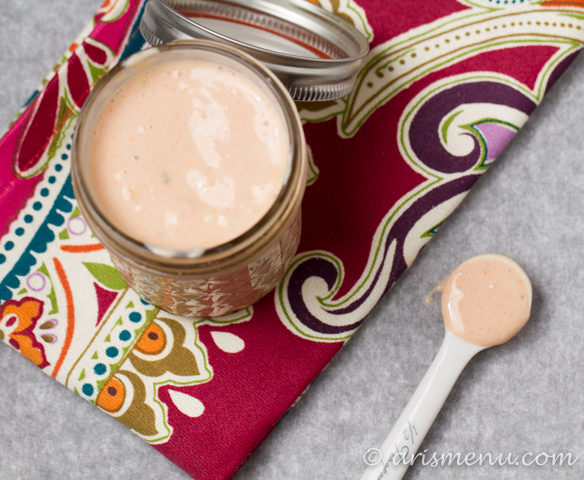
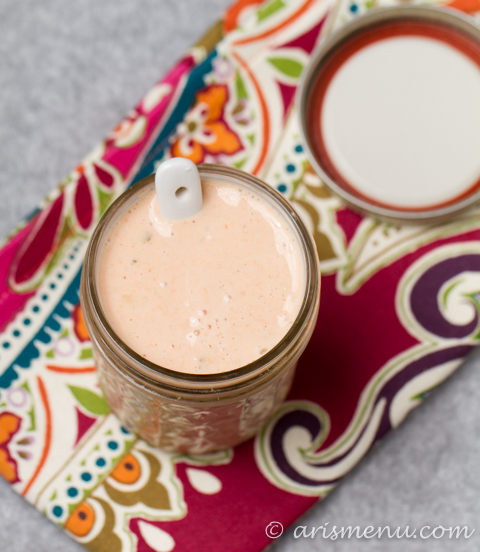
  • 1 tbsp fat free thousand island
  • 3 oz sliced turkey pastrami (I used Boar's Head found at Fry's/Kroger)
  • 1 slice reduced fat swiss cheese
  • 1/2 roma tomato, sliced
  • small handful mixed greens

Instructions

  1. Heat a medium grill pan (or regular sautee pan) over medium-low. Spray with nonstick spray.
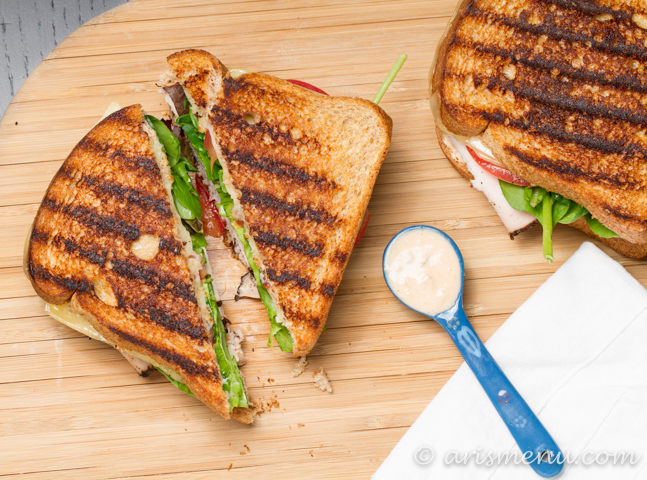
  2. While your grill pan heats, spread dijon mustard on one slice of bread. Spread your thousand island on the other. Top the dijon side with turkey pastrami, followed by tomato. Top the thousand island side with cheese.
  3. Cook sandwich open faced until bread cheese begins to melt and bread is golden brown on the bottom. Add mixed greens on top of tomato and place your other slice of bread on top, cheese side down. Grill for an additional 1-2 minutes on each side. Serve immediately.
3.1
https://arismenu.com/turkey-pastrami-melt/

Filed Under: Gluten-free, Lunch, Sandwiches, savory · Tagged: cheese, easy, lunch, pastrami, quick, recipe, sandwich, turkey

Fat Free Thousand Island Dressing

June 11, 2013 · by Ari ·

Fat Free Thousand Island Dressing

Does anyone actually eat thousand island on a salad? I mean, don’t get me wrong, I find it delicious, and I absolutely love it on sandwiches, burgers, and as a dipping sauce, but on a salad? I don’t think I’ve ever seen anyone eat it like that.

Fat Free Thousand Island Dressing

I told Hermano I made my own thousand island, and he told me I needed to recreate the big mac. I had totally forgotten that thing even exists, but I feel like now I have to tackle it. Especially since I’m apparently obsessed with burgers lately.

Fat Free Thousand Island Dressing

I used to get thousand island on my sandwiches all the time, but I kicked the habit to the curb when I started my weight loss journey. There aren’t a lot of options at the store if you want a healthier version, and most of them are filled with ingredients I don’t want to go anywhere near, so I figured I’d try my hand at my own version.

Fat Free Thousand Island Dressing

You guys…making your own salad dressing (or sandwich dressing, or dipping sauce) is SO EASY. Seriously. There is no reason to buy this stuff. It only requires a handful of ingredients, and about 5 minutes of your time.

Fat Free Thousand Island Dressing

Nonfat plain Greek yogurt is the secret to making it thick and creamy without any fat. From there, I just added a little bit of reduced sugar ketchup (available at most grocery stores), some sweet relish, honey for added sweetness, vinegar, and some seasonings. Aside from the relish, I had all of theĀ ingredientsĀ in my house already! And with hardly any added time, I had a delicious sandwich with sweet and creamy thousand island in minutes *hint hint*.

Print
Fat Free Thousand Island Dressing

Prep Time: 5 minutes

Total Time: 5 minutes

Yield: 3/4 cup

Serving Size: 2 tbsp

Fat Free Thousand Island Dressing

Ingredients

  • 1/2 cup nonfat plain Greek yogurt
  • 2 tbsp reduced sugar ketchup
  • 1 tbsp white vinegar
  • 1-2 tsp honey (depending on desired sweetness)
  • 2 tsp sweet pickle relish1 teaspoon white onion, finely minced
  • pinch onion powder
  • dash each salt and pepper

Instructions

  1. Whisk all ingredients together in a medium bowl. Store refrigerated in an airtight container for 7-10 days. Serve completely chilled.
3.1
https://arismenu.com/fat-free-thousand-island-dressing/


Filed Under: DIY/How To, Gluten-free, Miscellaneous, Sauces & Spreads · Tagged: dip, diy, dressing, easy, fast, gluten free, recipe, sauce, thousand island

Bacon Wrapped Gorgonzola Fig Burgers with Balsamic Glaze

June 10, 2013 · by Ari ·

Bacon Wrapped Gorgonzola Fig Burgers with Balsamic Glaze

You can take a moment and judge my insanely long title, per usual. Okay, now that we’ve gotten that out of the way, I’m sure you think I’ve gone off the deep end. When I told my husband what I was making for dinner last week, he raised an eyebrow, and gave me a look that can only be described as “WTF”, then he said “You’re really on a burger kick, aren’t you?”

Bacon Wrapped Gorgonzola Fig Burgers with Balsamic Glaze

Guilty. And I guess after making countless burgers, you have to do something a little weird and put fruit inside. Or at least I do.

Bacon Wrapped Gorgonzola Fig Burgers with Balsamic Glaze

I’m pretty much obsessed with anything sweet and savory. I used to think it was weird, but ever since people starting salting things (I soooo judged that salted caramel hot chocolate at the bux for a good 2 weeks), I haven’t tired of the depth of flavor adding an unexpected taste or ingredient can bring to your dish.

Bacon Wrapped Gorgonzola Fig Burgers with Balsamic Glaze

Did anyone watch that season of Top Chef with the watermelon gorgonzola salad? I don’t remember who made it, but I remember that he tried something unique, something most people would never do. I remember Tom Colicchio hated it, and said it was totally wrong, but Chef Tom ain’t got nothin’ on these burgers. šŸ˜‰

Bacon Wrapped Gorgonzola Fig Burgers with Balsamic Glaze

I’ve always loved the fig/gorgonzola combo, so I stuffed them inside my burger, then I wrapped that sucker in center cut bacon to add smokiness and some extra bold, salty flavor–wrapped around where it can stand out and be an attention whore, not tucked inside with the lesser-known ingredients. Then to bring it all together, and add an extra hint of sweetness, I reduced some balsamic vinegar on the stove until it was thick, syrupy and sweet. Careful, the fumes are INTENSE (think vinegar straight up your nose), but the end result is totally worth it. A unique burger that you won’t find at you local burger joint, with rich depth of flavor, yet still deceptively simple and easy to put together. There is nothing like it.

Print
Bacon Wrapped Gorgonzola Fig Burgers with Balsamic Glaze

Prep Time: 5 minutes

Cook Time: 30 minutes

Total Time: 35 minutes

Yield: 4 burgers

Serving Size: 1 burger

Bacon Wrapped Gorgonzola Fig Burgers with Balsamic Glaze

Ingredients

    For the burgers:
  • 1 lb extra lean ground beef (96% preferred)
  • 1/3 cup chopped dried mission figs
  • 1/4 cup crumbled gorgonzola cheese
  • pinch each salt and pepper
  • 4 slices center cut bacon
  • For the balsamic glaze:
  • 1/2 cup good quality balsamic vinegar
  • To assemble:
  • 4 whole grain buns (whole wheat, brown rice, etc)
  • 2 roma tomatoes, sliced
  • lettuce of choice

Instructions

  1. Begin with the balsamic glaze by pouring balsamic vinegar into a small sauce pan over high heat. Bring to a boil and reduce to medium-medium high to simmer. Stir occasionally until sauce has reached desired thickness. This took me about 30 minutes for a very syrupy glaze. 20-30 minutes should be all you need. Once desired consistency is reached, remove from heat immediately.
  2. In a large bowl, gently combine ground beef, figs, gorgonzola cheese, salt and pepper until ingredients are just incorporated. Form into 4 equal-sized patties. Press your thumb down into the center of each patty to create a small indent. Wrap each burger with a slice of bacon.
  3. Grill over medium heat beginning with the edge of the bacon side facing down until burgers have reached desired doneness, about 5 minutes each side. Transfer to buns and add lettuce and tomato. Drizzle with balsamic glaze.
3.1
https://arismenu.com/bacon-wrapped-gorgonzola-fig-burgers-with-balsamic-glaze/

Looking for some other burger recipes for summer? Like I said, I’ve been on a bit of a kick…

Buffalo Turkey Burgers

Spicy Chipotle Cheeseburgers

Thai Peanut Turkey Burgers

BBQ Bacon Ranch Burgers


Or if you don’t eat meat, I have a few veggie options too!

Sun-dried Tomato & Basil White Bean Burgers (vegan + gluten-free)

Chipotle Black Bean Burgers (vegan + gluten-free)

Filed Under: Dinner, Entree, Gluten-free, Holiday & Seasonal, Sandwiches, savory, Summer · Tagged: bacon, burger, dinner, figs, gorgonzola, grilling, lunch, recipe, summer

Guacamole Chicken Salad

May 30, 2013 · by Ari ·

Guacamole Chicken Salad #glutenfree #dairyfree

My name is Ari, and I have a chicken salad problem.

Guacamole Chicken Salad #glutenfree #dairyfree

There, I admit it. I just…I get on these kicks, and I have to make something every way humanly possible until I decide I’m bored, then I move on to the next best thing. Right now, I enjoy about 3 meals. Burgers, hot dogs (just you wait…so many are coming), and chicken salad (duh). At least my tastes seem to be seasonal?

http://arismenu.com/curried-chicken-salad/

So I actually realized I’ve been holding out on you guys. I’ve never actually posted my guacamole recipe. That’s probably because, until now, I had absolutely no idea what it was. I always just messed with a few key ingredients until it tasted the way I wanted. That’s the best part about guacamole–mess it up? Oh, just add more of something else, and it’s sure to even out eventually.

Guacamole Chicken Salad #glutenfree #dairyfree

So for the first time in my life, I measured out every single ingredient for my guacamole. Because I didn’t think using instructions like “Add salt until it’s salty enough” really counted as “quality content”. And I don’t mean to brag, but my guacamole is AWESOME! Spicy, fresh and creamy–it gets requested all.the.time.

Guacamole Chicken Salad #glutenfree #dairyfree

So I made it, then I added a rotisserie chicken, some tomatoes, and after all the photography was done, I had the brilliant idea to add dried cranberries. Oh Em Gee. ADD THE DRIED CRANBERRIES!!! I’m sorry they’re not in the picture. Add them anyway. You’re welcome.

This is legit the best chicken salad I have EVER tasted. It lasted about 3 days, and Steve and I were fighting each other for it. It’s perfect for all you dairy-free folk, and anyone who loves guacamole, or chicken, or food in general.

Print
Guacamole Chicken Salad

Prep Time: 10 minutes

Total Time: 10 minutes

Yield: 6-8 servings

Guacamole Chicken Salad

Ingredients

  • 2 large (or 3 small) avocados, peeled and pitted
  • 1 lime, zest & juice
  • small handful fresh cilantro
  • 3 cloves garlic, finely chopped
  • 1/2 jalapeno, finely chopped (remove stems and heat for less heat)
  • 1 tsp cumin
  • generous pinch each salt and pepper
  • 1/4 cup red onion, finely chopped
  • 1/2 cup cherry tomatoes, halved
  • 1/3 cup dried cranberries (optional, but recommended)
  • 10-12 oz cooked and shredded chicken (I used one rotisserie)

Instructions

  1. In a large bowl, combine avocado, lime (zest and juice), cilantro, garlic, jalapeno, cumin, salt and pepper. Use an immersion blender to blend all ingredients together until smooth and creamy, about 1 minute. Blend for less time if you like a thick and chunky consistency.
  2. Stir in onion, tomatoes, cranberries and chicken. Serve immediately, or store in an airtight container with half a lime (this prevent browning) for up to 5 days.
3.1
https://arismenu.com/guacamole-chicken-salad/

Want more chicken salad options? I have lots (and none of them have mayo)!

Curried Chicken Salad

Buffalo Chicken Salad

Cranberry Apple Chicken Salad

Filed Under: Dinner, Entree, Gluten-free, Holiday & Seasonal, Low Carb, Lunch, Paleo, Salads, savory, Summer · Tagged: avocado, chicken, chicken salad, dairy free, dinner, easy, gluten free, guacamole, lunch, quick, recipe, simple

Jalapeno Popper Chicken

May 27, 2013 · by Ari ·

Jalapeno Popper Chicken

I don’t know about you guys, but I am living in a haze of my post-long-weekend-fun. Did you guys do anything exciting for memorial day? I helped my brother move into his first apartment, celebrated my mom’s birthday, and had an awesome day at Lake Pleasant with Nicole. Oh, and then I spent actual Memorial Day creating recipes, meal planning, grocery shopping, and attempting productivity. Now? I just want to lay around and be lazy.

Jalapeno Popper Chicken

It’s always those lazy nights that I feel like throwing in the towel and hitting up Chipotle (honestly, does Chipotle EVER not sound good?) that I end up coming up with some of my favorite recipes. A quick survey of the fridge and pantry, throw a few things together in about 5 minutes, stick it in the oven and hope for the best.

Jalapeno Popper Chicken

I know you guys love recipes like that too. Who wants to cook healthy food if it means spending your entire life in the kitchen? Umm, I love cooking, and that sounds awful even to me! This chicken is breaded and crispy and filled with cheese and jalapeno creating the unmistakable flavor of a jalapeno popper (one of my favorite bar food appetizers) in a healthy, simple dinner. I fell in love with it at first bite, and you better believe it will become one of my I-don’t-feel-like-cooking staples.

Print
Jalapeno Popper Chicken

Prep Time: 10 minutes

Cook Time: 30 minutes

Total Time: 40 minutes

Yield: 2 servings

Serving Size: 1 x 6oz chicken breast

Jalapeno Popper Chicken

Crispy, breaded chicken breast stuffed with roasted jalapeno and cheese. It tastes like a jalapeno popper for dinner!

Ingredients

  • 1 cup whole grain bread crumbs (brown rice, whole wheat, etc.)
  • dash cayenne pepper
  • generous pinch each salt and pepper
  • 1 jalapeno, ribs and seeds removed
  • 2 cloves garlic
  • 1 tsp olive oil
  • 2 x 6 oz chicken breasts, butterflied
  • 1 oz goat cheese (or cream cheese)
  • 2 egg whites, beaten

Instructions

  1. Preheat oven to 375. Place a cooling rack inside of a cookie sheet and spray lightly with nonstick spray. Set aside.
  2. Combine bread crumbs, cayenne, salt and pepper in a large shallow bowl. Set aside.
  3. Place jalapeno and garlic on a small piece of tin foil. Lightly drizzle with olive oil. Broil until softened, about 10 minutes. Keep an eye on it to make sure the garlic doesn't burn. Roughly chop jalapeno, and finely chop garlic.
  4. Divide cheese, jalapeno and garlic between the center of the two chicken breasts. Fold chicken back over on top of the fillings. Secure with a toothpick.
  5. Place beaten egg whites in a large shallow bowl. Drench chicken in egg whites, then coat completely in bread crumb mixture and place on prepared baking sheet. Repeat with remaining chicken.
  6. Bake until cooked throughout and juices run clear, about 30 minutes.
3.1
https://arismenu.com/jalapeno-popper-chicken/

Filed Under: Entree, Gluten-free · Tagged: cheese, chicken, dinner, easy, jalapeno, jalapeno popper, recipe, simple

PB&J Cheesecake Cups

May 23, 2013 · by Ari ·

PB&J Cheesecake Cups

You.guys. I just…I’m not even sure I can talk about these little gems.

PB&J Cheesecake Cups

I guess that is why we take so many pictures? Because there is no way I could explain in words how out-of-this-world this dessert is.

PB&J Cheesecake Cups

First of all, peanut butter and jelly is my probably favorite combination. Well, peanut butter and chocolate miiiight give it a run for it’s money, but I am totally that person that will go to a restaurant and order a peanut butter and jelly sandwich. Especially if it includes words like “roasted” or other fancy adjectives. I’m a sucker for fancy adjectives.

PB&J Cheesecake Cups

I made these for Steve’s birthday. I think I’ve mentioned that his birthday dessert from last year is my very favorite dessert I’ve ever made. It’s also one of the most popular recipes on this li’l ol’ blog. Well, these cheesecake cups give thoseĀ vanilla bean cookie butter cup cupcakesĀ a run for their money!

PB&J Cheesecake Cups

You guys are going to love these babies. Creamy peanut butter cheesecake stuffed with raspberry (or whatever flavor you love most) jam on top of my very favorite go-to graham cracker crust. It just doesn’t get much better.

Print
PB&J Cheesecake Cups

Prep Time: 15 minutes

Cook Time: 25 minutes

Total Time: 5 hours, 30 minutes

Yield: 12 cups

Serving Size: 1 cup

PB&J Cheesecake Cups

Peanut butter and jelly meets cheesecake in these perfect, single serving cups.

Ingredients

    For the graham cracker crust:
  • 1 cup old fashioned graham cracker crumbs
  • 2 tbsp coconut oil, melted
  • For the cheesecake:
  • 1 lb reduced fat cream cheese
  • 1/2 cup peanut butter (I used PB&Co white chocolate wonderful)
  • 2/3 cup brown sugar
  • 2 eggs
  • 1/4 cup unsweetened almond milk
  • 1 tsp vanilla extract
  • approx 6 tbsp low sugar raspberry jam (or jam or your choosing)

Instructions

  1. Preheat oven to 350. Spray a standard muffin tin with nonstick spray. Set. Aside.
  2. To make the crust, combine graham cracker crumbs and coconut oil in a medium bowl. Place approx 1 tablespoon of crust into each muffin tin. Press down with your fingers or a shot glass. Bake until set, about 7-10 minutes. Cool on a wire rack while you prepare the filling.
  3. To make the cheesecake, beat cream cheese, peanut butter and brown sugar together in a large bowl or stand mixer. Add eggs one at a time, mixing until combined. Beat in almond milk and vanilla.
  4. Evenly divide half the cheesecake batter (eyeball it) between your 12 muffin tins. Top with approx 1/2 tbsp of jam, then divide remaining cheesecake batter.
  5. Bake until lightly browned and just set, about 15-20 minutes. Turn the oven off and crack the door. Allow cheesecakes to sit in opened oven for an additional 15 minutes.
  6. Cool completely on a wire rack, then refrigerate until fully chilled, about 3-4 hours. Store covered in refrigerator for up to one week.

Notes

Inspired by Gimme Some Oven

If you'd like, you can top the cheesecake cups with extra jam just before serving.

3.1
https://arismenu.com/pbj-cheesecake-cups/

Filed Under: Cheesecake, Cupcakes, Dessert · Tagged: cheesecake, dessert, jelly, peanut butter, peanut butter and jelly, recipe

Drink & Dish: Loaded Baked Potato Salad

May 21, 2013 · by Ari ·

Loaded Baked Potato Salad

I realllllly hope you like this recipe. I almost lost a leg creating it for you. I mean, “lost a leg” might be sliiiiightly dramatic, but I did end up with a pretty massive and nasty burn on my leg. I’ve had quite a few kitchen casualties recently, and I’m just considering it an opportunity to toughen up.

Loaded Baked Potato Salad

I’m pretty much a wimp about hurting myself. I will push through tons of pain when I run, but the second I SEE the physical pain happen, I kind of cry like a baby. It’s not my best character trait, but I mean it could be worse, right?

Loaded Baked Potato Salad

Ya know, for all my whining, this dish totallllly made up for it. I’ve made it before, but not for a long time, and with one bite I remembered just how dangerously delicious it was. In fact, after several days of nonstop picking at it and eating bites here and there, I finally had to throw in the towel and send the rest of the leftovers off with my family.

Loaded Baked Potato Salad

It literally tastes like a loaded baked potato. It has all the good stuff, and gets rid of a large amount of the bad. No butter (the original recipe calls for TWO STICKS–gross), no sour cream, and lighter cheese and bacon options. If you’re not a meat or bacon eater, I guess you cooouuulllld leave it out, but I feel like it’s totally worth the little extra splurge here. Plus, center cut bacon is like 35 caloies a slice, so unless you just don’t like it, I’d keep it. šŸ˜‰

Loaded Baked Potato Salad

The only time consuming part of this salad is waiting for the potatoes to bake. Literally, the rest is 5 minutes of throwing things together in a bowl. The flavors and textures come together perfectly with the starchy potatoes, creamy greek yogurt and crunchy, salty bacon.

Loaded Baked Potato Salad

Make sure you check out the latest episode of Drink & Dish, and if you want a fun summer treat for Memorial Day or lounging by the pool, check out Nicole’s delicious vodka lemonade slush.


Print
Drink & Dish: Loaded Baked Potato Salad

Prep Time: 10 minutes

Cook Time: 45 minutes

Total Time: 1 hour

Yield: 6-8 servings

Drink & Dish: Loaded Baked Potato Salad

Simple, easy, and lightened up loaded baked potato salad perfect for summer BBQs.

Ingredients

  • 2 lbs red skinned potatoes
  • 1/2 tbsp olive oil
  • 1/2 lb center cut bacon, cooked and crumbled
  • 1 heaping cup nonfat plain Greek yogurt
  • 1/4 cup scallions, thinly sliced
  • 1/3 cup reduced fat shredded cheddar cheese
  • Generous pinch salt and pepper

Instructions

  1. Preheat oven to 400. Pierce potatoes several times with a fork. Transfer to a large baking dish and lightly drizzle with olive oil. Cook until softened, about 45 minutes. Let cool for 15-20 minutes.
  2. Cut baked potatoes into 1" cubes. Place all ingredients in a large bowl, and lightly toss until combined. Serve immediately or store in an airtight container for up to 5 days.

Notes

Adapted from Rachel Ray

3.1
https://arismenu.com/drink-dish-loaded-baked-potato-salad/

Filed Under: Appetizers, Drink & Dish, Gluten-free, Holiday & Seasonal, Salads, savory, Side Dish, Snacks, Summer · Tagged: bacon, baked potato, cheese, gluten free, greek yogurt, grilling, potato, potato salad, recipe, salad, side, summer

Spicy Chipotle Cheeseburgers

May 19, 2013 · by Ari ·

Spicy Chipotle Cheeseburgers

My mind has officially checked out into summer vacation land. Technically, I have 2 more days of classes before it becomes official, but mentally I am….so….there. And let’s face it, Ā I’ve been there for a couple of weeks now.

Spicy Chipotle Cheeseburgers

There is something about summer when you work on the school calendar. I still work hard over the summer, but it all seems like so much FUN. Maybe it’s knowing it’s all only temporary, and eventually you will all go back to “real life”, but I just love it. Despite the hear here in Phoenix, it’s probably my favorite time of year.

Spicy Chipotle Cheeseburgers

It seems like no matter what I have on my meal plan these days, nothing sounds better than grilling up some burgers and eating dinner by the pool. It just makes my heart happy. Not to mention the flavor combinations for burgers are pretty much endless, leaving you with burger after burger recipe. Sorry I’m not sorry.

Spicy Chipotle Cheeseburgers

I do have a pretty sweet side dish coming your way later this week that you can eat along side these burgers during your Memorial Day festivities.

Print
Spicy Chipotle Cheeseburgers

Prep Time: 5 minutes

Cook Time: 10 minutes

Total Time: 15 minutes

Yield: 4 burgers

Serving Size: 1 burger

Spicy Chipotle Cheeseburgers

Simple and easy spicy chipotle cheeseburgers are a perfect way to kick up your summer grilling!

Ingredients

    For the burgers:
  • 1 lb 96% lean ground beef (or lean ground turkey)
  • 1 chipotle pepper in adobo sauce, finely chopped
  • pinch salt
  • For the creamy chipotle spread:
  • 1 cup nonfat plain Greek yogurt
  • 1 chipotle pepper in adobo sauce
  • Toppings/to put together the burger:
  • Whole grain buns (whole wheat, brown rice, etc.)
  • Sliced roma tomato
  • Lettuce
  • Extra sharp cheddar cheese

Instructions

  1. To make the burgers, combine beef, chopped chipotle pepper and salt in a large bowl. Create 4 evenly sized patties. Gently press each patty down in the center with your thumb to create an indent--this promotes even cooking. Grill to desired doneness, about 4-5 minutes per side.
  2. To make the sauce, blend Greek yogurt and chipotle pepper in a food processor or blender until well combined.
  3. To assemble burgers, spread sauce onto the top side of the bun. Top bottom half with lettuce, burger, cheese and tomato slices (or whatever you'd like--it's your burger!) and finish off with the top half of the bun. Serve immediately. Leftover meat patties can be stored in an airtight container in the refrigerator for up to 5 days.
3.1
https://arismenu.com/spicy-chipotle-cheeseburgers/

Filed Under: Dinner, Entree, Gluten-free, Holiday & Seasonal, Lunch, Sandwiches, savory, Summer · Tagged: beef, burger, cheese, chipotle, dinner, gluten free, grilling, lunch, recipe, spicy, summer

Banana Cream Cupcakes

May 15, 2013 · by Ari ·

Banana Cream Cupcakes

You guys you guys you guys you guys!!!!! I have the best house guest in the whole world right now!

Banana Cream Cupcakes

So I’m going to keep this short so we can commence with cooking, baking, wine drinking, and goat cheese eating. I made banana cupcakes. Then I stuffed them with cream cheese frosting. Then I topped them with salted caramel. I mean, how could that even possibly be bad?

Banana Cream Cupcakes

Did I mention that my “little” brother turned 16? He is also over 6′ tall, and has this deep man voice. When he calls me he just says “Yooooooooo” in this grumbly, ridiculously low-pitched man voice. Like, what IS that? I remember him being born. HOW CAN HE BE A MAN NOW????

Banana Cream Cupcakes

I try to imitate the “Yo” voice, but ummm, I have a high-pitched little girl voice, so it doesn’t work. At all. Everyone laughs at me. So I just let him stick to the man voice, and I stick to what I’m good at, like making him perfect birthday cupcakes. And they are. The banana makes the cupcakes ridiculously soft, and they are totally stuffed with the cream cheese filling, and that salted caramel is just the icing on the cake. Literally.

Print
Banana Cream Cupcakes

Banana Cream Cupcakes

Ingredients

    For the cupcakes:
  • 2 cups white whole wheat flour
  • 3/4 tsp baking soda
  • 1/2 tsp baking powder
  • 1/2 dash salt
  • 2 medium ripe bananas, mashed
  • 1/2 unsweetened apple sauce
  • 1 1/3 cups sugar
  • 2 eggs
  • 1 1/2 tsp vanilla extract
  • 1/2 cup reduced fat buttermilk
  • fleur de sel caramel for topping, optional
  • For the filling:
  • 8oz reduced fat cream cheese, softened
  • 1 cup powdered sugar
  • 1 tsp vanilla extract

Instructions

  1. To make the cupcakes, preheat the oven to 375. Line 2 muffin tins with 18 paper liners. Set aside.
  2. In a medium bowl, whisk together flour, baking soda, baking powder and salt. Set aside. In a large bowl, beat together apples, apple sauce and sugar. Slowly, beat in eggs one at a time, followed by vanilla. Slowly beat in half the dry ingredients, then buttermilk, followed by the last of the dry ingredients.
  3. Evenly divide batter between 18 muffin tins. Bake until golden and a toothpick inserted in the center comes out clean with just a few crumbs, about 20-25 minutes. Cool completely.
  4. To make the filling, beat cream cheese, powdered sugar and vanilla together until well combined. Transfer to a pastry bag fitted with a large tip. Insert tip into the center of cooled cupcakes and gently squeeze out 1-2 tbsp of filling.
  5. Drizzle with caramel if desired immediately before serving. Cupcakes are best the same day, but can be stored refrigerated in an airtight container for up to 5 days.
3.1
https://arismenu.com/banana-cream-cupcakes/

Filed Under: Cupcakes, Dessert · Tagged: banana, caramel, cream cheese, cupcakes, dessert, recipe, whole grain

3 Ingredient Roasted Banana Coconut Milk Ice Cream

May 12, 2013 · by Ari ·

3 Ingredient Roasted Banana Coconut Milk Ice Cream #vegan

Of course I would need the most complicated title ever to describe the simplest recipe. In fact, it’s probably more difficult to say the title out loud than it is to make it. It’s that chronic over-sharing thing I do. I just can’t help it.

3 Ingredient Roasted Banana Coconut Milk Ice Cream #vegan

So after an amazing cold front, it is officially into the triple digits for the next 5 months or so with very little hope at dipping back down into anything resembling a reasonable temperature, which means I need ice cream. Not want, need. Have I ever told you that ice cream is my favorite dessert? I rarely make it because I have the hardest time getting the right texture when I make it at home, but coconut milk is pretty much the best ingredient on earth, and when you combine that with sweet, roasted banana, you are looking at a pretty sure thing.

3 Ingredient Roasted Banana Coconut Milk Ice Cream #vegan

Between the sweetness and creaminess of those two ingredients, I promise you don’t need anything else. You can always add a little pure maple syrup or brown sugar if you prefer something a little sweeter, but believe me when I say that roasting that banana brings out all of it’s rich sweetness, and totally does the trick. You can also add chocolate chips, cinnamon, extra fruit, pretty much any add-ins you’d like. This recipe is more like your base–your starting point, and a great and simple treat for the long summer months coming our way!

Print
3 Ingredient Roasted Banana Coconut Milk Ice Cream

Prep Time: 2 hours, 15 minutes

Cook Time: 15 minutes

Total Time: 2 hours, 30 minutes

3 Ingredient Roasted Banana Coconut Milk Ice Cream

Simple, easy, vegan roasted banana coconut milk ice cream with only 3 ingredients.

Ingredients

  • 1 tbsp coconut oil, melted
  • 3 medium bananas, peeled and sliced
  • 1 can full fat coconut milk

Instructions

  1. Preheat oven to 400. Place banana slice in a rimmed baking dish and drizzle with coconut oil. Bake for 15-20 minutes, until soft and syrupy, tossing half way through.
  2. Transfer cooked bananas to a blender, scraping your pan well to include the syrup that cooked out from them. Add coconut milk and blend until combined.
  3. Chill mixture until cooled throughout, about 4 hours up to overnight.
  4. Freeze according to ice cream maker's instructions. Store in an airtight freezer-safe container for up to 2 weeks.
3.1
https://arismenu.com/3-ingredient-roasted-banana-coconut-milk-ice-cream/


Filed Under: Dessert, Gluten-free, Ice Cream & Fro-yo, Paleo, Vegan · Tagged: banana, coconut, fruit, gluten free, grain free, ice cream, recipe, summer, vegan

“Nutella” Granola {vegan + gluten-free}

May 7, 2013 · by Ari ·

"Nutella" Granola #vegan #glutenfree via arismenu.comOnce upon a time, I discovered the peanut butter & Nutella sandwich. Then, I discovered the Nutella + spoon combination. And sometimes the spoon never even came to join the party. Shameless.

"Nutella" Granola #vegan #glutenfree via arismenu.com

I can’t even have Nutella in the house these days. It’s just too tempting. Occasionally, I’ll buy it for a recipe (and then eat my oatmeal out of the empty jar and feel like I’ve died and gone to heaven), but I think it’s about time that I get to eat chocolate hazelnutty goodness for breakfast every single day. Does that not just sound like perfection?

"Nutella" Granola #vegan #glutenfree via arismenu.com

The best part? You don’t even have to buy Nutella for this recipe, but the taste is uncanny. I took one bite after it finished cooking and quickly exclaimed “It tastes like NUTELLA!!!” Just simple granola loaded with hazelnuts with some cocoa powder added to the mix. It is not overpoweringly sweet, and it doesn’t taste like dessert. I think the sweetness is perfect, but if you want a sweeter granola, you can absolutely add some extra brown sugar, or honey, or agave.

"Nutella" Granola #vegan #glutenfree via arismenu.com

I also discovered the secret to the biggest, fattest granola clusters–check those monsters out!! I’m always looking for the big, chunky clusters, and this time I got it right. I did not stir this granola once while it cooked. I just let it do it’s thing, flipped it around half way through, and ya know what? Everything cooked evenly, nothing burned, and I had granola clusters the size of my hand! What??? Now the problem is not eating those clusters every time I step into the pantry. It’s kind of a problem…

Print
ā€œNutellaā€ Granola

Prep Time: 15 minutes

Cook Time: 1 hour

Total Time: 1 hour, 45 minutes

Yield: Approx 10 cups

Serving Size: 1/2 cup

ā€œNutellaā€ Granola

Simple and easy chocolate hazelnut granola tastes remarkably like Nutella! The big clusters and bold flavors are totally addicting and will have you constantly reaching back for more.

Ingredients

  • 5 cups rolled oats (use gluten-free if that’s important to you)
  • 2 cups hazelnuts, roughly chopped
  • 1 cup slivered almonds
  • heavy pinch sea salt
  • 3/4 cup unsweetened applesauce
  • 1/2 cup brown sugar
  • 1/3 cup honey or agave
  • 2/3 cup cocoa powder (I used Hershey's special dark)
  • 2 tbsp coconut oil

Instructions

  1. Preheat oven to 300. In a very large bowl, mix together the oats, nuts and salt.
  2. In a small saucepan, warm the applesauce, brown sugar, honey/agave, cocoa powder and coconut oil until well combined, whisking constantly. Add the applesauce mixture into the dry ingredients and toss to combine. Evenly divide granola in an even layer between two large baking sheets.
  3. Bake until browned and crispy, about 50 minutes-1 hour, turning half way through.
  4. Cool completely, then store in an airtight container at room temperature. The granola will stay fresh for at least one month. I've never made a batch last any longer than that, but it's still great a month in and probably for longer.

Notes

If you'd like, you may gently stir the granola every 20 minutes while cooking. This will lead to less clusters and a finer granola. I prefer to be able to break the clusters up myself afterwards, but if you like a finer granola, then stirring will help.

3.1
https://arismenu.com/nutella-granola-vegan-gluten-free/


Filed Under: Breakfast, Gluten-free, Granola, Special Diet, Vegan · Tagged: breakfast, brunch, chocolate, gluten free, granola, hazelnut, nutella, recipe, vegan

Drink & Dish: Blueberry Pancakes {with video!}

May 5, 2013 · by Ari ·

I know that no one is *perfect*, but I’d have to say my mom is pretty darn close. So today, rather than tell you about how awesome the pancakes are (they are awesome, and make sure you check out the video at the end for all my pancake secrets!), I have compiled a list of a few of the many reasons I love my mom.

Whole Wheat Blueberry Pancakes #vegan via arismenu.com

1. My mom is the best listener. Any time I have a problem, she says all the right things. I can call her at any time of day and I know I can count on her to be my confidant, and give me A+ advice. She is a social worker, so in addition to her 28 years (gross, I’m old) of experience, she’s also legitimately educated in advice giving and people skills.

Whole Wheat Blueberry Pancakes #vegan via arismenu.com

2. She is hilarious and totally weird. When I was little, she would do this weird clap-in-patterns thing. I seriously don’t know how else to even explain it, but I was always so embarrassed. Now I see all my weird little quirks, and realize how alike we are. I appreciate that she taught me to be silly, and to be myself. Now I love all of her little oddities. They make her unique, and she wouldn’t be my mom without them.

Whole Wheat Blueberry Pancakes #vegan via arismenu.com

3. She is my biggest cheerleader, and also my biggest advocate. I love the positive support and encouragement I get from my mom, but it is the times when I see her stand up and fight for me that I am taken aback. My mom, rarely angry, occasionally turns into a real mama bear, and I can see her fight to protect me. I don’t care how old I am, I will always appreciate feeling protected, and I will also always need to hear her tell me “Good job. I’m proud of you.”

Whole Wheat Blueberry Pancakes #vegan via arismenu.com

4. She is the most patient woman I have ever met. It doesn’t run in the family. I simultaneously admire, and am in awe of her patience. You know when you want to grow up and be just like your mom? Yeah, I still feel that way, and I keep hoping one day it will happen.

There are a million more things I could say, but I’ll try not to make this a novel. Check out the latest episode of Drink & Dish for my pancake secrets, Nicole’s amazing Blackberry Wine Cooler (check out the recipe–they are AWESOME!), and our favorite memories with our moms.


What is your favorite thing/memory about/with your mom?

Print
Whole Wheat Blueberry Pancakes

Prep Time: 20 minutes

Cook Time: 10 minutes

Total Time: 30 minutes

Yield: 12 pancakes

Serving Size: 2 pancakes

Whole Wheat Blueberry Pancakes

Perfectly fluffy whole wheat and vegan blueberry pancakes are perfect for any brunch occasion!

Ingredients

  • 2 tbsp milled flax seed
  • 6 tbsp water
  • 2 cups whole wheat pastry flour
  • 2 tsp baking powder
  • 2 tsp baking soda
  • dash salt
  • 2-3 tbsp brown sugar*
  • 2 cups unsweetened almond milk
  • 1 tsp vanilla extract
  • 1 cup fresh blueberries

Instructions

  1. In a small bowl, whisk together flax seed and water. Let stand for 5 minutes.
  2. In a large bowl, whisk together flour, baking powder, baking soda, salt and brown sugar. Gently mix in flax mixture, almond milk, and vanilla, stirring until just combined, then fold in blueberries. Let stand for 10 minutes.
  3. Preheat griddle or large pan over medium-low heat, and spray with nonstick cooking spray. Pour 1/4 cup batter for each pancake. Cook until top forms small bubbles and bottom is golden brown, about 5 minutes. Flip and cook for an additional 3-4 minutes, until golden.

Notes

*I used 2 tbsp brown sugar, but you can easily use 3 if you like your pancakes on the sweeter side.

3.1
https://arismenu.com/drink-dish-blueberry-pancakes/

Filed Under: Breakfast, Drink & Dish, Vegan · Tagged: blueberries, breakfast, drink and dish, mothers day, pancakes, recipe, vegan, video, whole grain

« Previous Page
Next Page »
Image Map

Popular Posts

Tart Cherry Margaritas: The perfect, refreshing margarita--lightly sweet with a punch of tequila

Tart Cherry Margaritas

90+ Healthy Recipes for Breakfast, Lunch, Dinner & Dessert

90+ Healthy Recipes for Breakfast, Lunch, Dinner & Dessert

The Ultimate Peanut Butter Cup Brownie Cookies: Rich, fudgy, brownie-like chocolate cookies stuffed with melty peanut butter cups!

Ultimate Peanut Butter Cup Brownie Cookies

Drink & Dish: Cafe Au Lait Cupcakes

Crockpot Chicken Enchilada Soup

Subscribe via Email:

Enter your email address:

Save an additional $30 on Blendtec Factory Recertified Blenders + Free Shipping

Featured Here

recipe redux
Certified Yummly Recipes on Yummly.com

Member Of…

FitFluential Is Fitness Found
AZ Bloggers Network
az 150 photo az150_zpsfb093d32.gif

Archives


Image Map

Copyright © 2025 | Innovative Child Theme by The Pixelista | Built on the Genesis Framework


Loading Comments...