• Going Out
    • Phx Restaurants
    • How To Order At Starbucks
  • Running
    • My Running Story
    • Race Calendar
    • Race Recaps & Results
  • Blogroll
  • Bucket List
  • Video

Ari's Menu

Little changes making a big difference.

  • Home
  • Recipes
  • Weight Loss
    • My Story
    • Common Swaps
  • Who’s Who
  • Contact
    • Policies & Disclosure
  • Press

Fig, Prosciutto & Brie Cracker Bites

June 1, 2015 · by Ari ·

Fig, Prosciutto & Brie Cracker Bites: The perfect easy and delicious appetizer or snack!

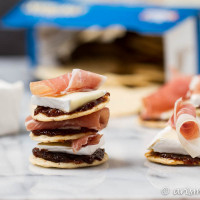
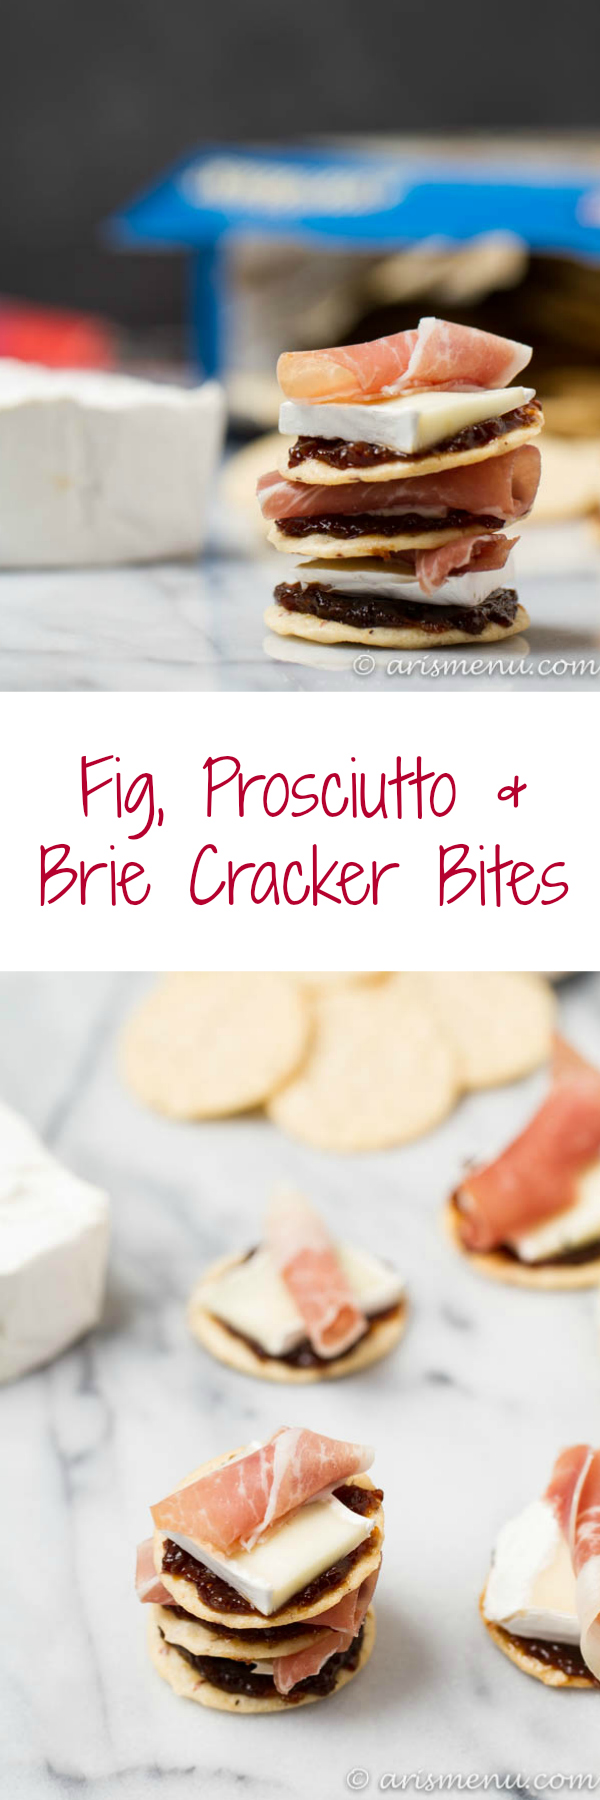
Elegant and simple, fig, prosciutto & brie cracker bites are the perfect appetizer for entertaining or a special afternoon snack. Just four delicious ingredients and next to no prep time!

Fig, Prosciutto & Brie Cracker Bites: The perfect easy and delicious appetizer or snack!

One of my very favorite sandwiches comes from a little wine bar here in Arizona. They have a great wine selection (obviously), but also lots of delicious sandwiches, salads, and to-die-for bruschetta boards. 

I always get their sandwich that comes with fig jam, prosciutto, and brie. I love the perfect balance of a sweet and salty entree, and I will choose it almost every time.

Fig, Prosciutto & Brie Cracker Bites: The perfect easy and delicious appetizer or snack!

Now that summer is officially in full swing, we’re spending lots of time grilling by the pool, and I have already eaten my weight in grilled corn and zucchini. We’ve already enjoyed many nights of entertaining outdoors while sipping crisp cocktails by the pool. 

As I put my menu together, sometimes I have a hard time deciding what to put out for appetizers. I love creating fresh and flavorful side dishes to accompany the main event on the grill, and I of course can’t resist the opportunity to bake up a special dessert. But I struggle a little when it comes to appetizers and hors d’oeuvres.

The other night I had these delicious Nut Thins crackers from Blue Diamond hanging out in my pantry and I decided to put them to good use.

Fig, Prosciutto & Brie Cracker Bites: The perfect easy and delicious appetizer or snack!

These Fig, Prosciutto & Brie Cracker Bites

  • Come together in minutes
  • Offer an elegant presentation
  • Won’t break the bank
  • Taste divine

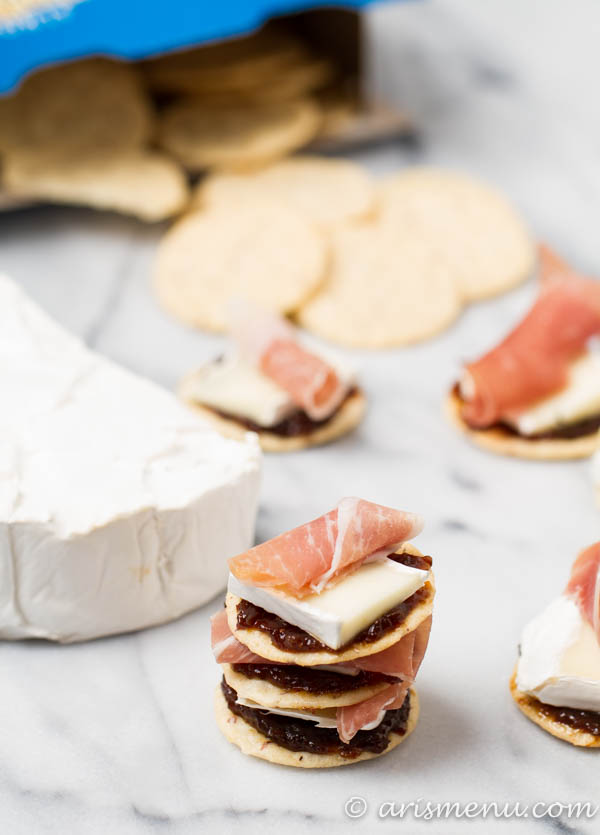
The flavor-packed nut thin crackers provide the perfect base for this appetizer – crisp and crunchy with the perfect salty bite. They’re wonderful on they’re on, and even better all dressed up!

Fig, Prosciutto & Brie Cracker Bites: The perfect easy and delicious appetizer or snack!

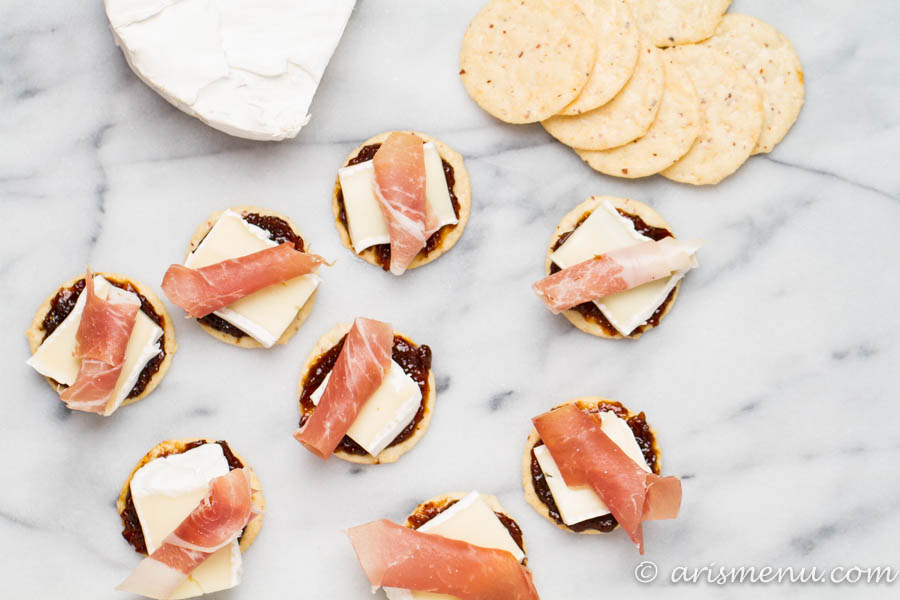
How to Make Fig, Prosciutto & Brie Cracker Bites

    1. Lay your crackers out in an even layer. Use Blue Diamond Nut Thins for best results.
    2. Layer each cracker with a thick spread of fig jam. Use your favorite, or make your own. Don’t go too light here – you want plenty of sweet, syrupy fig flavor.
    3. Add a small wedge of brie. You want about a 1” piece so the brie is perfectly nestled inside your cracker, not overlapping the sides. Cut nice, thick pieces for an ultra-creamy bite.
    4. Top with loosely-rolled prosciutto. One 2” piece will do it, but if you really love prosciutto, feel free to sneak in an extra piece.

It only took a few minutes to spread on some fig jam (I used a balsamic fig jam, and it was an excellent life choice), add a thin slice of creamy brie, and top it off with a beautiful slice of rolled-up prosciutto. 

With the mix of sweet and salty flavors, crunchy and velvety textures, and perfect simplicity, these little bites will easily become the hit at all your gatherings!

Fig, Prosciutto & Brie Cracker Bites
Recipe Type: Appetizer
Author: Ari Ziskin
Prep time: 10 mins
Total time: 10 mins
Ridiculously simple and easy fig, prosciutto & brie cracker bites are the perfect appetizer for entertaining, or just an afternoon snack. Just 4 delicious ingredients and next to no prep time!
Ingredients
    • [url href=”https://www.bluediamond.com/index.cfm?navid=34″ target=”_blank”]Blue Diamond Nut Thins[/url] (I used the original flavor)
    • Fig jam
    • Brie cheese, cut into 1″ slices
  • Sliced prosciutto, cut into 2″ pieces, loosely rolled
Instructions
  1. Assemble by spreading fig jam onto crackers, then top with brie and prosciutto. Serve.
3.3.3070

This post is sponsored by Blue Diamond. All opinions are my own.

Filed Under: Appetizers, DIY/How To, Gluten-free, savory, Snacks · Tagged: 4 ingredient appetizer, appetizers, brie, cheese, crackers, easy appetizers, fig, prosciutto, snacks

Lasagna Baked Chicken

January 4, 2015 · by Ari ·

Lasagna Baked Chicken: Healthy, easy, delicious and low-carb baked chicken with all the flavor and comfort of classic lasagna!

Easy, healthy, cheesy and delicious lasagna baked chicken breast is the perfect dinner to get your new year started off right! All the taste and comfort of lasagna in a healthy chicken entree that comes together before you know it.

Lasagna Baked Chicken: Healthy, easy, delicious and low-carb baked chicken with all the flavor and comfort of classic lasagna!

If there’s one thing that drives me crazy (okay, there’s probably, like, a zillion…), it’s the idea that healthy eating means you can’t eat your favorite things. Before I was finally successful with my weight loss, I had so many failed attempts because each time I felt like I couldn’t eat anything, and it’s just not true. It’s just about finding ways to make your favorite things fit into your healthy lifestyle, and this chicken does just that!

Lasagna Baked Chicken: Healthy, easy, delicious and low-carb baked chicken with all the flavor and comfort of classic lasagna!

Lasagna has to be the ultimate comfort food. With melty, gooey cheese and pasta you really can’t go wrong, but I honestly have never felt like pasta even adds much to a dish. It is the vehicle for cheese and sauce. I’m happy just eating cheese and sauce. By themselves. With a spoon. But I guess I should eat protein or something too.

Lasagna Baked Chicken: Healthy, easy, delicious and low-carb baked chicken with all the flavor and comfort of classic lasagna!

I love stuffing chicken. It’s one of my favorite, easy ways to make my dinner more fun without having to do much. Chicken on its own can quickly become boring and monotonous, but there are so many fun varieties and flavor combinations you can use to dress it up a little. I just made my favorite lasagna filling, butterflied the chicken, stuffed that cheesy goodness inside, then baked it. Finish it off with a little mozzarella, stick it under the broiler to get brown and bubbly, and top it off with your favorite marinara sauce. Mine came from a bottle because, like I said, I am a totally lazy cook.

Lasagna Baked Chicken: Healthy, easy, delicious and low-carb baked chicken with all the flavor and comfort of classic lasagna!

The result was total cheesy dreaminess, and I literally haven’t stopped thinking about it since.

Lasagna Baked Chicken
Recipe Type: Entree
Author: Ari Ziskin
Prep time: 15 mins
Cook time: 25 mins
Total time: 40 mins
Serves: 40
Easy, healthy, cheesy and delicious lasagna baked chicken breast is the perfect dinner to get your new year started off right! All the taste and comfort of lasagna in a healthy chicken entree that comes together before you know it.
Ingredients
  • 4 large chicken breasts
  • salt and pepper
  • 1 tablespoon olive oil
  • 1/2 cup part skim ricotta cheese
  • 1/2 cup nonfat cottage cheese
  • 1 teaspoon dried or finely chopped fresh oregano
  • 1 teaspoon dried or finely chopped fresh basil
  • 1 cup shredded part skim mozzarella
  • 1 cup marinara sauce (or more if desired)
Instructions
  1. Preheat oven to 350. Season both sides of each chicken breast with salt and pepper. Butterfly each chicken breast then set aside.
  2. To make the filling, combine ricotta cheese, cottage cheese, oregano and basil in a medium bowl. Fill the center of each chicken breast with cheese mixture and fold the top half of the chicken back over on top. Make sure chicken can fold back over completely, and that cheese isn’t spilling out. Depending on the size of your chicken breasts, you may have some cheese mixture left over.
  3. Carefully place filled chicken breasts in a large, rimmed baking dish and lightly drizzle with olive oil. Bake until chicken is completely cooked and juices run clear. This will vary depending on thickness, but I usually start to check around 20 minutes. You do not want to over cook them.
  4. Top with mozzarella cheese and broil until cheese is bubbly, about 2 minutes. Watch closely–it can burn quickly. Plate and top with marinara sauce. Serve immediately. Leftovers may be refrigerated in an airtight container for up to 5 days.
3.2.2885


Filed Under: Chicken, Dinner, Entree, Gluten-free, Low Carb · Tagged: cheese, chicken, cottage cheese, italian, lasagna, ricotta

Crockpot Chicken Taco Dip

October 9, 2014 · by Ari ·

Crockpot Chicken Taco Dip

Disclosure: I was asked to participate in the McCormick Gluten-Free Recipe Mixes Launch as a member of the Healthy Aperture Blogger Network. I received free samples of McCormick Gluten-Free Recipe Mixes from McCormick mentioned in this post. I was compensated for my time. All opinions are my own.

Rich, creamy and bold chicken taco dip made easily in your slow cooker, topped with melty pepper jack. This dip is so full of flavor, you won’t be able to stay away!

Crockpot Chicken Taco Dip

I have a confession. I never make my own taco seasoning / pumpkin pie spice / tomato sauce seasonings / etc. I love to cook, but I am honestly all about convenience, and I’m a busy human who needs for things to be quick and easy when I’m cooking at home. Sometimes I feel like, because I have a food blog, I have to be one of those 100% from scratch type cooks. I just can’t live up to that. I mean, I guess I’m somewhere between that cookie dough that’s not just already made, but already cut for you and someone who churns their own butter.

Crockpot Chicken Taco Dip

Something that really surprised me when Steve found out he had a gluten intolerance was just how many things contained gluten. I mean, we’re both pretty lucky in the fact that we’re more gluten-get-grouchy than gluten intolerant (well, he is closer to intolerant, but does okay with cross contamination), but even still, so many of the seasonings that we’d used in the past contained flour–what is that about?? We learned to label check like crazy, even things you wouldn’t imagine, and it’s even more important for our friends with Celiac.

Crockpot Chicken Taco Dip

We LOVE that McCormick has some of our favorite seasoning mixes that are certified by the National Foundation for Celiac Awareness and they contain no MSG, artificial colors or flavors. The flavors are bold and spot on, and they make it so easy to turn a boring dinner into a flavorful one! I also love that their gluten-free products are the same price as their regular products. Eating gluten-free can get soooo expensive (hellloooo $5 for a loaf of bread…), and it’s really refreshing to finally have a product that has the same cost.

Crockpot Chicken Taco Dip

This dip couldn’t be easier–I just took some chicken breasts, a can of refried beans, a block of cream cheese and the McCormick gluten-free taco seasoning and threw ’em in the crockpot. I added some Greek yogurt after they were done cooking then topped it with pepper jack cheese that I put in the oven on broil until it got all bubbly and dreamy. The taste and the texture were absolutely amazing. I couldn’t stop eating it, and ended up eating dip for dinner. Oh well, I guess there’s worse things. 😉

Print
Crockpot Chicken Taco Dip

Prep Time: 5 minutes

Cook Time: 5 hours

Total Time: 5 hours, 5 minutes

Yield: about 9-10 cups

Crockpot Chicken Taco Dip

Ingredients

  • 1 pound chicken breast
  • 1 x 16 ounce can refried beans (I used fat free)
  • 3 cups salsa
  • 8 ounces reduced fat cream cheese, softened and cut into 1" cubes
  • 2-3 tablespoons McCormick Gluten-Free Taco Seasoning
  • 1/2 cup nonfat plain Greek yogurt
  • 1 cup shredded pepper jack cheese
  • 1 jalapeno, sliced (optional for serving)
  • corn tortilla chips for serving

Instructions

  1. Place chicken breasts at the bottom of your slow cooker. Cover with beans, salsa, cream cheese and taco seasoning. Cook on low for 4-5 hours, stirring once in between if possible.
  2. Remove chicken and shred. Take about a tablespoon of warm dip and mix into Greek yogurt to temper, then add Greek yogurt and stir to combine.Stir in shredded chicken. Transfer to an oven safe serving dish and top with shredded cheese. Cook on broil until cheese starts to brown and bubble, about 3-4 minutes. Watch carefully to avoid burning.
  3. Top with sliced jalapeno and serve immediately with chips. Leftovers may be refrigerated in an airtight container for 5-7 days.
3.1
https://arismenu.com/crockpot-chicken-taco-dip/

Other gluten-free seasoning options include Gluten-Free Chili Seasoning, Gluten-Free Turkey Gravy, and Gluten-Free Brown Gravy. For more from McCormick,  you can follow them on Facebook, Pinterest and Instagram!

Filed Under: Appetizers, Gluten-free, Holiday & Seasonal, savory, Side Dish, Slow Cooker, Snacks · Tagged: beans, cheese, chicken, crockpot, dip, football, gluten free, slow cooker, taco, taco dip

French Onion Burgers

July 28, 2014 · by Ari ·

Satisfy your craving for French onion soup in the summer time with these big, juicy beef burgers stuffed with caramelized onions, then topped with melty gruyere and even more caramelized onions. 

French Onion Burgers with tons of caramelized onions and melty gruyere

Once upon a time, I’m pretty sure I thought caramelized onions actually had caramel in them. I mean, they’re sooo sweet and delicious. I just figured they at least had buckets of sugar to get them to that point!

French Onion Burgers with tons of caramelized onions and melty gruyere

Turns out, onions are kind of magical, and you probably already know that if you let em cook on low heat for a ridiculous amount of time, they transform into the sweetest and most tender veggie you will ever eat.

French Onion Burgers with tons of caramelized onions and melty gruyere

It does take a while, but it is soooo easy. Once I get them going, I generally prep everything else I have to do for dinner and then, if dinner is super easy, sometimes I just watch Netflix and go back to the kitchen to stir them around every now and then. They are totally low maintenance.

French Onion Burgers with tons of caramelized onions and melty gruyere

As much as I love onions, ya know what really makes French onion soup for me? That thick layer of bubbly cheese on top. Bubbling cheese is like the stuff dreams are made of. Put it on top of that thick slice of bread they put on top, and your meal is pretty much guaranteed to be awesome. Bread. Cheese. Onions. Done.

French Onion Burgers with tons of caramelized onions and melty gruyere

But I have to say, it’s all even better when sitting on top of a super juicy beef burger that has even more onions hiding inside! It’s so good, you totally don’t even need the bun. In fact, I won’t eat a burger unless it’s good enough to eat bunless. It’s kind of a rule in my house because 99% of the time I toss the bun after it serves its purpose of looking cute on camera, and eat my delicious burger nekked. 😉

Print
French Onion Burgers

Prep Time: 10 minutes

Cook Time: 50 minutes

Total Time: 1 hour

Yield: 3-4 burgers

Serving Size: 1 burger

French Onion Burgers

Satisfy your craving for French onion soup in the summer time with these big, juicy beef burgers stuffed with caramelized onions, then topped with melty gruyere and even more caramelized onions.

Ingredients

  • 2 large sweet onions, sliced
  • 4 cloves garlic, minced
  • 1 tablespoon olive oil
  • 1 teaspoon balsamic vinegar
  • generous pinch salt and pepper
  • 1 pound extra lean ground beef (94-96%)
  • pinch thyme (fresh or dried)
  • pinch paprika
  • 2-4 ounces sliced or shredded gruyere cheese
  • whole grain buns for serving (if desired)

Instructions

  1. In a large pan, cook onions and garlic in olive oil and balsamic vinegar over medium-low heat. Season with salt and pepper. Cook until soft and caramelized, stirring occasionally, about 40 minutes.
  2. In a medium bowl combine ground beef, 1/4 of the caramelized onions, thyme, paprika, and an extra pinch of black pepper. Form into 3-4 even patties (depending on how big you like your burgers).
  3. Grill burgers to desired doneness. Top immediately with gruyere and allow to melt slightly then top with a generous portion of caramelized onions. Serve immediately.

Notes

For even cooking in your burgers, gently press your thumb into the center of each patty before cooking.

3.1
https://arismenu.com/french-onion-burgers/

Filed Under: Dinner, Entree, Gluten-free, Holiday & Seasonal, Hot Dogs & Sandwiches, Low Carb, Lunch, Sandwiches, savory, Summer · Tagged: burgers, cheese, french onion, french onion burgers, grilling, onions, recipe, summer

Greek Lamb Burgers

June 22, 2014 · by Ari ·

Bold, flavorful and tender half lamb/half beef burgers stuffed with feta cheese and topped with creamy tzatziki sauce. Everything you love about a classic gyro in healthy, summer burger form!

Greek Lamb Burgers: Like a healthier gyro in burger form!

I F-ing love a gyro. When I worked at my last school, we did our shows at the MAC which is dangerously close to this little hole in the wall Greek restaurant. I had actually never (whaaaaat???) eaten a gyro (and I still pronounced it with a j sound…shhhh…), but my friend Emily raved about it, and I have to tell you, I have not stopped thinking about that damn gyro ever since.

Greek Lamb Burgers: Like a healthier gyro in burger form!

We’re talking years here people. When I love food, I don’t forget about it. Trust me, I still talk about this Italian restaurant I ate at in London when I was 14.  I can’t remember to return pretty much any emails, but I can remember the meal I ate 5 zillion years ago that was “life changing”. It’s a gift. You know, like how Karen in Mean Girls can tell the weather.

Greek Lamb Burgers: Like a healthier gyro in burger form!

Okay, so we all know I have a bit of a burger problem, yes? I have actually heard my man food and meat loving husband utter the words “burgers….again?”. Yes. Once June hits (okay…May…), burgers multiple times a week are not only normal, but expected. I mean, sometimes I change it up. With a hot dog.

Greek Lamb Burgers: Like a healthier gyro in burger form!

But this was not a “burgers…again?” moment. This was one of those getting feisty and fighting over the leftovers all week long moments. I’m serious. It gets crazy over here. Like a race to the fridge to claim the good leftovers. We’re both very considerate and grown up human beings.

Greek Lamb Burgers: Like a healthier gyro in burger form!

Okay, let’s discuss what makes these burgers so flippin fantastic. First of all, they are half lamb, half beef. Lamb is delicious. If you haven’t gotten on board yet, I highly suggest it. I find lamb to be one of the juiciest, most tender and flavorful meats. Well, this has a lot to do with the high fat/calorie content. Now, if you don’t care about that sort of thing, feel free to use all lamb. That would be delicious. While I don’t count calories, or any macronutrients, or even really anything past the #8 (dancer joke…see what I did there? 😉 ), I still do think about that sort of thing, and I would prefer to get all the flavor, but keep it a little on the leaner side.

Greek Lamb Burgers: Like a healthier gyro in burger form!

That being said, in the name of “health”, obviously I had to stuff them full of freshly crumbled feta and smother them with creamy tzaziki because…obviously? Oh, and you can totally use a bun. I never do. I buy them for photos. It’s pretty silly. But these babies looked gorgeous on their own with just some fresh greens, the grilled onions, black olives, green onion and fresh parsley. There was so much going on, I just wanted to show them off for exactly what they were. I can tell you that these will definitely be making their way back into my burger rotation, and they will take your next grill night not just to the next level, but like a lot of levels up. 😉

Print
Greek Lamb Burgers

Prep Time: 10 minutes

Cook Time: 10 minutes

Total Time: 20 minutes

Yield: 8 burgers

Serving Size: 1 burger

Greek Lamb Burgers

Bold, flavorful and tender half lamb/half beef burgers stuffed with feta cheese and topped with creamy tzatziki sauce. Everything you love about a classic gyro in healthy, summer burger form!

Ingredients

    For the burgers:
  • 1 lb ground lamb
  • 1 lb extra lean ground beef (93% or higher)
  • 2-3 ounces freshly crumbled feta
  • 3 tablespoons minced onion
  • generous pinch oregano (finely chopped or dried)
  • generous pinch thyme (finely chopped or dried)
  • 3 large cloves garlic, minced
  • generous pinch each salt and pepper
  • For serving:
  • 1/2 red onion, sliced and grilled
  • fresh greens
  • tratziki
  • fresh chopped parsley
  • sliced olives
  • chopped green onion

Instructions

  1. In a large bowl, combine all ingredients for the burgers. Mix until just combined. Form into burger patties and grill to desired doneness, about 3-5 minutes per side. Lamb, like beef, does not need to be cooked well done, but do make sure it reaches 160 for food safety.
  2. Serve over fresh greens (or on tops of your favorite buns) and grilled onions. Top with tzatziki, parsley, olives and onion. Leftovers may be refrigerated in an airtight container for up to 5 days.
3.1
https://arismenu.com/greek-lamb-burgers/

Filed Under: Dinner, Entree, Gluten-free, Holiday & Seasonal, Low Carb, Lunch, Sandwiches, savory, Summer · Tagged: beef, burger, cheese, feta, greek, grilling, lamb, recipe, summer, tzaziki

Loaded Sweet Potato Salad

October 6, 2013 · by Ari ·

A healthy twist on a loaded baked sweet potato and potato salad. Looking for more sweet potato recipes? Check these out!

Loaded Sweet Potato Salad

Last month we hosted a barbecue at our house. I like to do a BYOM&B (bring your own meat & booze)–I make all the sides and desserts, and everyone can choose their own meat (or non-meat) and whatever they want to drink. It saves a lot of money, and you don’t have to worry so much about numbers, RSVPs, etc. It can be more laid back, and it makes it easier to invite all your friends.

Loaded Sweet Potato Salad

I created something like 5 new recipes that day, and they all turned out amazing. Let me tell you, that never  happens. It was a miracle. For the sides, I made a Thai peanut slaw (coming soon…) and this baby. There was a big debate over which side was better. Nobody could agree, but I can tell you that this was Steve’s favorite. Mine too. 😉

Loaded Sweet Potato Salad

The recipe is super easy, and other than the time spent cooking the potatoes, it comes together in minutes. I just took a little spin with the concept of my loaded baked potato salad, and it was literally love at first bite. The sweetness of the sweet potatoes with salty bacon and tangy goat cheese…uggghhh–it’s just so right.

Loaded Sweet Potato Salad

And I love how this is a side dish that’s perfect for all seasons–it’s perfect for a summer barbecue, but to me the sweet potatoes scream fall, and it’s such an easy dish to throw together that you can literally take it with you to just about any party, or even eat it as a meal for lunch! The Greek yogurt packs it with protein while the sweet potatoes add healthy carbs, and tons of vitamins. It’s literally the best of every world.

Print
Loaded Sweet Potato Salad

Prep Time: 10 minutes

Cook Time: 45 minutes

Total Time: 1 hour

Yield: 6-8 servings

Loaded Sweet Potato Salad

Healthy, protein and vitamin packed loaded sweet potato salad with Greek yogurt, goat cheese and center cut bacon

Ingredients

  • 2 lbs sweet potatoes
  • 1/2 lb center cut bacon, cooked and crumbled
  • 1 heaping cup nonfat plain Greek yogurt
  • 1/4 cup scallions, thinly sliced
  • 1/4 cup crumbled goat cheese (I used and herb goat cheese)
  • Generous pinch each salt and pepper

Instructions

  1. Preheat oven to 400. Pierce potatoes several times with a fork. Transfer to a large baking dish and cook until softened, about 45 minutes. Let cool for 15-20 minutes.
  2. Cut baked sweet potatoes into 1" cubes. Place all ingredients in a large bowl, and lightly toss until combined. Serve immediately or store in an airtight container for up to 5 days.
3.1
https://arismenu.com/loaded-sweet-potato-salad/

Filed Under: Appetizers, Fall, Gluten-free, Holiday & Seasonal, Salads, savory, Side Dish · Tagged: cheese, gluten free, greek yogurt, recipe, salad, side, side dish, sweet potato

Drink & Dish: Jalapeno Popper Hot Dogs

August 29, 2013 · by Ari ·

Jalapeno Popper Hot Dogs

So…apparently it’s football season? Or it’s about to be? To be honest, I have absolutely no idea. Sometimes people post things about it on facebook, and as soon as I even read the word football, I immediately think “Ewww” and scroll away.

Jalapeno Popper Hot Dogs

I went to school at the University of Idaho (yes….Idaho), and football was a BIG deal. We had some big rivalry with Boise State, but our football team was terrible, and I’m pretty sure we never won a single game.

Jalapeno Popper Hot Dogs

I’m sure it comes as no surprise that I’ve never been a sports person. Like, at all. I was always the un-athletic artsy kid, and even now that I have a tumultuous love affair with endurance sports, I have to admit that I still don’t really enjoy watching  any of them. I’ve always said the only reason I wanted to go to any sporting event was for the hot dogs. I’ve never had any problem getting excited about food.

Jalapeno Popper Hot Dogs

I knew I wanted to create a delicious hot dog for our tailgating episode of Drink & Dish, but I wasn’t quite sure where I wanted to take it, until I had a little brainstorming sesh with one of my favorite foodies, and before I knew it, I was sold on these jalapeno popper dog. I mean, let’s get real here–it’s a hot dog wrapped in bacon topped with jalapeno cream cheese, then topped with more cheese and fresh jalapenos. It is every bit as delicious as it sounds–the flavors, the textures!–and shockingly light in the calorie department. I mean, it’s no green smoothie, but pair it with some veggies, and it is a delicious meal for any occasion.

The cream cheese mixture is easy to make ahead and take with you to your tailgating event, and the hot dogs come together in minutes! They pair perfectly with Nicole’s game day beer punch. Nicole and I both agreed that this episode of D&D has to be one of our favorites. Check it out!

Print
Drink & Dish: Jalapeno Popper Hot Dogs

Prep Time: 5 minutes

Cook Time: 5 minutes

Total Time: 10 minutes

Yield: 2 hot dogs*

Serving Size: 1 hot dog

Drink & Dish: Jalapeno Popper Hot Dogs

Ingredients

  • 1/4 cup reduced fat cream cheese
  • 2 tbsp plain Greek yogurt, nonfat or low-fat
  • 1/2 jalapeno, ribs and seeds removed (+ extra for topping)
  • 1 clove garlic
  • 2 low fat all beef hot dogs (or turkey dogs)
  • 2 slices center cut bacon
  • 2 hot dog buns, preferably whole grain (whole wheat, any whole grain gluten-free option, etc.),
  • Approx 2 tbsp freshly shredded reduced fat cheddar cheese

Instructions

  1. Place cream cheese, Greek yogurt, 1/2 jalapeno and garlic in food processor. Pulse until well combined.
  2. Wrap a bacon slice around each hot dog and grill over medium heat until hot dog is warmed and bacon is fully cooked, about 4-6 minutes.
  3. To serve, place cooked hot dog inside a hot dog bun (I always toast mine a little on the grill first). Top with cream cheese mixture, a pinch of cheddar cheese and a few jalapeno slices if desired. Serve immediately.

Notes

*Depending on how much cream cheese mixture you like, you may have enough to top a 3rd hot dog if desired.

3.1
https://arismenu.com/drink-dish-jalapeno-popper-hot-dogs/

Filed Under: Dinner, Drink & Dish, Entree, Gluten-free, Holiday & Seasonal, Lunch, Sandwiches, savory, Summer · Tagged: cheese, drink and dish, easy, gluten free, hot dogs, jalapeno popper, recipe, tailgating

Ricotta Pesto

August 15, 2013 · by Ari ·

Ricotta Pesto

Ever since I was little and my dad used to take me out for Italian food a minimum of two nights per week, I have been obsessed with pesto sauce. Sure, during my teens and early 20’s I was always ordering whatever came with alfredo sauce, but my dad’s a real good sharer, and he would always give me a little plate of his pesto sauce. I considered this the “healthy” sauce because it was green and there was no cream.

Ricotta Pesto

Well, pesto sauce although loaded with healthy fats from the olive oil and pine nuts, is still incredibly calorie dense. Especially if you’re me and you like a side of pasta with your sauce. It’s funny that adding extra cheese actually makes this sauce lower in calories and fat. I can’t argue that it’s necessarily “healthier” than traditional pesto, but it makes me feel a little better about the whole thing. 😉

Ricotta Pesto

Not to mention it is ridiculously good. In fact, I think I even like it more than a traditional pesto. The ricotta cheese makes it thick and creamy–perfect for lasagna, calzones or pizza (coming soon…). It’s great with pasta too, or just as a dipping sauce for veggies. Or, you know, a spoon. It’s ridiculously easy to make and comes together in about 3 minutes flat. Yes, 3 minutes. Of course depending on how quick and nimble your food processor is, but it makes creating a dish with it a total breeze!

Print
Ricotta Pesto

Prep Time: 5 minutes

Total Time: 5 minutes

Yield: approx 1 cup

Ricotta Pesto

Ingredients

  • 2 cups packed fresh basil
  • 2 cloves garlic
  • 1/2 cup pine nuts
  • 1/2 cup freshly grated parmesan cheese
  • 1/3 cup low fat (or part skim) ricotta cheese
  • 1/3 cup olive oil

Instructions

  1. Place basil, garlic, pine nuts, and cheeses in food processor and blend. Slowly, stream in olive oil until everything comes together to form a thick sauce. If sauce is too thick for your taste, stream in a little more olive oil. Store in an airtight container for 3-5 days.

Notes

Lightly adapted from Rachael Ray

3.1
https://arismenu.com/ricotta-pesto/

Filed Under: Gluten-free, Sauces & Spreads · Tagged: basil, cheese, gluten free, italian, pesto, recipe, ricotta

BBQ Bacon Cheddar Dogs

June 25, 2013 · by Ari ·

BBQ Bacon Cheddar Dogs

I’ve developed this kind of ridiculous hot dog obsession. Kinda like the hamburger one, but ya know, with hot dogs. A couple of weeks ago after the 3rd consecutive hot dog recipe, Hermano asked when the heck I decided I liked hot dogs so much.

BBQ Bacon Cheddar Dogs

The truth is, I’ve always been a fan, but unless it was an enormous Cost Co hot dog, it just never seemed like a full meal to me, and I always wanted a hamburger to go with it. BBQ Bacon Cheddar Dogs

So I decided to make a hot dog that sounds sinful and over the top, but is really healthy enough to eat 2, or eat 1 with a big ol’ side of veggies which is more my style these days.

BBQ Bacon Cheddar Dogs

The low fat beef hot dogs combined with the center cut bacon add healthy meat options that are full of flavor. The  sweet barbecue sauce and roasted corn pair perfectly with the salty dog, and then everything is better with cheddar cheese. It’s like a fact. These babies are perfect for 4th of July, any summer cookout, or any time you feel like firing up the grill!

Print
BBQ Bacon Cheddar Dogs

Prep Time: 10 minutes

Cook Time: 10 minutes

Total Time: 20 minutes

Yield: 2 hot dogs

Serving Size: 1 hot dog

BBQ Bacon Cheddar Dogs

Ingredients

  • 2 low fat beef or turkey dogs (I used Hebrew National 45 calorie beef)
  • 2 whole grain hot dog buns (use gluten-free if applicable)
  • 1 slice center cut bacon, cooked and crumbled
  • 2 tbsp low sugar barbecue sauce
  • 2 tbsp roasted corn kernels
  • 2 tbsp roasted corn kernels
  • 2 generous pinches grated reduced fat sharp cheddar cheese
  • 2 pinches finely chopped scallions

Instructions

  1. Grill hot dogs over medium heat until warmed throughout, about 5 minutes.
  2. Place hot dogs inside buns and top each dog with ½ slice cooked bacon, 1 tbsp barbecue sauce, 1 tbsp roasted corn, a generous pinch of cheddar cheese and a pinch of chopped scallions. Serve immediately.
3.1
https://arismenu.com/bbq-bacon-cheddar-dogs/

Filed Under: Dinner, Entree, Gluten-free, Holiday & Seasonal, Lunch, Sandwiches, savory, Summer · Tagged: 4th of july, bacon, barbecue, cheese, dinner, grilling, hot dogs, lunch

Drink & Dish: Red, White & Blue Grilled Cheese

June 23, 2013 · by Ari ·

Red, White & Blue Grilled Cheese.jpg

It’s almost the 4th of July!!!

Red, White & Blue Grilled Cheese

One of my very favorite holidays because I am obsessed with fireworks. I’m sure this is totally surprising information given that I am never a sucker for bright, sparkly things, but I can ooohh and ahhh for the entire fireworks show, and always get a little sad when they start going all crazy for the grand finale because that means it’s over.

Red, White & Blue Grilled Cheese

Maybe it’s because for years I never got to watch the fireworks? I’ve spent almost every summer since I was 15 years old at theatre camp. First as a student, then as a counselor, and the last few years as a teacher/director/choreographer. For most of those years, the camp was located at the top of this hill in the middle of nowhere White Salmon, WA. We were always in rehearsals at night, so I never got to get into town (a good 40 minute drive) to watch the fireworks. Now camp is in Portland, and we light little sparklers and the kids get really into it which is fun in an entirely different way.

Red, White & Blue Grilled Cheese

You know what else I love about the 4th of July? RED WHITE AND BLUE FOOD!!! Last year, I made red, white and blue cookies, and they still stand as some of my all time favorite cookies. This year, I decided to go with something you could eat for lunch or dinner while celebrating America (you have to pronounce it Ah-murrr-kah).

Red, White & Blue Grilled Cheese

This sandwich….I just…I’m not sure I even have the words? I made it 3 times in 1 week. The brie cheese is so melty and dreamy, and then the goat cheese provides the perfect creaminess. Both of these cheeses pair perfectly with fruit, and the raspberry jam adds a bright sweetness the compliments the slightly tart bursting blueberries. It sounds crazy, but it just works. It works so well that you want to eat it every day for the rest of your life. You know I’m not usually a meal repeater, but I can’t get enough of this sandwich, and I can see it making a comeback all year long.

Check out the latest episode of Drink & Dish to learn the secret to making a perfectly melty grilled cheese, and make sure to also check out Nicole’s super fun 4th of July Citrus Splash. I mean, it has poprocks and it’s BLUE!

Print
Drink & Dish: Red, White & Blue Grilled Cheese

Prep Time: 5 minutes

Cook Time: 15 minutes

Total Time: 20 minutes

Yield: 2 sandwiches

Serving Size: 1 sandwich

Drink & Dish: Red, White & Blue Grilled Cheese

Ingredients

  • 4 slices whole grain bread (use gluten-free if applicable)
  • 2 tbsp reduced sugar raspberry jam (or jam or choice)
  • 1 1/2 oz goat cheese, at room temperature
  • 2 small handfuls fresh blueberries (preferably organic)
  • 2 oz light brie cheese, sliced, rinds removed

Instructions

  1. Heat a large grill pan, griddle or nonstick pan over medium-low heat.
  2. Spread 2 slices of bread with 1 tbsp each of jam. Spread remaining two pieces with softened goat cheese (evenly divide the 1 1/2 oz between the two slices). Place a handful of blueberries on each goat cheese slice and lightly press the berries into the cheese. Top each with 1 oz sliced brie. Place the jam side on top.
  3. Grill until the bottom is browned, about 5-7 minutes. Flip and continue cooking until both sides are browned and cheese is fully melted, about an other 5-7 minutes. Serve immediately.
3.1
https://arismenu.com/drink-dish-red-white-blue-grilled-cheese/

Filed Under: Drink & Dish, Gluten-free, Holiday & Seasonal, Lunch, Sandwiches, savory, Summer · Tagged: 4th of july, blueberries, brie, cheese, dinner, drink and dish, goat cheese, lunch, recipe, summer, vegetarian, video.sandwich

Black Bean Burger Salad

June 16, 2013 · by Ari ·

Black Bean Burger Salad with Cilantro Lime Vinaigrette #glutenfree

In the summertime, the only things I crave other than burgers (and grilled food in general) are big, delicious, cool and refreshing salads. I’m not talking the kind of “salad” that is some lettuce thrown on a plate and then drowned with ranch dressing. My salads need to be loaded with flavor, and they have to have a little something special to keep me interested.

Black Bean Burger Salad with Cilantro Lime Vinaigrette #glutenfree

I also always love a new way to eat one of my favorite foods. I fell head over heels for these black bean burgers at first bite, and since I almost never make the same meal twice, I wanted a new way to enjoy them. I have to say, I like them even better this way!

Black Bean Burger Salad with Cilantro Lime Vinaigrette #glutenfree

The bold, spicy burgers balance perfectly with the fresh, crisp lettuce and cucumber, and the sweet tomatoes, peppers, roasted corn and dried cranberries. And that tangy, creamy goat cheese on top? Flavor heaven. Not to mention the sweet and spicy cilantro lime vinaigrette. It is legit the best salad dressing I have ever tasted.

Black Bean Burger Salad with Cilantro Lime Vinaigrette #glutenfree

If you don’t do dairy, you could leave the goat cheese off and replace it with avocado. I mean, you should probably just add avocado anyway to all things, but especially if you leave the cheese off. This salad is perfect for summer (or any time), and I even continued to make it with my left over black bean burgers for the entire rest of the week! You can also easily double or triple it if you’re serving a bigger group!

Print
Black Bean Burger Salad with Cilantro Lime Vinaigrette

Prep Time: 10 minutes

Cook Time: 1 hour

Total Time: 1 hour, 10 minutes

Yield: 2 servings

Black Bean Burger Salad with Cilantro Lime Vinaigrette

Ingredients

  • 2 ears corn
  • 1 tbsp olive oil
  • salt and pepper
  • 1 heart of romain, chopped
  • 1 cup cherry tomatoes, halved
  • 1 red bell pepper, chopped
  • 1 large cucumber, chopped
  • 1/3 cup dried cranberries
  • 2 black bean burgers*
  • 3 oz goat cheese
  • For the Cilantro Lime Vinaigrette:
  • 2 limes
  • 1/4 cup olive oil
  • 2/3 cup cilantro
  • 1/2 jalapeno, seeds removed
  • 1 clove garlic
  • 1 tbsp honey
  • 1 tbsp balsamic vinegar
  • 2 tbsp water
  • 1 tsp cumin
  • pinch salt

Instructions

  1. Drizzle corn with olive oil and season with salt and pepper. Roast at 400 until golden and tender, about an hour.
  2. Prepare the dressing by adding the zest of 1 lime, and the juice of two with all remaining ingredients in your food processor and pulsing until combined and smooth, about 1 minute.
  3. For the salad, gently toss together roasted corn, lettuce, tomato, bell pepper, cucumber, and cranberries. Transfer to serving dishes. Crumble 1 black bean burger and 1.5 oz goat cheese on top of each salad. Serve with prepared dressing.

Notes

*Store bought/frozen black bean burgers may be used. Cook per package instructions before adding to your salad.

**To keep vegan, avocado may be subbed for goat cheese and agave may be subbed for honey in the dressing.

3.1
https://arismenu.com/black-bean-burger-salad/

Filed Under: Appetizers, Dinner, Entree, Gluten-free, Holiday & Seasonal, Lunch, Salads, savory, Summer, Vegetarian · Tagged: beans, black bean burger, cheese, cilantro, corn, dinner, gluten free, lunch, recipe, salad, summer, vegetarian

Turkey Pastrami Melt

June 13, 2013 · by Ari ·

Turkey Pastrami Melt

Helllloooo sandwich. Do you guys ever go to Schlotsky’s? When I was in high school, I would always drive over to my best friend’s house and pick up Schlotsky’s sandwiches for us. My staple? White bread, pastrami, swiss and thousand island. Kinda like a rueben, but with only the good parts.

Turkey Pastrami Melt

I have missed that sandwich. These days, I’m much more of a hummus, veggies and goat cheese sandwich girl, but every once in a while I crave that salty pastrami, melty cheese, and sweet and creamy thousand island. It’s like sandwich heaven.

Turkey Pastrami Melt

It’s one of those things that I just can’t seem to justify at a restaurant when I know I can make it 10x healthier myself. Not to mention, it takes about 15 minutes, including the time it took to make the dressing.

Turkey Pastrami Melt

I definitely don’t have the patience for anything time consuming around lunch time. I just want the quickest and most delicious way to get a sandwich to my face, and this baby tastes like the real deal–just like that big, juicy sandwich I remember, but with a list of healthy, protein-packed ingredients that will keep you full until dinner time!

Print
Turkey Pastrami Melt

Prep Time: 5 minutes

Cook Time: 10 minutes

Total Time: 15 minutes

Yield: 1 sandwich

Serving Size: 1 sandwich

Turkey Pastrami Melt

Ingredients

  • 2 slices whole grain bread (whole wheat, Ezekiel, brown rice, etc.)
  • 2 tsp dijon mustard
  • 1 tbsp fat free thousand island
  • 3 oz sliced turkey pastrami (I used Boar's Head found at Fry's/Kroger)
  • 1 slice reduced fat swiss cheese
  • 1/2 roma tomato, sliced
  • small handful mixed greens

Instructions

  1. Heat a medium grill pan (or regular sautee pan) over medium-low. Spray with nonstick spray.
  2. While your grill pan heats, spread dijon mustard on one slice of bread. Spread your thousand island on the other. Top the dijon side with turkey pastrami, followed by tomato. Top the thousand island side with cheese.
  3. Cook sandwich open faced until bread cheese begins to melt and bread is golden brown on the bottom. Add mixed greens on top of tomato and place your other slice of bread on top, cheese side down. Grill for an additional 1-2 minutes on each side. Serve immediately.
3.1
https://arismenu.com/turkey-pastrami-melt/

Filed Under: Gluten-free, Lunch, Sandwiches, savory · Tagged: cheese, easy, lunch, pastrami, quick, recipe, sandwich, turkey

Next Page »
Image Map

Popular Posts

Tart Cherry Margaritas: The perfect, refreshing margarita--lightly sweet with a punch of tequila

Tart Cherry Margaritas

90+ Healthy Recipes for Breakfast, Lunch, Dinner & Dessert

90+ Healthy Recipes for Breakfast, Lunch, Dinner & Dessert

The Ultimate Peanut Butter Cup Brownie Cookies: Rich, fudgy, brownie-like chocolate cookies stuffed with melty peanut butter cups!

Ultimate Peanut Butter Cup Brownie Cookies

Drink & Dish: Cafe Au Lait Cupcakes

Crockpot Chicken Enchilada Soup

Subscribe via Email:

Enter your email address:

Save an additional $30 on Blendtec Factory Recertified Blenders + Free Shipping

Featured Here

recipe redux
Certified Yummly Recipes on Yummly.com

Member Of…

FitFluential Is Fitness Found
AZ Bloggers Network
az 150 photo az150_zpsfb093d32.gif

Archives


Image Map

Copyright © 2025 | Innovative Child Theme by The Pixelista | Built on the Genesis Framework


Loading Comments...