• Going Out
    • Phx Restaurants
    • How To Order At Starbucks
  • Running
    • My Running Story
    • Race Calendar
    • Race Recaps & Results
  • Blogroll
  • Bucket List
  • Video

Ari's Menu

Little changes making a big difference.

  • Home
  • Recipes
  • Weight Loss
    • My Story
    • Common Swaps
  • Who’s Who
  • Contact
    • Policies & Disclosure
  • Press

Caprese Pasta

February 25, 2013 · by Ari ·

Caprese Pasta: A simple, healthy and delicious weeknight dinner that will impress the whole family. With only a handful of ingredients, this comes together in a flash with so much flavor and the perfect amount of melty mozzarella.

Caprese Pasta .jpg


I find that people have strong opinions on tomatoes. Either you’re ordering them on all your salads and sandwiches, or you absolutely hate them.

Caprese Pasta


I used to be a total hater. I always loved salsa, and I liked tomato sauce as long as it wasn’t chunky, and I liked ketchup, although I’ve never been one of those people who goes crazy over ketchup. There are so many awesome condiments out there with so much more flavor! I’ve never understood the people that put ketchup on everything.

Caprese Pasta


Like my husband. He puts ketchup on macaroni and cheese. WHAT IS THAT??? I will season the crap out of some meat, and we will sit down to dinner, and he grabs the ketchup bottle. What a jerk.

Caprese Pasta


Anyway, I never used to be a tomato fan. My dad would order a caprese salad, and I would just eat the cheese. Not that this was abnormal behavior for me with any dish. All my friends still make fun of me about the way I used to eat. I would order food, eat until I started to get full, then proceed to pick all the cheese out. What can I say? I’ve always loved my cheese. 😉


Caprese Pasta


Somewhere along my healthy living journey, I turned the page on tomatoes. Now, I eat the whole caprese salad (or pasta), but the best part is still the mozzarella cheese. 😉

Caprese Pasta


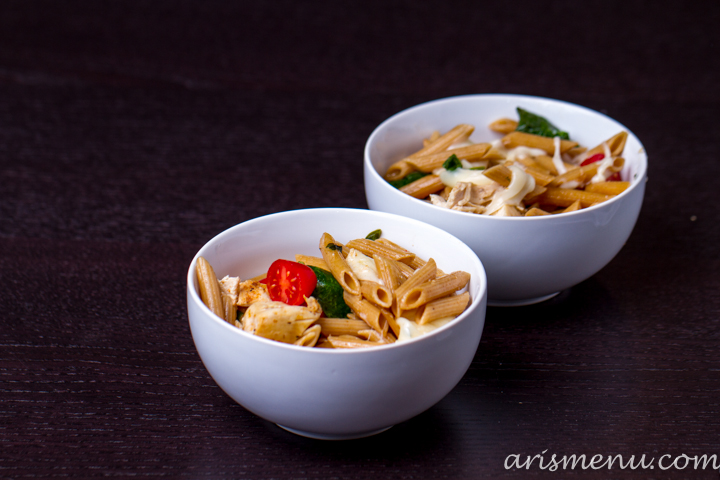
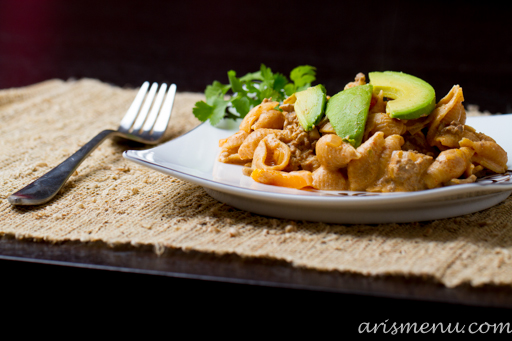
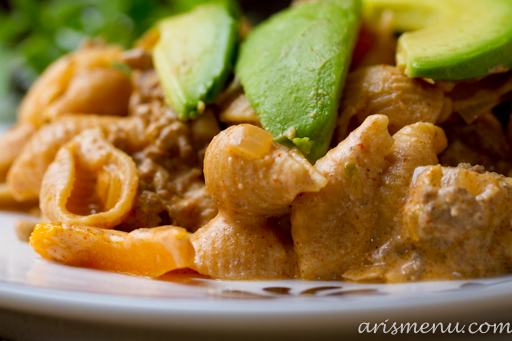
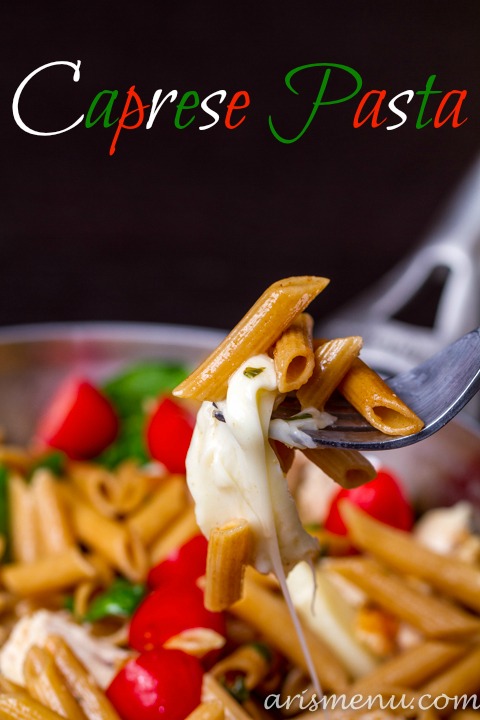
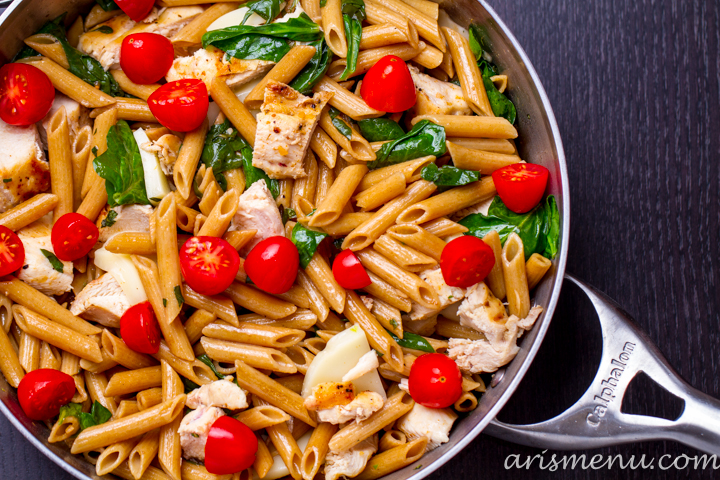
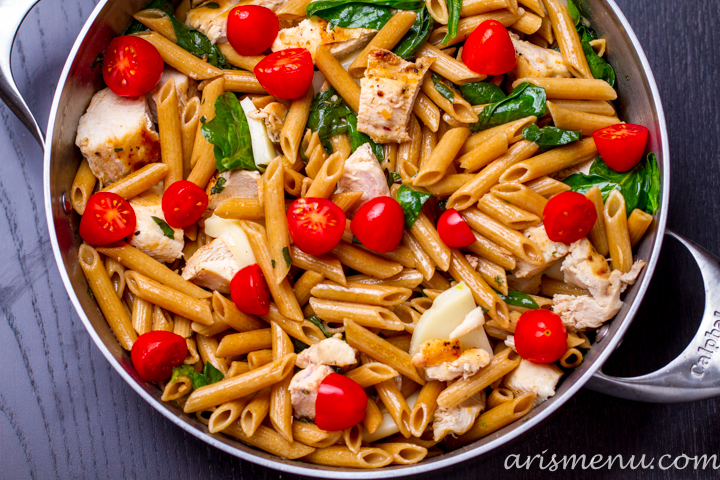
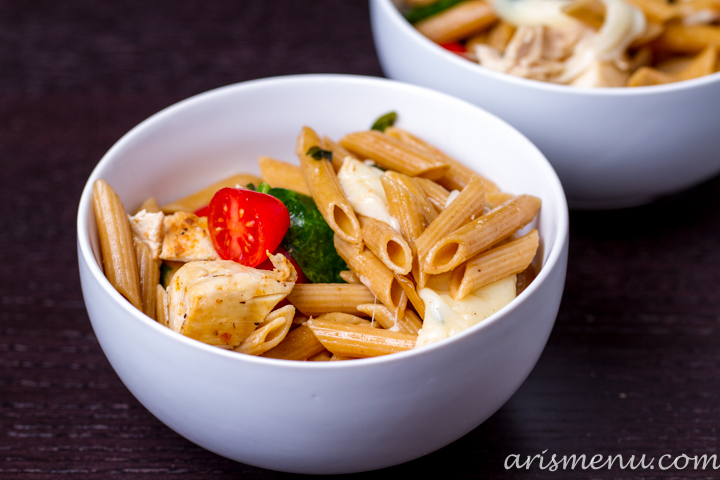
In this pasta, the cheese gets just warm enough to get a little soft, melty, and gooey. I could have picked it out all night long, and lived on the cheese alone, but it was even better paired with the fresh basil, and juicy tomatoes.


Caprese Pasta


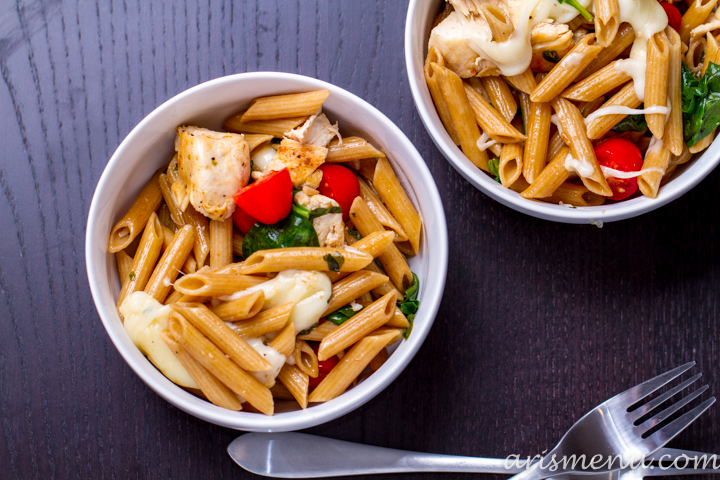
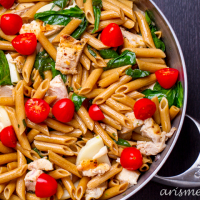
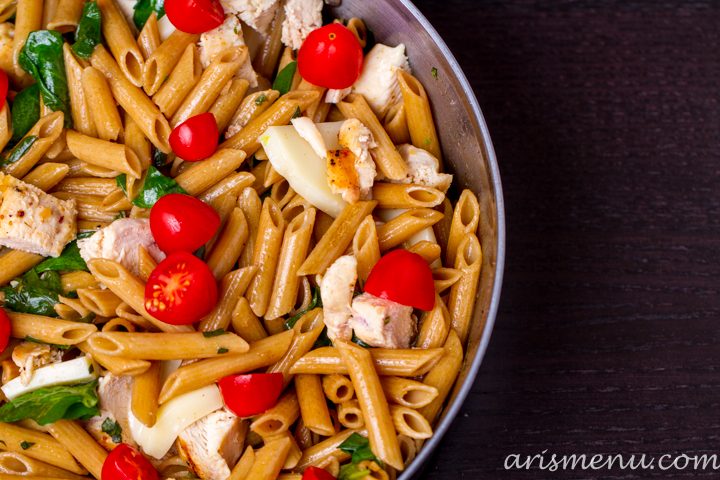
This pasta takes everything I love about a caprese salad, and translates it to a full, protein packed, delicious dinner. It was so easy–ready in about 20 minutes, and my whole family loved it!


Caprese Pasta

yield 8 servings

  • 13 oz box whole grain penne (brown rice, whole wheat, quinoa, whatever you like)
  • 3 cloves garlic, finely chopped
  • 2 tbsp olive oil, divided
  • 1-2 tbsp balsamic vinegar
  • 5 fresh basil leaves, chopped
  • salt and pepper
  • 3 chicken breasts, grilled and sliced
  • 8 oz part skim mozzarella, cubes
  • 2 big handfuls baby spinach, stems removed
  • 10 oz cherry tomatoes, halved

Directions:

  1. Cook pasta according to package instructions.
  2. In a large skillet over medium heat, cook garlic in 1 tbsp olive oil until fragrant. Add cooked and drained pasta, and toss with remaining oil, vinegar and basil. Season with salt and pepper.
  3. Add chicken, cheese and spinach, and gently toss until spinach slightly wilts, and cheese softens. Remove from heat and stir in tomatoes. Serve immediately. Store leftovers in an airtight container in the refrigerator for up to 1 week.

Filed Under: Entree, Gluten-free, Pasta · Tagged: caprese, cheese, dinner, gluten free, pasta, recipe, spinach, tomatoes

Taco Mac & Cheese {like DIY Hamburger Helper}

February 20, 2013 · by Ari ·

Taco Mac & Cheese

Have we ever talked about how I went from a fast food diet to Ari’s Menu? I could hardly boil water. My dad can’t even make spaghetti or boxes of Kraft mac & cheese. I grew up constantly eating out, and spent the first few years of college making grilled cheese sandwiches, heating up ramen noodles, and in the Jack in the Box drive through.

Taco Mac & Cheese

When I moved home from Idaho, I had sparked an interest in cooking. I graduated to Hamburger Helper. It’s funny now, but I loved the stuff. I would swap out my ground turkey, and for me, that was “healthy cooking”. I guess I’ve come a long way in the last few years. 🙂 Just ask my mother in law about the time I tried to make gravy….

Taco Mac & Cheese

When the thought occurred to make taco mac & cheese, I didn’t realize that it was so similar to the Hamburger Helper I started out on, but it is similar–just a whole lot better. Real foods, tons of lean protein, and whole grains. Plus, it’s so simple that there is really no reason to cook from a box ever again!

Taco Mac & Cheese

I made this for Steve and Jason to rave reviews. I’m pretty sure Jason ate 3 bowls. Then I gave Steve’s mom the leftovers when she came over for lunch, and she’s been asking when I’m going to post the recipe ever since. 🙂

Taco Mac & Cheese

All of the flavors of macaroni and cheese mixed with bold spicy taco seasonings topped with creamy avocado for the perfect final touch. I loved this dinner so much I made it again not even a week later! That is unheard of for me.

Taco Mac & Cheese

My favorite thing about this dish is it really represents everything I feel like this blog stands for–simple comfort food made healthy. That’s the whole reason I started cooking–I didn’t want to give up foods like tacos and mac & cheese. 🙂


Taco Mac & Cheese

yield 6-8 servings

  • 1-2 tsp olive oil
  • 1 medium onion, chopped
  • 2 bell red, yellow, or orange bell peppers
  • 3 cloves garlic, finely chopped
  • 1 lb lean ground turkey or beef (I used 99% ground turkey breast)
  • salt and pepper
  • 8 oz whole grain macaroni (whole wheat, brown rice, quinoa….whatever works for you)
  • 4 oz reduced fat cream cheese
  • 3/4 cup unsweetened almond milk
  • 1 cup nonfat plain Greek yogurt
  • 3 tbsp taco seasoning
  • 1 tbsp lime juice
  • couple dashes hot sauce
  • 2/3 cup shredded reduced fat sharp cheddar cheese
  • sliced avocado and chopped cilantro for serving

Directions:

  1. In a large pan over medium heat, saute onion, bell peppers, and garlic until tender, about 10 minutes. Add turkey and season with salt and pepper (about a pinch of each). Cook until turkey is browned, then remove from heat.
  2. In a medium pot, cook macaroni according to package instructions.
  3. Meanwhile, in a large pot, whisk together cream cheese and almond milk over medium-low heat until combined. Whisk in greek yogurt, taco seasoning, lime juice, and hot sauce. Stir in cheddar cheese until melted and combined.
  4. Stir turkey and veggies into sauce, then stir in cooked and drained pasta.
  5. Top with sliced avocado and fresh chopped cilantro.

Filed Under: Entree, Gluten-free, Pasta · Tagged: dinner, gluten free, greek yogurt, hamburger helper, mac and cheese, pasta, recipe, taco, whole grain

Take 5 Cookies {HAPPY BIRTHDAY TO LISA!!!!!}

February 19, 2013 · by Ari ·

Take 5 Cookies.jpg

Today is a very special day!! It’s my amazing, wonderful friend Lisa’s birthday! I’ve known Lisa since my sophomore year of college, which doesn’t seem like that long ago, but when I do the math, I realize that it was almost 9 years ago. Yikes. I’m old. But it’s okay because Lisa is older.

Take 5 Cookies

I will never forget when I went away to college (I stayed local at community college before transferring to Idaho), I had a hard time being away from friends and family on my birthday, and Lisa always sent me the BEST care packages! This year, I wanted to make her feel extra special, so I sent her a care package that *hopefully* will arrive today with these cookies, and a flashcard timeline of our friendship. Complete with stick figure humans and dogs.

Take 5 Cookies

I may or may not have cried for about half of the time it took to put this together. I also cry picking out cards for all occasions. What can I say? We all know I’m an emotional human. Anyway, Lisa’s favorite candy bar is a Take 5. I’d never had one when I met her, but she introduced me, and I was instantly hooked. I haven’t had one in years and years (except for a couple pieces in the cookies I saved for “taste testing”), but I remember loving the combination of creamy chocolate, sweet caramel, peanuts, peanut butter and salty pretzels. It is everything amazing in the world of candy all mixed into one bar!

Take 5 Cookies

I knew I wanted a peanut butter cookie base to partner with the Take 5 candy bars, so I went with my favorite peanut butter cookie base, and used White Chocolate Wonderful because Lisa loves it as much as I do. Then, I added white chocolate chips because I knew I wanted a little extra add in.

Take 5 Cookies

The result? They were everything I hoped they would be, and the perfect way to send lots of love to one of my favorite people in my life.

Take 5 Cookies


Take 5 Cookies

yield 1 1/2 dozen

  • 1 cup white whole wheat flour
  • 3/4 tsp baking soda
  • 1/2 tsp baking powder
  • 4 oz light cream cheese
  • 1 cup peanut butter
  • 1/2 cup sugar
  • 3/4 cup dark brown sugar, packed
  • 1 egg
  • 1 tsp vanilla
  • 3 full size Take 5 candy bars, chopped
  • 1/3 cup white chocolate chips

Directions:

  1. Preheat oven to 350. Line 2 large cookie sheets with silpat or parchment paper. Set aside.
  2. In a medium bowl, whisk together flour, baking soda, and baking powder. Set aside.
  3. In a large bowl (I used my stand mixer), beat together cream cheese, peanut butter, and sugars until combined. Beat in egg, then vanilla. Gently, fold in chopped Take 5 bars and white chocolate chips. I ended up just using my hands to get everything combined.
  4. Roll dough into balls just over 1″ and transfer to prepared baking sheet. Bake until edges are golden and cookies are just set, about 12-15 minutes. Do not over bake.
  5. Let stand for 5 minutes, then transfer to a wire rack to cool completely. Store completely cooled cookies in a tupperware with the lid sitting on top, but not sealed–these will get mushy if they are in a completely airtight container–for up to one week.


Filed Under: Cookies, Dessert · Tagged: candy, cookies, dessert, peanut butter, recipe, take 5, white chocolate, whole grain

Cinnamon Raisin Sunflower Seed Butter

February 18, 2013 · by Ari ·

Cinnamon Raisin Sunflower Seed Butter #vegan #glutenfree.jpg


If you’ve been reading this blog for any length of time, there are a few things you’ll know about me.

Cinnamon Raisin Sunflower Seed Butter #vegan #glutenfree.jpg


1. I am addicted to nut/seed butters. Peanut, almond, pistachio, macadamia, pecan, sunflower….you name it, I love it. and 2. I am obsessed with all flavors of PB&Co, but my two favorites are white chocolate wonderful and cinnamon raisin swirl.

Cinnamon Raisin Sunflower Seed Butter #vegan #glutenfree


It’s funny, sometimes I have ideas floating around in my head for months before I get around to making them, and sometimes I just go to the kitchen to get a glass of water, and before I know it, I’m whipping up some new recipe that I had no plans on making. We were out of most of our nut butters, so I stuck some sunflower seeds in the food processor to make more, and before I knew it, this came out!

Cinnamon Raisin Sunflower Seed Butter #vegan #glutenfree


Okay, maybe not before I knew it. I must confess that sunflower seeds took longer to process, and form a nut butter than anything I’ve tried before. BUT with patience (and overheating my food processor), I finally got the result I was looking for! Thick, creamy, slightly sweet, with the bold flavor of cinnamon, and sweet, soft raisins in the mix. It was well worth the wait.

Cinnamon Raisin Sunflower Seed Butter #vegan #glutenfree


I’ve learned a little bit of patience since I first started making my own nut butters. I used to quickly get frustrated that it wasn’t coming together quickly enough, and add oil to help it along. Well, I’ve learned that *most* of the time, it really isn’t necessary. Most of the time, if you are patient, it will come together on it’s own, but patience isn’t really my forte, so I recommend spending the time while you wait reading a book, or blogging, or making dinner to keep yourself occupies. 😉

Cinnamon Raisin Sunflower Seed Butter #vegan #glutenfree


In the end, it’s 100% worth the wait. Pinky promise.


Cinnamon Raisin Sunflower Seed Butter

  • 8oz roasted sunflower seeds (I used salted, if you don’t, add a pinch of salt)
  • 1 tsp cinnamon
  • 1-2 tbsp brown sugar (depending on how sweet you like it. I used 1 1/2, but I love sugar, and could have easily added more…)
  • 1/2 cup raisins

Directions:

  1. Place sunflower seeds in your food processor. Blend for 3-4 minutes at a time (less if your food processor starts to sound like it needs a break–give it one!), scraping down the sides of the bowl in between. Eventually, sunflower seeds will form a paste-like consistency, then finally a nut butter consistency. This took me about 30 minutes.
  2. When seeds have reached your desired texture, add cinnamon and brown sugar to food processor, and blend to combine. Start with 1 tbsp brown sugar, and add the rest at your discretion.
  3. Remove sunflower seed butter from food processor and fold in raisins. Store in an airtight container for up to 2 weeks. I do not refrigerate mine, but you may if you like.

Filed Under: DIY/How To, Gluten-free, Miscellaneous, Sauces & Spreads, Snacks, Vegan · Tagged: cinnamon, nut butter, nuts, raisin, recipe, seeds, sunflower seed butter

Pretzel M&M Peanut Butter Cookies

February 13, 2013 · by Ari ·

Pretzel M&M Peanut Butter Cookies

Remember my pretzel m&m obsession? It actually started over the summer. You see, I’d been wanting to try them ever since I heard they were a real thing. But I figured trying, and inevitably falling in love with a new type of candy was probably a horrible decision. Then my friend Kara had some in her freezer (yes, they are delicious frozen), and I caved.

Pretzel M&M Peanut Butter Cookies

She lurred me in by telling me they had less calories than other varieties. That pretzel takes up all of this room, and has less calories than chocolate. Well, okay then…that makes it a healthy candy, right?

Pretzel M&M Peanut Butter Cookies

Ever since, I can’t get them out of my mind. Sweet chocolate, salty pretzel with a candy crunch? What’s not to love?? Well, obviously the only way to make them better is to put them into a cookie. A peanut butter cookie to be exact.

Pretzel M&M Peanut Butter Cookies

The first time I made these was for book club and although I liked them enough to bring them, they weren’t perfect yet. I knew I didn’t want to share them with you guys until I was 100% in love with them, so I tried again, and this time I added chocolate chips, took out a little flour, and didn’t chill the dough. I think the rice krispies soaked up too much liquid when I chilled it the first go around, and they lost their crunch.

Pretzel M&M Peanut Butter Cookies

I am SO glad I gave them a second try! They ended up with the most perfect cookie texture–you know, crunchy on the outside, soft and gooey on the inside. The extra chocolate worked like a charm, and the cereal was crunchy, and added that little bit of extra texture I was craving. They were a huge hit, and Steve even said he had a new favorite cookie! 🙂


Pretzel M&M Peanut Butter Cookies

yield 1 1/2 dozen

  • 1 cup white whole wheat flour
  • 3/4 tsp baking soda
  • 1/2 tsp baking powder
  • 4 oz light cream cheese
  • 1 cup peanut butter (I used White Chocolate Wonderful)
  • 1/2 cup sugar
  • 3/4 cup dark brown sugar, packed
  • 1 egg
  • 1 tsp vanilla
  • 1/2 cup crispy brown rice cereal (or just regular rice krispies if you have them on hand)
  • 1 cup pretzel m&ms
  • 1/2 cup dark chocolate chips

Directions:

  1. Preheat oven to 350. Line 2 large cookie sheets with silpat or parchment paper. Set aside.
  2. In a medium bowl, whisk together flour, baking soda, and baking powder. Set aside.
  3. In a large bowl (I used my stand mixer), beat together cream cheese, peanut butter, and sugars until combined. Beat in egg and vanilla followed by flour mixture. Gently, fold in rice cereal, m&ms and chocolate chips. I ended up just using my hands to get everything combined.
  4. Roll dough into balls just over 1″ and transfer to prepared baking sheet. Bake until edges are golden and cookies are just set, about 12-15 minutes. Do not over bake.
  5. Let stand for 5 minutes, then transfer to a wire rack to cool completely. Store completely cooled cookies in a tupperware with the lid sitting on top, but not sealed–these will get mushy if they are in a completely airtight container–for up to one week.

Filed Under: Cookies, Dessert · Tagged: chocolate, cookies, dessert, m&ms, peanut butter, pretzel, recipe, whole grain

Cookie Butter Cookie Dough Bars

February 11, 2013 · by Ari ·

Cookie Butter Cookie Dough Bars #vegan

You know those people who go through life only speaking the bare minimum amount of word required to get by in social situations?

Cookie Butter Cookie Dough Bars #vegan

Yeah, that’s not me. I’m that person who, even as an adult, can’t get through situations where you’re supposed to be quiet. Work meetings? Don’t put me next to anyone I find remotely interesting. Library? I get the evil eye from everyone who actually went there for some peace and quiet. I even talk the entire time through massages.

Cookie Butter Cookie Dough Bars #vegan

I think the only time I ever stop talking is during a run when I get reallllly tired, and then it doesn’t matter because I’m usually with the only girl I know who loves to talk more than I do. 😉

Cookie Butter Cookie Dough Bars #vegan

So when I name a recipe, I always want to tell you every single thing about it. The name doesn’t do justice for me unless it accurately describes every detail of the food. In fact, if I were going to name these what I wanted to, they would be called Double Salted Chocolate Covered Cookie Butter Cookie Dough Tops with Graham Cracker Crust. I had to put it in bold so that you could actually see the beginning and end. It’s only slightly excessive.

cookiebutterbars-670Cookie Butter Cookie Dough Bars #vegan

The problem is, it is all of those details that make these bars so fantastic. It took me a few tries to actually figure them out. The first time, I didn’t put two layers of chocolate–I only put chocolate on the top–and the dough didn’t stick to the crust, and they ended up a sticky mess.

Cookie Butter Cookie Dough Bars #vegan

Then I tried to cut them before freezing them–well that resulted in cookie dough oozing out. It wasn’t pretty, but they still tasted great. However, it was when I finally completely froze them before cutting that they finally worked for me. You can see that cutting the frozen chocolate causes the tops to crack, but I didn’t mind it. If you do, you could always cute them when the chocolate is first put on, and is still melty, then freeze.

Cookie Butter Cookie Dough Bars #vegan

For the graham cracker crust, you must use old fashioned graham crackers. Please don’t use the regular store bought one. The crust is probably my favorite part, and it is due to that spicy cinnamon and molasses taste that the old fashioned graham crackers bring. This crumbly crust is topped with a layer of melted chocolate, then sprinkled with sea salt, followed by soft, gooey, eggless cookie butter cookie dough, and topped with more chocolate and an other layer of sea salt. If you don’t love sweet and salty as much as I do (ummm WHY NOT?). you could leave out the salt on the bottom layer, or (gasp) all of the salt, but I wouldn’t do that. With all the sweetness of the graham crackers, chocolate, and cookie butter, the salt puts everything into perfect balance.

Cookie Butter Cookie Dough Bars #vegan


Using a spring form pan makes them about a million times easier to get out, but it does make cutting them….interesting. I did most of the outside pieces in triangles, but did the middle in squares and rectangles. Honestly, it doesn’t matter how you slice ’em–they are a totally out-of-this-world decadent treat that is perfect for any occasion. I made them after Steve’s first century and again for after my marathon.


Cookie Butter Cookie Dough Bars

  • 8 oz old fashioned graham crackers
  • 3 tbsp coconut oil, melted
  • 1/2 cup apple butter
  • 1 cup cookie butter
  • 1/2 cup sugar
  • 1/2 cup molasses
  • 1/4 cup brown sugar
  • 1 tsp vanilla
  • 1/4 cup unsweetened almond milk
  • 1 cup white whole wheat flour
  • 12 oz bag dark chocolate chips, melted and divided
  • coarse sea salt

Directions:

  1. Preheat oven to 350. Line the bottom of a 9-10″ springform pan with parchment paper. Spray edges and parchment paper well with nonstick spray. Set aside.
  2. Pule graham crackers in a food processor until you have fine crumbs. With the food processor on, stream in the coconut oil and continue to run until combined, about 1 minute.
  3. Press graham cracker crust into the bottom of your spring form pan making  smooth, even layer. Bake until lightly browned and set, about 15 minutes. Place on a wire rack to cool slightly.
  4. Spread half the melted chocolate over cooked crust. Sprinkle with sea salt. Let set in the refrigerator.
  5. Meanwhile, beat together apple butter, cookie butter, sugars and molasses until well combined. Beat in vanilla and almond milk. Slowly beat in flour and continue mixing until fully combined.
  6. Top cooled chocolate with cookie dough. Use a sprayed piece of parchment paper to press cookie dough into a smooth even layer.
  7. Top with remaining melting chocolate. Use a pastry brush or spatula to spread evenly. Sprinkle with more sea salt.
  8. Either slice immediately, then freeze, or freeze completely for about 3 hours, then slice and serve. Store in an airtight container in the freezer for up to 1 month (yes, I was eating these for a WHOLE MONTH!).

Filed Under: Brownies & Bars, Dessert, Vegan · Tagged: chocolate, cookie butter, cookie dough, dessert, graham cracker, recipe, salted, vegan

Drink & Dish: Red Velvet Whoopie Pies {with video!}

February 7, 2013 · by Ari ·

Red Velvet Whoopie Pies

So for a hot second, I was pretty sure that after our first video, Nicole and I would be crazy to ever try this crazy idea again.

Red Velvet Whoopie Pies

I mean, I’m pretty sure we made every mistake one could possibly make when embarking on this kind of adventure. We forgot to plug in our microphones, we exported the video incorrectly, and ended up with a video that looked like when Mike TV goes into millions of pieces to be transmitted to the television in Willy Wonka and the Chocolate Factory.

Red Velvet Whoopie Pies

Then there was the editing, which took us five hours. That is the amount of time it took us to run a marathon when I was injured. We also both decided this was more difficult.

Red Velvet Whoopie Pies

But then you guys were so kind. You gave the most supportive and kind response, and you didn’t even make fun of the visual quality of our video. You actually took 6 minutes out of your day, and watched us take this big step. I was beyond nervous, and I wasn’t sure I even wanted anyone to watch, but this awesome blogging community has been nothing but positive and supportive. So with newfound respect for everyone who has ever posted a vlog or video on the internet, we made a list of things we wanted to improve, and set off for round 2.

Red Velvet Whoopie Pies

And I’m so glad we did! Yes, there is still tons to work on (how the heck do I figure out the right amount of perkiness, and personality when I’m in front of the camera???!), but I am still really excited to share the second episode of Drink & Dish with you guys.

Red Velvet Whoopie Pies

Whether or not you are a Valentines Day person, I feel like the love of red velvet is pretty universal. And if you don’t like red velvet, honestly what is even happening inside your taste buds?!

Red Velvet Whoopie Pies

I’ve always wanted to try making red velvet whoopie pies. I always imagined them with a white chocolate cream cheese frosting. Then, I was shopping for ingredients and, almost instinctively, I grabbed a jar of marshmallow fluff. The rest is history, because I am over-the-moon obsessed with this filling. It’s perfect for cakes, cupcakes, whoopie pies, spoons, and fingers. Light and fluffy with the sweet hint of white chocolate–I diiiie.

Red Velvet Whoopie Pies

When the cakes came out of the oven, I almost couldn’t believe it! They were more beautiful, soft, and fluffy than I ever imagined they could be. It was one of those happy kitchen moments where you want to jump up and down, and sing from the rafters (OMG, why did I not do all of those things on camera? Silly Ari…) about that very special thing you’ve just created. I’m glad Nicole was there to experience it with me. Hermano said they were probably the best thing I’ve ever made, and I might agree. I am pretty darn proud of them, and I just want you all to make them, like rightthissecond, because I am pretty sure you will love them too.

Don’t forget to check out Nicole’s post and recipe for her delicious cocktail!


Red Velvet Whoopie Pies

adapted from Better Homes and Gardens

yield 1 dozen large whoopie pies

  • 2 cups white whole wheat flour
  • 2 tbsp unsweetened cocoa powder
  • 1/2 tsp baking soda
  • dash salt
  • 1/2 cup unsweetened applesauce
  • 1 cup light brown sugar, packed
  • 1 egg
  • 1 tsp vanilla
  • 1/2 cup reduced fat buttermilk
  • 1 oz red food coloring

For the filling:

  • 8 oz reduced fat cream cheese, softened
  • 4 oz marshmallow fluff
  • 1/4 cup white chocolate chips, melted and cooled
  • 1 tsp vanilla extract
  • 1 cup powdered sugar

Directions:

  1. Preheat oven to 375. Line 2 large baking sheets with a silpat or parchment paper. Set aside.
  2. In a medium bowl, whisk together flour, cocoa powder, baking soda and salt. Set aside.
  3. In a stand mixer (or large mixing bowl), beat together applesauce and brown sugar until well combined. Add egg and vanilla. Continue beating until fully combined.
  4. Alternate adding flour mixture and buttermilk to applesauce mixture starting and ending with dry ingredients. Scrape down the sides and continue beating until combined. Add food coloring, and continue mixing until dough is red throughout.
  5. Use a small cookie scoop sprayed with nonstick spray to transfer dough to prepared baking sheet. Bake for 7-10 minutes. Let stand for 3-5 minutes, then transfer to a wire rack to cool completely.
  6. To make the filling, beat cream cheese in a medium mixing bowl until fluffy. Beat in marshmallow fluff, followed by white chocolate and vanilla. Slowly, beat in powdered sugar.
  7. Top flat side of half of the whoopie pies with filling, then cover with remaining pies. Store in an airtight container in the refrigerator for 5 days.


Filed Under: Cakes & Pies, Cookies, Dessert, Drink & Dish, Holiday & Seasonal · Tagged: cream cheese, dessert, drink and dish, marshmallow, recipe, red velvet, video, white chocolate, whole grain, whoopie pies

Chai Spiced Vanilla Bean “Buttermilk” Muffins

February 6, 2013 · by Ari ·

Soft and fluffy whole grain chai spiced muffins with fresh vanilla bean, made with vegan buttermilk. A perfect healthy treat for brunch, or a mid-afternoon snack.Chai Spiced Vanilla Bean "Buttermilk" Muffins #vegan

I don’t eat a lot of muffins. I mean, I’ve never met a baked good I don’t like, but a muffin isn’t what I generally grab. I usually find them to be glorified cupcakes without the frosting, and really, why would you want a cupcake with no frosting???

Chai Spiced Vanilla Bean "Buttermilk" Muffins #vegan

Well, these muffins do not taste like a cupcake, and I love that. They taste like everything you could ever want in a breakfast: spicy chai, sweet vanilla and, of course, carbs. Yes, carbs have a taste. I would describe it as “amazing” or “perfection”.

Chai Spiced Vanilla Bean "Buttermilk" Muffins #vegan

I have a secret. These actually started out as cupcakes. You see, that’s much more my style, but as I frosted them with a sugary glaze, I just wasn’t in love. These flavors are bold, and the “cupcake” came out so perfectly soft and moist that I didn’t want to hide it. So I tried again. I took away some excess sugar, cut the frosting, and I discovered that muffins can actually be pretty spectacular.

Chai Spiced Vanilla Bean "Buttermilk" Muffins #vegan

They would pair perfectly with your breakfast protein of choice, or smeared with peanut butter as an afternoon snack, or dusted with some cinnamon and powdered sugar for dessert. They are incredibly versatile and at 89 calories a pop, why not enjoy??

Chai Muffin Nutrition

You may have noticed my untraditional “buttermilk”. Well, it’s not only to make the recipe vegan (added bonus!), but honestly, every time I seem to buy buttermilk, it just sits in my fridge and then goes bad. Instead, I used a cup of Silk Pure Almond Vanilla with 1 tbs of apple cider vinegar. In addition to keeping the muffins vegan, using the Silk saved an extra 5 calories per muffin opposed to making homemade buttermilk with skim milk. Now, 5 may seem like nothing, but as my tagline says, I truly believe that “Little changes make a big difference”, and I promise that after you’ve gone through the entire batch (trust me, it’s inevitable), those 5 calories will add up!

Chai Spiced Vanilla Bean "Buttermilk" Muffins #vegan


Print
Chai Spiced Vanilla Bean “Buttermilk” Muffins

Prep Time: 20 minutes

Cook Time: 25 minutes

Total Time: 45 minutes

Yield: 1 dozen

Serving Size: 1 muffin

Chai Spiced Vanilla Bean “Buttermilk” Muffins

Soft and fluffy whole grain chai spiced muffins with fresh vanilla bean, made with vegan buttermilk. A perfect healthy treat for brunch, or a mid-afternoon snack.

Ingredients

  • 1 1/4 cup Silk Pure Almond Unsweetened Vanilla
  • 1 tablespoon apple cider vinegar
  • 1 1/3 cups white whole wheat flour
  • 1/2 teaspoon baking soda
  • 1/2 teaspoon baking powder
  • 1 tablespoon cornstarch
  • 1/4 teaspoon salt
  • 3/4 teaspoon ground cardamom
  • 3/4 teaspoon ground cinnamon
  • 1/4 teaspoon ground ginger
  • 1/8 teaspoon cloves
  • 1/8 teaspoon ground nutmeg
  • 3/4 cup sugar
  • 1/4 cup unsweetened applesauce
  • 1 vanilla bean

Instructions

  1. Preheat oven to 350. Line a 12-cup muffin tin with paper liners and spray lightly with nonstick spray. Set aside.
  2. Measure out almond milk and add apple cider vinegar. Let stand for 5 minutes.
  3. In a medium bowl, whisk together flour, baking soda, baking powder, cornstarch, salt, cardamom, cinnamon, ginger, cloves and nutmeg.
  4. In a large bowl, beat together sugar and applesauce. Scrape out the center of vanilla bean and add to the mixture. Beat until combined. Alternate adding dry and wet ingredients to the sugar and apple sauce mixture in 3 additions beginning and ending with dry ingredients. Mix until well combined.
  5. Divide batter evenly between lines muffin tins and bake for 25 minutes, until a toothpick inserted in the center comes out clean. Let stand for 10 minutes, then transfer to a wire rack to cool completely.
3.1
https://arismenu.com/chai-spiced-vanilla-bean-buttermilk-muffins/

This post is part of a sponsored campaign with Silk and FitFluential LLC.  All opinions are my own. To learn more about Silk Pure Almond Unsweetened on Facebook and Twitter.

Filed Under: Breads & Muffins, Breakfast, Christmas, Dessert, Fall, Holiday & Seasonal, Vegan, Winter · Tagged: breakfast, buttermilk, chai, muffin, recipe, silk, vanilla bean, vegan, whole grain

Chocolate Frosted Orange Donuts

February 4, 2013 · by Ari ·

I have something really embarrassing to tell you.

Chocolate Frosted Orange (baked) Donuts #vegan #glutenfree

So I pretty much never know the correct way to store my baked goods. Either I wrap it all up super close in an airtight container when it is still entirely too warm resulting in a big gooey mess of cookies/cupcakes/etc. basically unbaking themselves; or I leave everything out chillin’ with all the breezy air flowing freely throughout my house resulting in stale baked goods in something like 48 hours.

Chocolate Frosted Orange (baked) Donuts #vegan #glutenfree

It is a particularly sad experience to spend 75% of your life baking cookies, only to end up not being able to enjoy them the next day. Life is hard when you have a food blog.

Chocolate Frosted Orange (baked) Donuts #vegan #glutenfree

Okay, but we’re not even to the embarrassing part yet. This happened when I chose option B, letting my baked goods hang out (read: I was lazy, and didn’t store anything properly). You see, this became a problem because I was unbelievably head over heels for these donuts. That’s part of the reason I didn’t store them in the first place. They were so tempting. I was scared to keep them.

Chocolate Frosted Orange (baked) Donuts #vegan #glutenfree

Well, my plans to trick myself into not eating all of the donuts failed miserably when I found myself picking at the lone stale donut still standing 3 days later. That’s the embarrassing part. But if you baked  the most perfect tasting orange donuts that were melt-in-your-mouth soft, and covered with sweet chocolatey goodness, you would be picking at the stale leftovers too.

Chocolate Frosted Orange (baked) Donuts #vegan #glutenfree

Oh, and by the way, they’re vegan, and gluten-free. 😉


Chocolate Frosted Orange Donuts

yield 8-10 donuts

For the donuts:

  • 2 cups almond meal
  • zest of 1 orange
  • 3 tbsp corn starch
  • 3/4 tsp baking powder
  • dash salt
  • 3/4 cup unsweetened almond milk
  • 1/4 cup honey or agave
  • 1/3 cup orange juice
  • 1/2 tsp orange extract

For the frosting:

  • 1 cup powdered sugar
  • 2-4 tbsp hot water
  • 1 and 1/2 ounces unsweetened chocolate, melted

Directions:

  1. Start with the donuts. Preheat oven to 350 degrees. Spray donut pan with nonstick spray. Set aside.
  2. In a large bowl, whisk together almond meal, orange zest, corn starch, baking powder and salt. Stir in almond milk, honey/agave, orange juice and orange extract until combined.
  3. Fill donut molds about 2/3 – 3/4 full. Bake for 12-16 minutes until golden and set. Let stand for 5-10 minutes, then transfer to a wire rack (I flipped mine over onto the rack and they came right out) to cool completely.
  4. To make the frosting, place powdered sugar in a medium bowl. Slowly add in water 1 tbsp at a time, stirring constantly, until it reaches a spreadable glaze consistency. Stir in melted chocolate. If glaze becomes too thick, add an other tbsp hot water. Spread glaze on top of cooled donuts.
  5. Top with extra orange zest and/or sprinkles if desired. Store in an airtight container (so you don’t pick at stale donuts) for up to one week.

**Note: If while spreading the glaze it becomes too stiff, stick the bowl in the microwave for 10 seconds, and it will thin out again.

Filed Under: Breakfast, Dessert, Donuts, Gluten-free, Vegan · Tagged: almond meal, baked, chocolate, dessert, donuts, doughnuts, gluten free, orange, recipe, vegan

Sweet Potato Bisque

February 1, 2013 · by Ari ·

Sweet Potato Bisque #vegan #glutenfree

You guys you guys you guysssss!!!! I have so many exciting things to share with you!!

Sweet Potato Bisque #vegan #glutenfree

First of all, my birthday is on Wednesday, and clearly, I am turning 5. Maturity? Ehhh, not my thing. I have a major case of Peter Pan syndrome, and I have no plans to change in my *gulp* 28th year of life. Twenty eight. That is dangerously close to thirty. And it’s more miles than I have ever ran at once, and I just don’t really feel like I should be an age that is greater than my PDR.

Sweet Potato Bisque #vegan #glutenfree

Also, this week my buffalo deviled eggs were featured on Fox Magazine Online. Ummmm, WHAT?!?!?! When I got the initial email, I just assumed it was, like, the Phoenix chapter or something, and that’s why I was chosen. But then I went to the article, and there was my recipe DIRECTLY UNDERNEATH MY VERY FAVORITE FOOD BLOGGER!!!! And if that wasn’t awesome enough, I was beyond honored to be featured with a couple of my other favorite foodies.

Sweet Potato Bisque #vegan #glutenfree

As if this week wasn’t amazing enough, Steve and I booked our anniversary trip to New Orleans! On our first wedding anniversary, we spent maybe an hour together. Steve was back for a short trip from some work in California, and I was in the middle of rehearsals, and it was just…not a great way to spend our anniversary, so this year we plan to make up for it by going somewhere neither of us have been, and enjoying almost an entire week vacation. So freaking stoked. If you have any recommendation for things to do or, ahem, restaurants, TELL ME EVERYTHING.

Sweet Potato Bisque #vegan #glutenfree

As for this soup…It’s my favorite soup. I made it about a year ago for the first time, but never got pictures of it, and I haven’t stopped thinking about it since. It’s rich and creamy like you would imagine a bisque to be, but it doesn’t leave you with that heavy feeling afterwards. Steve claims to hate sweet potato soup, yet ate his entire bowl and went on to rave about it. The maple syrup and sriracha provide a great combination of sweet and spicy.

Sweet Potato Bisque #vegan #glutenfree

It also works really well in the crock pot–that’s how I made it the first time, but this time I was short on time, and didn’t prepare ahead of time, so I made it on the stove top. It is equally delicious both ways.


Sweet Potato Bisque 

yield 6 servings

  • 2 lbs sweet potatoes
  • 3 tbsp cornstarch
  • 3 cups unsweetened almond milk
  • 1 tbsp pure maple syrup
  • 1 tsp sriracha (optional, but recommended)
  • 1 tsp salt
  • 1/2 tsp black pepper
  • dash freshly ground nutmeg

Directions:

  1. Preheat oven to 400. Pierce sweet potatoes several times with a fork, then transfer to a large cooking dish. Roast for about 1 hour until tender.** Let cool for 10 minutes, then remove skin. Blend roasted and peeled sweet potatoes with an immersion blender (or in a regular blender) until smooth. 
  2. In a large sauce pan over medium heat, whisk together  cornstarch and almond milk until combined. Add sweet potatoes, maple syrup, sriracha and spices whisking constantly until well combined. Continue to cook on medium heat until soup is hot throughout. Serve immediately. Leftovers can be refrigerated in an airtight container for 1 week.

**Notes: If you’re short on time, you can bake your potatoes in the microwave in about 8-10 minutes. I’ve done this, and it’s not quite as flavorful as roasting, but it’s still great and works in a pinch.

To make in the crock pot, throw in all your ingredients, whisk together, and cook on low for 4-6 hours.

Filed Under: Gluten-free, Paleo, Side Dish, Soup, Vegan, Vegetarian · Tagged: almond milk, bisque, dinner, fall, gluten free, recipe, soup, sweet potato, vegan, winter

Drink & Dish: Buffalo Chicken Dip {with video!}

January 29, 2013 · by Ari ·


Let’s talk for a second about making a video.

Healthy Buffalo Chicken Dip

It’s, um…hard. I naively assumed that I would be great at this, You see, I’m an actor. I have a degree in musical theatre. This is what I teach people to do all day long, right??? Well, as it turns out, it’s not quite that simple. Shocking, right? But it is a whole lot of fun!

Healthy Buffalo Chicken Dip

I believe it was the day that Nicole and I ran 21 miles that we decided to create our own internet cooking show. When we talk about food, we run faster. We spend a lot of time talking about food.

Healthy Buffalo Chicken Dip

I think the hardest part of this process for me was that my big, ridiculous, often over-the-top personality doesn’t always translate to a tiny little camera box. Nicole kept telling me I was shouting because I’m so used to having to project on stage, haha. It’s definitely a learning process, and there are quite a few things I want to work on for the next time (like, oh…actually plugging in our microphone and shooting in the hd format…whoops…), but I am pretty proud of what we put together.

Healthy Buffalo Chicken Dip

Make sure you go over to Nicole’s page to check out her recipe too!

Buffalo Chicken Dip

yield your entire party

  • 9-11 oz chicken breast, cooked and shredded 
  • 4 oz reduced fat cream cheese
  • 1 cup nonfat plain Greek yogurt
  • 4 oz reduced fat sharp cheddar cheese
  • 2-3 tsp ranch seasoning
  • 1/3 cup buffalo sauce (or more if you want it spicier)
  • bleu cheese for topping (optional)
  • carrots and celery for dipping

Directions:

  1. Combine chicken, cream cheese, Greek yogurt, cheddar cheese, ranch seasoning, and buffalo sauce in a medium sauce pan over medium heat. Stir constantly until all items are incorporated and dip is heated throughout, about 10-15 minutes.
  2. Serve topped with crumbled bleu cheese, with carrots and celery. Dip can be stored in an airtight container in the refrigerator for one week, and reheated or eaten cold (if you’re weird like me 😉 ).

Filed Under: Appetizers, Drink & Dish, Gluten-free, Holiday & Seasonal, savory, Snacks · Tagged: buffalo, cheese, chicken, dip, drink & dish, greek yogurt, low fat, recipe, super bowl, video

Cheesy Broccoli Soup with Roasted Corn

January 28, 2013 · by Ari ·

The weather has been unusually cold and rainy here in Phoenix. Not that I’m complaining. We only get about 5 days a year of this, and so it’s kind of like a treat. I generally like to keep my schedule jam packed, constantly going from one thing to the next, but when the weather gets like this, it’s like one of life’s little reminders to slow down, cuddle up under a blanket with the puppies, and listen to the rainfall.

brocollicheddarsoup-16

Oh, and eat my body weight in rich. creamy, hot soup. I could probably eat soup year round. I love it sososo much, but when it’s 115* outside, it sort of loses it’s luster, if you know what I mean.

brocollicheddarsoup-12

Therefore, after December 25th, when I stop eating cookies for dinner every single night, I usually declare the month of January soup month, and cook pretty much only soup for the entire month. I’m sure my husband loves it, and never gets bored.

brocollicheddarsoup-11

I’m such a creature of habbit. Have I ever told you I eat the same thing for breakfast every.single.day.? Pumpkin, Greek yogurt, chopped apple, chia seeds, spices, and cereal on top. It’s really….weird. But I love it. Steve makes fun of it. I find him rude. Also, when I find a lunch I’m into, I eat that every day as well. Lately, it’s a grilled sandwich with hummus, cheese, mustard, and lots of veggies. It’s delicious.

brocollicheddarsoup-9

So, I’ve been enjoying my month of soup. I had a serious craving for broccoli cheddar soup, and then I went grocery shopping and saw that the ears of corn actually looked good. In January. I decided that was a sign that corn needed to make it’s way into my soup.

brocollicheddarsoup-1


This isn’t your typical broccoli cheese soup. The corn makes it thick, and chunky, and it’s more creamy than cheesey, because I didn’t want to add an entire block of cheese. Right about the time it was ready, I got reallll nervous, and told Jason we might just be eating bread for dinner (I made some really delicious biscuits to go with it that I never doubted for a second), but I decided I would take pictures juuuust in case. Then I took a bite, and I couldn’t believe how much I loved it! It was different than what I was expecting with the initial broccoli cheddar feel, but I absolutely loved the rich creaminess with the texture of the broccoli and corn.


Cheesey Broccoli Soup with Roasted Corn

yield 6 servings

  • 1 1/2 tbsp olive oil, divided
  • 3 ears sweet corn
  • 1 medium onion, chopped
  • 2 cloves garlic, finely chopped
  • 3 cups unsweetened almond milk
  • 3 cups vegetable stock
  • 1 lb fresh broccoli florets, chopped
  • 1 tsp salt
  • 1 tsp black pepper
  • dash hot sauce
  • 4 oz freshly grated reduced fat cheddar cheese
  • 1/2 cup nonfat plain Greek yogurt

Directions:

  1. Preheat oven to 400. Place corn in a large baking dish. Drizzle with 1 tbsp olive oil, and add salt and pepper if desired. Roast for 1 hour until lightly browned.
  2. Meanwhile, in a large pot over medium heat, saute onion and garlic in olive oil until fragrant. Add almond milk and veggie stalk whisking together for 3-5 minutes. 
  3. Add broccoli, salt, pepper, and hot sauce. Reduce heat to medium low, and continue to cook until broccoli is tender, about 40-50 minutes.
  4. Remove pot from heat, and pulse with an immersion blender, until desired consistency (I like mine chunky, so I only pulse it through a few times. For a smoother soup, blend for longer, or transfer soup to a blender to blend completely).
  5. Return pot to heat, turn down to low, and add cheddar cheese. Allow to simmer for 10 minutes.
  6. When corn is finished cooking, scrape kernels off with a knife. Stir in corn and Greek yogurt, and serve. Leftovers can be stored in the refrigerator in an airtight container for up to 1 week.

Filed Under: Entree, Gluten-free, Side Dish, Soup, Vegetarian · Tagged: broccoli, cheese, corn, dinner, gluten free, recipe, soup, vegetarian

« Previous Page
Next Page »
Image Map

Popular Posts

Tart Cherry Margaritas: The perfect, refreshing margarita--lightly sweet with a punch of tequila

Tart Cherry Margaritas

90+ Healthy Recipes for Breakfast, Lunch, Dinner & Dessert

90+ Healthy Recipes for Breakfast, Lunch, Dinner & Dessert

The Ultimate Peanut Butter Cup Brownie Cookies: Rich, fudgy, brownie-like chocolate cookies stuffed with melty peanut butter cups!

Ultimate Peanut Butter Cup Brownie Cookies

Drink & Dish: Cafe Au Lait Cupcakes

Crockpot Chicken Enchilada Soup

Subscribe via Email:

Enter your email address:

Save an additional $30 on Blendtec Factory Recertified Blenders + Free Shipping

Featured Here

recipe redux
Certified Yummly Recipes on Yummly.com

Member Of…

FitFluential Is Fitness Found
AZ Bloggers Network
az 150 photo az150_zpsfb093d32.gif

Archives


Image Map

Copyright © 2026 | Innovative Child Theme by The Pixelista | Built on the Genesis Framework


Loading Comments...