• Going Out
    • Phx Restaurants
    • How To Order At Starbucks
  • Running
    • My Running Story
    • Race Calendar
    • Race Recaps & Results
  • Blogroll
  • Bucket List
  • Video

Ari's Menu

Little changes making a big difference.

  • Home
  • Recipes
  • Weight Loss
    • My Story
    • Common Swaps
  • Who’s Who
  • Contact
    • Policies & Disclosure
  • Press

Candy Corn Oatmeal Cookies

October 3, 2012 · by Ari ·

Happy October! I know we’re technically on day 3 here, but it’s still the beginning, so I figured what better way to celebrate than with Halloween candy?

Okay, I have a confession. I don’t think I actually like candy corn. I LOVE these cookies, but I bought this entire bag of candy corn to make them, and so once in a while when I was craving something sweet, I would grab a couple. I wanted to like them. Everyone loves candy corn at Halloween time! I tried way too many times, but the truth is, I think they taste weird on their own. I would much rather have a chocolate peanut butter pumpkin.

You know those round ones wrapped in pumpkin foil paper with the crunch in the middle that only come out for Halloween? I have a serious obsession. I used to buy at least 4-5 bags a season, and eat them all. It was kind of gross. Really gross. But those pumpkins are delicious. This year, I’m abstaining from delicious peanut butter pumpkins. I don’t trust myself. However, if you buy a bag and wanted to give me jusssstttt ooonnneee, we would maybe be best friends for ever and ever.

In return, I will give you the whole 2/3 full bag of candy corn sitting on my counter. I would say in my pantry, but yeah…. Still haven’t put that away. In fact, my house is a bit of a disaster, but that’s a whole other story, and it’s a little embarrassing. Let’s just pretend for one day that I am the neatest person ever, and my house always looks immaculate. That’s a fun dream.

Let me tell you, the first time I attempted candy corn cookies, disaster ensued. I tried to make pumpkin ones, and they were entirely too cake-like, plus I mixed the candy corns into the batter, and my poor cookie pan is still recovering. It was a sticky, cakey mess that no one would enjoy eating. Surprisingly, I didn’t freak out like I normally would. I laughed about it, threw away the disaster cookies, and went back to the drawing board. The result? Halloween cookie perfection.

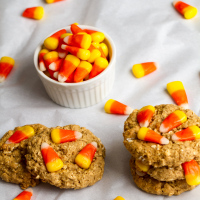
It’s still important to bake the candy corns in the cookie, because that’s what makes them gooey, and stick to the cookie, but pressing them in on top saves you the mess! Also, a heartier oatmeal cookie stands up a lot better when adding strange little yellow, orange, and white candies to the mix 😉 The cookies are slightly crispy on the edges, while perfectly soft and gooey on the inside, with the perfect melty sweetness of baked candy corn.

Even this candy corn hater couldn’t get enough!! I’m telling you, if you too think you hate candy corn, you can reform to society’s candy corn obsession by putting them in these cookies! And if you love candy corn, you will really  love these cookies!

Candy Corn Oatmeal Cookies

yield 3 dozen

  • 1 1/2 cups white whole wheat four
  • 1 tsp baking soda
  • 1 tsp baking powder
  • dash salt
  • 6 tbs apple butter
  • 3 tbs coconut oil
  • 3/4 cup raw turbinado sugar
  • 1/4 cup egg substitute
  • 1 1/2 tsp vanilla
  • 1 cup rolled oats
  • approx 1 cup candy corn

Directions:

  1. Preheat oven to 350. In a medium bowl, combine flour, baking soda, baking powder and salt. Set aside.
  2. In a large bowl, beat together apple butter, coconut oil, sugar, egg substitute and vanilla until combined. Slowly beat in dry ingredients, then fold in oats.
  3. Line a baking sheet with parchment paper, and drop cookies onto the sheet using a small cookie scoop. Press 3-4 candy corns into the top of each cookie.
  4. Bake for 12 minutes until golden. Let stand on cookie sheet for 3-5 minutes, then transfer to a wire rack to cool completely.


What’s your favorite Halloween candy??


Filed Under: Cookies, Dessert, Holiday & Seasonal · Tagged: baking, candy corn, cookies, dessert, fall, halloween, oatmeal, recipe, seasonal, whole grain

Loaded Butternut Mac & Cheese

August 30, 2012 · by Ari ·

You know what I love about macaroni and cheese?


I mean aside from the fact that the combination of carbs and cheese  is pretty much the most amazing thing on earth.

I love that there are so many options.

This mac & cheese….ooooooomg. It’s filled with center cut bacon, caramelized onions, and crispy sweet apples for the most amazing and surprising flavor combination. I wish I could tell you it was my idea. It totally wasn’t. I took it from this awesome lady, and changed a few things around.

Steve claims to not like butternut squash, but he definitely helped himself to seconds of this dish! The thing about adding butternut squash/pumpkin/sweet potato to mac + cheese, is that is just adds some creaminess, fullness and a hint of sweetness. You can use less cheese, but still get a thick, creamy, cheesy sauce that feels like you are breaking every diet rule you’ve ever followed.

I love how all of the textures come together in this dish too. Creamy, silky cheese sauce with crunchy bacon, crispy apples and perfectly tender onions. Opposing flavors and textures = my favorite thing ever. This dish has both. Excellent.

Drrrrroooooool.


Loaded Butternut Mac & Cheese

yield 6 servings

adapted from Butternut Squash Mac n’ Cheese with Bacon, Caramelized Onions, and Apples

  • 2 cups dry whole grain pasta (brown rice, whole wheat, etc.–I had rotini on hand, but macaroni or penne also hold cheesey sauce really well)
  • 1 cup butternut squash puree (I steamed chopped butternut squash and pureed it with my immersion blender, but you could buy canned, or even better, roast it first!)
  • 1/2 cup unsweetened almond milk
  • 1/4 cup dry white wine
  • 1 oz low fat cream cheese
  • pinch salt
  • 1/2 cup shredded 75% reduced fat cheddar cheese + extra for topping
  • 1 tablespoon light whipped butter
  • 1/2 yellow onion, sliced thinly
  • 1 large crispy apple, chopped
  • 4 slices center cut bacon, crumbled

Directions:

  1. Melt butter in a medium skillet over medium heat. Add onions, cover and cook on low-medium low for 30 min, tossing occasionally. When fully cooked, remove from pan and set aside.
  2. Cook the pasta according to package instructions. In a large skillet over medium heat, whisk together butternut squash, wine, milk, and cream cheese. When combined, add in salt, then stir in cooked pasta.
  3. Add onions and apples to the pasta. Stir to combine and add a dash more milk if needed.
  4. Stir in cheddar cheese, then transfer to a n 8×8 cooking dish. Top with cooked bacon and a small handful of extra cheese. Broil for 2-3 minutes until the top browns slightly. Serve immediately.


Filed Under: Entree, Gluten-free, Pasta · Tagged: bacon, butternut squash, dinner, mac and cheese, pasta, recipe, whole grain

Starburst Cookies

August 1, 2012 · by Ari ·

That sounds weird, right?

But think about it. Cookies are good. Starburst are good.

You like fruit in your cookies. Starbursts are like fruit, but bad for you. But don’t worry, the cookie part if less than bad for you, so it all evens out. Trust me.

Did you know that now there are packages of Starburst that come with just the red and pink ones??? Amazing. Is there any reason to eat a fruit flavored candy that isn’t red or pink? Like gummy bears…why do they even make the other colors? Why can’t they just stick to the red ones?!

You know what I think is weird? Gummy bears in ice cream! I do not prefer that. The cold ice cream makes them hard, and not gummy at all really. But a warm cookie makes a Starburst warm and gooey, like when you put taffy in the microwave. Yummmm.

Taffy, on the other hand, should only come in yellow. But that’s neither here nor there. As it turns out, Starburst inside a cookie is actually not weird, but delicious.

Especially if the cookie gets just a little crunch on the outside. Then all the textures and flavors work out in harmony and all that crap. Yes, my cookies are freaking harmonious. What are your cookies? Just melodic? Pssshhhh. Okay, I’m sorry. I had a music nerd baker moment. Don’t give up–LOOK AT THE COOKIES!!


Starburst Cookies

yield 1 dozen

  • 2/3 cup white whole wheat flour
  • 1/4 tsp baking soda
  • 1/8 tsp baking powder
  • 3 tbs fat free cream cheese, softened
  • 1 tbs light whipped butter, softened
  • 3 tbs turbinado sugar
  • 3 tbs Splenda
  • 1 tbs egg substitute
  • 1/2 tsp vanilla extract
  • 12 Starburst candies

Directions:

  1. Preheat oven to 375. Line a large cookie sheet with parchment paper. Set aside.
  2. In a small bowl, stir together flour, baking soda, and baking powder. Set aside.
  3. In a large bowl, beat together cream cheese, butter, sugar, and Splenda until smooth. Beat in egg substitute and vanilla.  Gradually blend in the dry ingredients.
  4. Roll dough into 1 inch balls, and stuff each dough ball with 1 Starburst. Re-roll dough around Starburst, so that it is completely covered, then place on prepared cookie sheet,
  5. Bake 8 to 10 min, or until golden. Let stand on cookie sheet for 2 min before serving.
  6. Serve warm, fresh out of the oven for optimal Starburst consistency. If you make them ahead of time, you may wish to rewarm before serving.

Filed Under: Uncategorized · Tagged: baking, cookies, dessert, recipe, starburst, whole grain

Pumpkin Spice Churro Bites

July 25, 2012 · by Ari ·

One of my favorite things about going places like Disneyland, well, aside from the fact that I am freakishly obsessed with Disneyland, was always the churro stand.

Crispy on the outside, and warm and gooey on the inside. How can anyone not like churros??? Seriously. They are so soft on the inside, I used to be convinced that there was actually a filling. I didn’t quite understand the depths, and amazingness of deep frying. Don’t worry, I get it now. Deep frying = instant texture success. Sad, but true.

However, we all know greasy, oily, deep fried food and I are not besties, and, clearly, I need churros in my life. These things are the real deal. Crispy and cinnamony on the outside, while still gooey on the inside with a hint of pumpkin. Pumpkin + cinnamon = always delicious.

Also, why are all foods in life not served dipped in chocolate? That sounds like the cure for all things bad in the world. War. World hunger. People you don’t like. Just serve them dipped in chocolate.

Okay, don’t dip people in chocolate. That’s weird. I am, at least it’s definitely weird if you plan to eat them. This isn’t Silence of the Lambs or anything. In fact, I don’t even like scary movies. And this has taken a turn for the weird, so um, where was I? Chocolate. Cinnamon. Pumpkin. Churros. Mini. Oh yes, they’re mini. Which means you can eat 10 churros instead of 1. We all know I like to eat in volume, so that is obviously a plus.

Okay, before we get to the recipe, I have to tell you a secret about how I messed these up the first time. I made the bites, all was going well, but then I mixed the butter with the cinnamon sugar instead of dipping and rolling. Needless to say, it was delicious, but not quite what I was going for. Also messy, very messy. However, if you don’t mind mess, and don’t care what they look like, I would say that is an equally delicious way to achieve churro love 🙂

Pumpkin Spice Churro Bites adapted from Erica’s Sweet Tooth yield approx 3 dozen

For the churros bites:
  • 1 1/2 cups white whole wheat flour
  • 1 tsp baking powder
  • 1/2 tsp salt
  • dash pumpkin pie spice
  • 1/2 cup turbinado sugar
  • 1/3 cup canned pumpkin
  • 1 tsp pure vanilla extract
  • 1/4 egg substitute
  • 1/2 cup unsweetened vanilla almond milk
For the cinnamon sugar topping:
  • 1/4 cup light whipped butter, melted
  • 1/2 cup brown sugar
  • 1-1/2 tsp cinnamon
Directions:
  1. Preheat the oven to 350 degrees and spray a pan of mini muffin tins with cooking spray.
  2. In a medium bowl, whisk together the flour, baking powder, salt, and pumpkin pie spice.  Set aside.
  3. In a medium bowl, beat sugar and pumpkin together. Add egg substitute and vanilla. Beat until well combined.
  4. Slowly alternate adding the flour mixture and milk, starting and ending with the flour.  Mix until just incorporated.
  5. Use an extra small cookie scoop to fill each muffin tin and bake for 10-15 minutes (depending on how small your cookie scoop is), or until just golden brown.
  6. While the churro bites are baking, melt butter in a small bowl and combine cinnamon and sugar in a shallow dish. When churro bites are finished, immediately remove from the pan and dip each bite in the butter and roll in the cinnamon sugar mixture.  Enjoy immediately or store in an airtight container for 2-3 days.

Filed Under: Dessert, Holiday & Seasonal, Snacks · Tagged: baking, churro, cinnamon, dessert, pumpkin, whole grain

Skinnified Sunday: S’mores Brownies

July 22, 2012 · by Ari ·

My girl Nicole knows her brownies, and when she posted her recipe for her favorite S’mores Brownies, I almost ended my friendship with her because she didn’t share any with me knew I had to make my own version!

Okay, so don’t go look at her blog, because hers are sooooo much prettier. We all know that presentation is not my forte, but they were delicious, so you know…

Honestly, with gooey, browned marshmallows, chocolate and graham cracker, how could that be bad???

These had everything I love about s’mores combined with everything I love about brownies. I had to send them all home with Jason, so I wouldn’t devour them in one sitting!

No, I don’t think it’s weird to add more chocolate to a brownie. I think you’re weird if you don’t always enjoy the idea of more chocolate.

Original Recipe:

via Nicole @ Foodie Misadventures

My swaps:
  • Nonfat vanilla yogurt for butter (-fat, -saturated fat, -calories, -cholesterol)
  • Turbinado/Splenda combo for sugar (-sugar, -calories)
  • Egg substitute for whole eggs (-fat, -calories, -cholesterol)
  • White whole wheat flour for all purpose (+fiber, +protein)
  • Whole wheat graham crackers for regular (+fiber, +protein)
  • Natural dark chocolate for Hershey’s bars (-sugar)


Skinnified S’mores Brownies

yield 16 brownies

  • 3/4 cup nonfat vanilla yogurt
  • 1 cup turbinado sugar
  • 1/2 cup Splenda
  • 3/4 cup egg substitute
  • 1 tsp vanilla extract
  • 1/2 cup unsweetened cocoa powder
  • 1 cup white whole wheat flour
  • 1/2 tsp baking powder
  • dash salt
  • 6 whole wheat graham cracker squares + crumbs for sprinkling
  • 1/2 cup all natural dark chocolate chips
  • 5 oz marshmallows (regular or mini)
Directions:
  1. Preheat oven to 350 F°. Grease an 8 inch square pan.
  2. In a large bowl, beat together yogurt, vanilla, egg substitute, Splenda, and sugar until thoroughly combined. Mix in cocoa powder, flour, baking powder and salt until well blended.
  3. Pour half of the batter into the prepared pan. Layer graham crackers side by side over the top of the brownie batter until completely covered. Next pour chocolate chocolate chips evenly over the graham crackers. Then lay the marshmallows out over the chocolate. Pour remaining batter evenly over the marshmallows, spreading with a spatula if necessary.
  4. Bake at 350 for 35-40 minutes. Let cool completely before slicing and serving.

Filed Under: Brownies & Bars, Dessert · Tagged: brownies, chocolate, dessert, recipe, s'mores, skinnified, whole grain

3 Cheese Apple Cranberry Pizza

July 14, 2012 · by Ari ·

I don’t know about you, but my taste buds totally change in the summer time. Most of my favorite foods (other than fro yo which is 100 times better in the summer) are hot and cheesy, and just don’t sound good when it’s 115 outside.

Well, this pizza is still hot and cheesy, so it wins for taste, but it is also fruity and refreshing which is perfect for the summer heat!

Confession: My favorite pizza used to be the kind that got delivered. Greasy, drippy Pizza Hut or Dominoes pizza was a staple in my diet, and something I continued to crave until I realized that pizza didn’t have to be off limits. That was like the best day of my life–when I started eating pizza again. Maybe I should be embarrassed by that?

Oh, whatever, I don’t care–I LOVE PIZZA!!! And I am now head over heels for making my own pizza, and how ridiculously easy it is! You just put whatever you want on top of some dough…

Then toss it in the oven!

Taaaaaddddaaaa!

3 Cheese Apple Cranberry Pizza

yield 6 servings

  • 1 package refrigerated whole wheat pizza crust
  • 3/4 cup fat free ricotta cheese
  • 1/4 cup nonfat plain Greek yogurt
  • 2-3 tbs unsweetened almond milk
  • 1 tbs fresh rosemary leaves, finely chopped
  • 1 tbs balsamic vinegar
  • 1/2 cup part skin mozzarella
  • 1.5 oz herbed goat cheese, crumbled
  • 1 apple, thinly sliced
  • 1/4 cup dried cranberries

Directions:

  1. Spray a medium-large cookie sheet with nonstick spray, then roll dough out using a rolling pin to fill out the sheet.
  2. In a small bowl, whisk together ricotta, Greek yogurt, milk, rosemary, and balsamic vinegar. Spread evenly onto rolled out dough, then top with mozzarella and goat cheese, followed by apple slices and dried cranberries.
  3. Cook according to instructions on the prepared pizza dough package.

Filed Under: Dinner, Entree, Fall, Holiday & Seasonal, pizza, savory, Vegetarian, Winter · Tagged: dinner, easy recipe, fruit, pizza, recipe, whole grain

Red White & Blue Cookies

June 24, 2012 · by Ari ·

It’s almost the 4th of July!!!

One of my very favorite things in the world is fireworks. I missed them for years when I was working at camp, and I will never forget the summer I stayed in Idaho, going to see fireworks was a huge deal for me! You know me…I like bright, pretty colors. They make me happy. I’m 5 years old on the inside, so it doesn’t take a whole lot to impress me.

Last year, I stayed in Phoenix for the summer, and we had a big BBQ around the 4th, and that’s when I got the idea for these cookies. In fact, I posted them waaaayyy back when I first started blogging, but the pictures were pretty bad, and I loved them so sooooo much, that I had to make them again!

In fact, a year ago, they were Steve’s very favorite dessert I’d ever made. Now, I think there may be a new favorite, but these cookies are still pretty high up on the list. We took them to the bike shop, and I left with a fundraising order! Sweet!

I realllllly love these cookies. I love the combination of flavors and the soft, gooey texture, but I especially love the way the blueberries burst when you take a bit. It’s like the most amazingly fresh blueberry muffin, but a cookie.

Also, they’re pretty. That pretty much never happens with my food. In fact, the other day Steve told me that my brownies were photogenic, and it was, like, the best compliment ever. Usually my food looks like a kindergartner put it together. Which is almost true. Maturity wise.

And now I want to eat a dozen. And not share. Good thing we don’t have a cookie sheet up here yet…


Red White & Blue Cookies

yield approx 3 dozen

  • 1 cup brandy (to soak the berries in, then saving 2 tsp for later)
  • 2/3 cup dried cranberries
  • 2/3 cup small blueberries
  • 1/2 cup honey apple butter
  • 1/2 cup non fat plain greek yogurt
  • 3/4 cup turbinado sugar
  • 2/3 cup brown sugar
  • 1/4 cup + 2 tbs liquid egg whites (or other egg substitute, or 3 egg whites)
  • 1 tsp baking soda
  • dash salt
  • 2 1/4 cups white whole wheat flour
  • 2/3 cup all natural white chocolate chips
  1. Put the blueberries in a wide and shallow bowl, pour in a bit of brandy. Enough so they’re surrounded by it, but not drowning. Cover and place in the fridge for at least one hour. Afterwards, place a colander over a bowl and pour the berries and brandy through, putting the cranberries and the brandy they soaked in aside.
  2. Preheat oven to 375°F. In a large bowl, beat apple butter, yogurt, and sugars until combined. Add liquid egg whites, and 2 tsp berry soaked brandy. Beat well, scraping sides of the bowl as necessary.
  3. In a separate bowl, whisk together the flour, baking soda, and salt, then slowly add to wet mixture, beating until just incorporated. Fold in the brandy soaked blueberries, dried cranberries, and white chocolate chips. Let chill for 15 minutes in the fridge.
  4. Spray baking sheet with non stick spray or parchment paper. Use a small-medium sized cookie scoop to transfer dough onto the baking sheet. Bake at 375°F for 8-10 minutes until just set, and the edged are slightly golden. Let cool for a minute, then transfer to a wire rack to cool completely.


Filed Under: Cookies, Dessert, Holiday & Seasonal · Tagged: 4th of july, baking, cookies, dessert, recipe, theme, whole grain

Triple Chocolate Cupcakes

June 19, 2012 · by Ari ·

My mom loves chocolate. She used to tell me that a dessert without chocolate was a total waste.

Most of my life, I was more of a vanilla person. I liked chocolate in things, but I never liked chocolate based desserts–I always thought they were too overwhelming. In fact, at one point in my life, I swore off chocolate thinking it would help with my weight loss. It didn’t. Turns out when you replace your mocha with a caramel macchiato, and make your chocolate chip cookies with butterscotch chips, it actually makes no difference at all. Funny how that works.

When I did the awful carb diets and swore off sweets for entirely too long (if you can imagine me eating no dessert–it’s a scary thought), my tastes entirely changed. Suddenly, the richer, deeper, and more intense the flavor was, the more I loved it! Dark chocolate became more appealing than my once favorite white, and I started craving brownies instead of snickerdoodle cookies.

These days, it depends on my mood, and if you offered me a chocolate and a vanilla cupcake, I would probably want a vanilla one with chocolate frosting. Or a chocolate one with vanilla frosting. But my mother–she will choose all chocolate. Well, to be honest, it probably doesn’t matter what kind of cupcake it is, because all she really wants is the frosting 😉

Frosting is an other thing I used to not like. But I think that’s because I was eating store bought frosting, and that’s gross. In fact, I find most buttercream kind of disgusting. So sickeningly sweet that it makes your mouth feel funny. I look at the amount of sugar in most frosting recipes, and usually end up taking almost a cup of it away! Now don’t get me wrong, this frosting has plenty of sugar, but it isn’t overwhelming. You can taste the cream cheese, and the chocolate, and not just get a mouthful of sugar. Cream cheese and whipped cream frostings are something I can get behind. You can keep your buttercream and fondant.

These were my mom’s birthday cupcakes. Chocolate cupcakes made with coffee to enhance the chocolate flavor, filled with white chocolate, and topped with my very favorite chocolate cream cheese frosting. Rich chocolatey flavor, without feeling heavy. That is my kind of cupcake. Especially delicious with a glass of almond milk. Mmmmm.


Triple Chocolate Cupcakes
yield 1 dozen

Cupcakes inspired by Brown Eyed Baker

  • 1 1/3 cup white whole wheat flour
  • 1/3 cup dutch process cocoa powder (or Hershey’s special dark)
  • 1 tsp baking powder
  • 1/2 tsp baking soda
  • dash salt
  • ½ cup unsweetened almond milk
  • 1/2 cup strong brewed coffee
  • 1 tsp vanilla
  • 1/2 cup unsweetened applesauce
  • 1 cup turbinado sugar
  • 1/4 cup egg substitute
  • 1/2 cup all natural white chocolate chips
  • 1/2 batch Chocolate Cream Cheese Frosting
Directions:
  1. Preheat the oven to 350 degrees F. Line 12 muffin tins with paper liners, and spray lightly with nonstick spray.
  2. In a medium bowl, whisk together flour, cocoa powder, baking powder, baking soda and salt. Set aside.
  3. In a large bowl, beat together applesauce, sugar, and egg substitute until well combined. In a measuring cup, combine the milk, coffee, and vanilla. Slowly add the flour mixture, alternating with the coffee mixture, ending with the flour mixture. Fold in white chocolate chips.
  4. Divide the batter evenly between the 12 liners. Baking for 17-20 minutes or until a toothpick inserted in the center of a cupcake comes out clean.
  5. Cool cupcakes completely on wire racks. Meanwhile, prepare frosting. When cupcakes are completely cooled, frost and enjoy.


Filed Under: Uncategorized · Tagged: birthdays, chocolate, cupcakes, dessert, frosting, recipe, white chocolate, whole grain

Vegan Banana Chocolate Chip Muffins

June 1, 2012 · by Ari ·

This never happens. We eat a lot of bananas in this house, so they never stick around long enough to make banana bread/muffins/etc.

But I guess one day I got overzealous on my banana buying. Or we got sick of them for a while, because all of the sudden I had more over ripe bananas than I knew what to do with.

Okay, that’s a lie. I knew exactly what to do with them!

Note to self: bananas don’t typically stick around too long. Banana muffins don’t make it through the night.

I always talk about how I love experimenting with cooking for different diets. I won’t ever, ever, ever do an other diet with rules again, unless I develop some medical condition in which it is necessary or I’m going to die, and even then I’d still consider my options. Kidding. Mostly. 😉 I do love trying different things, however, and cooking in different ways. I’ve been dying to find some amazing looking recipe to make Diana some candida baked goods! Soon, soon, soon. But for now, amazing people like Jen that can’t have dairy, can eat delicious muffins (and Jen, I promise I am sending your cookies before I leave for camp!).

I could not get over how soft and moist these muffins were! Honestly, what is the point of butter in a muffin? Bananas and applesauce do the same thing and, in my opinion, like a million times better. I mean, don’t get me wrong…I love butter. It’s sick, really, how much I love butter, but well…now I feel slightly embarrassed because about my last statement, so let’s get back to these muffins which don’t fill my love of butter, but fill my bigger love of baked goods and chocolate. And now I am reminded of how sad I am that there are no longer any left in my house. First world problems people. This means you should make them, and enjoy them for me!

Like, perhaps, while lounging by the pool. 😉


Vegan Banana Chocolate Chip Muffins

yield 1 dozen

  • 2 1/3 cup white whole wheat flour
  • 3/4 tsp baking soda
  • 1/2 tsp baking powder
  • dash salt
  • 1 tsp pumpkin pie spice
  • 3 extra-ripe bananas, mashed
  • 1 1/2 tsp vanilla
  • 1/2 cup unsweetened applesauce
  • 3/4 cup turbinado sugar + more for sprinkling
  • 1/3 cup unsweetened vanilla almond milk
  • 1/2 cup non dairy dark chocolate chips (I recommend using the mini size)

Directions:

  1. Preheat oven to 350. Line muffin tin with paper liners, and spray lightly with nonstick spray.
  2. In a medium bowl, whisk together flour, baking soda, baking powder, salt, and pumpkin pie spice. Set aside.
  3. In a large bowl, beat together bananas, vanilla, applesauce, 3/4 cup sugar, and almond milk, until well combined. Slowly, beat in dry ingredients, then fold in chocolate chips.
  4. Evenly divide batter between the 12 muffin tins. Sprinkle an extra pinch of turbinado sugar on the top of each muffin (optional), and bake for 25-30 minutes until golden, and a toothpick inserted in the center comes out clean. Transfer immediately to wire racks to cool.

Filed Under: Breads & Muffins, Breakfast, Dessert, Vegan · Tagged: baking, bananas, breakfast, chocolate, dessert, muffins, recipe, vegan, whole grain

Chocolate Covered Strawberry Cupcakes

May 31, 2012 · by Ari ·

Want to know what’s special about these cupcakes???

Well for one, they are my first batch that were ordered and SOLD! EEEEEK!!!!

Susan ordered them for her Niece’s graduation party, along with a bunch of candy cups to contribute to my fundraising goal!

So, confession: I was ridiculously nervous about this! Sure, I love to bake and share my recipes, and invite people over to help me not inhale 7 servings of my food enjoy my food with me, but am I really good enough for someone to pay for it??? I honestly still don’t even really consider myself a cook, or a baker, or much of anything, other than someone with a sweet tooth the size of Canada. This was a big and scary step! The good news? They came back to rave reviews!!

Everyone I know goes crazy over chocolate covered strawberries. Me? I don’t like strawberries. Not a bit. However, my taste tester said they were delicious, soft and fluffy with the perfect strawberry flavor. The perfect strawberry flavor for me would be not, but I kind of liked that because it meant I consumed way less batter during the process. The frosting…well that’s an other story. It’s my favorite.

You know what else? I took all of these photos myself! Check out my rude husband taking all the credit with his signature 😉 To be fair, he did help me get everything set up, but then it was all me! I’m learning, and I’m really enjoying getting better at the photography!

Chocolate Covered Strawberry Cupcakes

yield approx 2 dozen

For the cupcakes:
adapted from Eat Live Run

  • 3 cups white whole wheat flour
  • 2 tsp baking powder
  • dash salt
  • 1 1/3 cups pureed fresh strawberries (from about 2 cups whole strawberries—puree in a blender until smooth)
  • 1/2 cup unsweetened almond milk
  • 2 tsp vanilla
  • zest from one large lemon
  • 1 cup unsweetened applesauce
  • 1 3/4 cup turbinado sugar
  • 1/2 cup egg substitute (or 3 more egg whites)
  • 4 egg whites
For the Chocolate Cream Cheese Frosting
barely adapted from How Sweet It Is
  • 3 x 8 oz blocks reduced fat cream cheese (you could also use fat free, I just had red fat on hand)
  • 3/4 cup unsweetened cocoa powder
  • 3 cups powdered sugar
  • 2 1/2 oz grain sweetened chocolate chips, melted and cooled
  • 1 tsp vanilla extract
  • sprinkles for topping (optional)

Directions:

  1. Preheat oven to 350 degrees. Line 24 cupcake tins, and spray with nonstick spray.
  2. In a medium bowl, whisk together flour, baking powder and salt. Set aside.
  3. In a separate bowl, whisk together pureed strawberries, lemon zest, milk and vanilla. Also set aside.
  4. In a large bowl, beat together applesauce, sugar and egg substitute. Add egg whites one at a time, beating after each, until combined. Alternate between adding the dry ingredients and the wet strawberry ingredients to the sugar mixture, starting and ending with the dry ingredients. Mix until just combined.
  5. Evenly divide batter between prepared cupcake tins (I used a cookie scoop). Bake for 25-27 minutes or until golden, and a toothpick inserted in the center comes out clean. Transfer immediately to wire racks to cool completely.
  6. Meanwhile, in a large bowl , beat cream cheese on medium speed until smooth. Add vanilla extract.
  7. Add in powdered sugar 1/2 cup at a time, beating on low speed, followed by cocoa powder.
  8. Increase to medium speed and add melted chocolate. Beat until smooth, scraping down sides of bowl often.
  9. Frost completely cooled cupcakes, then top with sprinkles if desired.


Filed Under: Cupcakes, Dessert · Tagged: chocolate, cupcakes, dessert, recipe, strawberry, whole grain

Bacon Chocolate Chip Pancakes

May 23, 2012 · by Ari ·

Yup.

.

That happened.

You guys…I don’t even know what to say. These should have had like a zillion calories. With the name, and the deliciousness, and the whole eating dessert for breakfast thing. But really, a little dark chocolate is good for us, yes?

Okay, so I’m not about to switch out my Greek yogurt, pumpkin puree, chopped apple weirdness and turn bacon chocolate chip pancakes into my staple breakfast, but on a Sunday morning? Hell, yes.

I’m really sad you weren’t here to share in the fun. Although, I bet Steve and Jason are not in the least bit sad, because it meant more pancakes for them.

Sweet, salty, fluffy, melt in your mouth pancakes that will satisfy every single breakfast craving you’ve ever experienced. And just a little hint: whole wheat pastry flour is the secret to perfect whole grain pancakes. Do not used regular. Do not use white whole wheat. And please, do not think you need to add in bleached out white flour.

Oh, and my final instructions: Save that middle section with the most chocolate for last. It will be the best bite.

Bacon Chocolate Chip Pancakes

yield 6 servings

  • 2 cups whole wheat pastry flour
  • 2 tsp baking powder
  • 2 tsp baking soda
  • dash salt
  • 2 tsp sugar free maple syrup (or honey, agave, or pure maple syrup)
  • 1/2 cup egg substitute
  • 2 cups unsweetened almond milk
  • 1 tsp vanilla extract
  • 6 slices center cut or turkey bacon, cooked, chopped and cooled
  • 1/2 cup all natural dark chocolate chips

Directions:

  1.  In a large bowl, whisk together flour, baking powder, baking soda and salt. Gently mix in syrup, egg substitute, milk, and vanilla, stirring until just combined. Then fold in cooked bacon and chocolate chips. Let stand for 10 minutes.
  2. Preheat a large pan over medium heat, and spray with nonstick cooking spray. Pour approx 1/4 cup batter for each pancake. Cook until top forms small bubbles and bottom is golden brown. Flip and continue cooking until both sides are golden.
  3. Serve topped with any combination of Greek yogurt/syrup/light whipped butter

Filed Under: Breakfast · Tagged: bacon, breakfast, chocolate, pancakes, recipe, whole grain

French Onion Pizza

May 22, 2012 · by Ari ·

Trader Joe’s whole wheat pizza crust, WHERE HAVE YOU BEEN ALL MY LIFE?!?!?!

Why, yes, I would like some of the most delicious pizza ever made by me at home in about 20 minutes. Thanks for the help TJ’s!

So a couple of weeks ago I told Steve that I wanted to make french onion grilled cheese sandwiches. I was so excited about this brilliant idea. Obviously no one has ever done that before. Then the next day pretty much every popular food blogger out there stole my idea. Not cool, people. They clearly read my mind, and took my brilliance to claim as there own. Suffice it to say, I didn’t make those sandwiches.

Instead, I made pizza. Delicious, sweet oniony, garlicy pizza that I wanted to scarf down in one sitting. I seriously can’t believe it’s taken me this long to make my own pizza! I already have approximately 500 more pizza ideas that I want to create now. I may have a problem, but once you try it, you will see! You will be hooked, and there is no turning back!

French Onion Pizza

yield 6 servings

  • 1 package refrigerated whole wheat pizza dough (I used the Trader Joe’s kind, and would highly recommend it!)
  • 2 medium red onions, chopped
  • 2 cloves garlic, finely chopped
  • 1 tbs + 1 tsp olive oil, divided
  • 3-4 tbs beef broth, divided (you could also sub veggie broth to make it vegetarian)
  • 1 tbs balsamic vinegar
  • 1/2 cup freshly grated part skim mozzarella cheese
  • 1/2 cup freshly grated gruyere cheese
  • freshly ground pepper

Directions:

  1. In a large pan over medium heat, cook onions and garlic in 1 tbs olive oil and 1 tbs beef broth. Season with pepper and cook until onions are browned and caramelized (about 15 minutes).
  2. Spray a medium cookie sheet with nonstick spray, then roll dough out using a rolling pin to fill out the sheet.
  3. In a small bowl, whisk together 1 tsp olive oil, 2-3 tbs beef broth, and 1 tbs balsamic vinegar. Brush onto rolled out dough, then top with cooked onions and garlic, and cheeses. Top with extra ground pepper if desired.
  4. Cook according to instructions on the prepared pizza dough package.

Filed Under: Entree, pizza · Tagged: dinner, easy recipe, french onion, pizza, recipe, whole grain

« Previous Page
Next Page »
Image Map

Popular Posts

Tart Cherry Margaritas: The perfect, refreshing margarita--lightly sweet with a punch of tequila

Tart Cherry Margaritas

90+ Healthy Recipes for Breakfast, Lunch, Dinner & Dessert

90+ Healthy Recipes for Breakfast, Lunch, Dinner & Dessert

The Ultimate Peanut Butter Cup Brownie Cookies: Rich, fudgy, brownie-like chocolate cookies stuffed with melty peanut butter cups!

Ultimate Peanut Butter Cup Brownie Cookies

Drink & Dish: Cafe Au Lait Cupcakes

Crockpot Chicken Enchilada Soup

Subscribe via Email:

Enter your email address:

Save an additional $30 on Blendtec Factory Recertified Blenders + Free Shipping

Featured Here

recipe redux
Certified Yummly Recipes on Yummly.com

Member Of…

FitFluential Is Fitness Found
AZ Bloggers Network
az 150 photo az150_zpsfb093d32.gif

Archives


Image Map

Copyright © 2025 | Innovative Child Theme by The Pixelista | Built on the Genesis Framework


Loading Comments...