• Going Out
    • Phx Restaurants
    • How To Order At Starbucks
  • Running
    • My Running Story
    • Race Calendar
    • Race Recaps & Results
  • Blogroll
  • Bucket List
  • Video

Ari's Menu

Little changes making a big difference.

  • Home
  • Recipes
  • Weight Loss
    • My Story
    • Common Swaps
  • Who’s Who
  • Contact
    • Policies & Disclosure
  • Press

3 Cheese Apple Cranberry Pizza

July 14, 2012 · by Ari ·

I don’t know about you, but my taste buds totally change in the summer time. Most of my favorite foods (other than fro yo which is 100 times better in the summer) are hot and cheesy, and just don’t sound good when it’s 115 outside.

Well, this pizza is still hot and cheesy, so it wins for taste, but it is also fruity and refreshing which is perfect for the summer heat!

Confession: My favorite pizza used to be the kind that got delivered. Greasy, drippy Pizza Hut or Dominoes pizza was a staple in my diet, and something I continued to crave until I realized that pizza didn’t have to be off limits. That was like the best day of my life–when I started eating pizza again. Maybe I should be embarrassed by that?

Oh, whatever, I don’t care–I LOVE PIZZA!!! And I am now head over heels for making my own pizza, and how ridiculously easy it is! You just put whatever you want on top of some dough…

Then toss it in the oven!
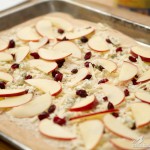
Taaaaaddddaaaa!

3 Cheese Apple Cranberry Pizza

yield 6 servings

  • 1 package refrigerated whole wheat pizza crust
  • 3/4 cup fat free ricotta cheese
  • 1/4 cup nonfat plain Greek yogurt
  • 2-3 tbs unsweetened almond milk
  • 1 tbs fresh rosemary leaves, finely chopped
  • 1 tbs balsamic vinegar
  • 1/2 cup part skin mozzarella
  • 1.5 oz herbed goat cheese, crumbled
  • 1 apple, thinly sliced
  • 1/4 cup dried cranberries

Directions:

  1. Spray a medium-large cookie sheet with nonstick spray, then roll dough out using a rolling pin to fill out the sheet.
  2. In a small bowl, whisk together ricotta, Greek yogurt, milk, rosemary, and balsamic vinegar. Spread evenly onto rolled out dough, then top with mozzarella and goat cheese, followed by apple slices and dried cranberries.
  3. Cook according to instructions on the prepared pizza dough package.

Filed Under: Dinner, Entree, Fall, Holiday & Seasonal, pizza, savory, Vegetarian, Winter · Tagged: dinner, easy recipe, fruit, pizza, recipe, whole grain

BBQ Ranch Turkey Burgers

June 5, 2012 · by Ari ·

Once upon a time, ranch dressing was my food of choice. Have I ever mentioned my undying love for french fries dipped in ranch? I actually used to eat cheese fries dipped in ranch. From Denny’s. Clearly, I’ve always been an example of clean, intuitive eating. What body doesn’t need cheese fries dipped in ranch?!?! Freaks. Weirdos. Crazies.


You know what else ranch is delicious on? Pizza. Is that weird? Maybe. I swear, unless it was ice cream, I put ranch on it. Ice cream is good enough on its own, I guess. Actually, it’s probably the only food I loved more than ranch and cheese. Mmmmmmmm, ice cream. Okay, but seriously. Burger. Barbecue. Bacon. Ranch. Heaven. Just like you’d find at any burger joint.

Only, you know, more delicious. And minus the side of heart attack 😉

This is one of my favorite ways to cook. Taking my favorite meals from my unhealthier days, and turning them into something equally (and often more) delicious that I can feel good about enjoying! I spent a long time thinking that eating healthy meant I had to give up everything I loved, and that healthy food would be gross, and unsatisfying, but I have proven myself wrong time, and time again. These burgers are no exception–they taste like comfort food, and leave you feeling energized, rather than weighed down. Perfect for summer!

BBQ Ranch Turkey Burgers

yield 5 servings

  • 20 oz lean ground turkey (at least 93%, but 99% ground turkey breast is the best)
  • 1 tbs egg substitute
  • 1/4 cup + 2 tbs all natural barbecue sauce, divided
  • 1/2 cup finely chopped red onion + more for topping
  • 3 slices center cut bacon, cooked and chopped + (extra slices for topping–optional)
  • freshly ground salt & pepper
  • 1/3 cup nonfat plain Greek yogurt
  • 1-2 tsp ranch seasoning
  • 5 100% whole grain buns (whole wheat, brown rice, etc.), toasted

Directions:

  1. Preheat grill. In a large bowl, combine ground turkey, egg substitute, 2 tbs barbecue sauce, 0nion, chopped bacon, salt and pepper. Thoroughly combine, and form into 5 even patties.
  2. Grill until cooked throughout (approx 5 minutes per side). Meanwhile, in a medium bowl, Greek yogurt, 1/4 cup barbecue sauce, and ranch seasoning. Mix until well combined.
  3. Place cooked patties on toasted wheat buns, then top with barbecue ranch sauce, bacon, onions, and any other desired toppings (lettuce, tomato, cheese, bell pepper, etc.)


Filed Under: Dinner, Entree, Gluten-free, Lunch, savory, Summer · Tagged: burger, dinner, grilling, recipe, summer

Thai Peanut Turkey Burgers

May 29, 2012 · by Ari ·

So I’ve been really mad that it’s summer time. Lots of whining and complaining about the heat, and how it affects my running, and blah blah blah. But I forgot how much I LOVE some things about summer! Like burgers!

And swimming!

Tuesday evening, Jason came over with my dog niece and nephew, and we seriously had the best time playing around outside with the puppies. They got so hyped up about the pool!

Nico and Winston have a love connection. They will play for hours on end.

Every time Jason was in the pool and would make eye contact with Nico, she would immediately go crazy and start barking, and then all the other dogs would start going crazy too.

Clementine is hiding under the chair. She wants to play, but she’s scared. It’s hard to be a Clementine.

Anyway, before all the fun dog playing, there were seriously amazing, delicious burgers.

Made with extra lean ground turkey, and homemade Thai peanut sauce.

Savory and spicy, with just a hint of sweetness.

Have I ever mentioned how much I also love Thai food? Give me some take out Chicken Pad Thai with extra cilantro, and I am a happy girl. I used to eat it all the time because someone told me Thai food was healthy once. Now, I figure out my own ways to use the flavors that are actually healthy, and not 7 servings of noodles 😉

Also, if you are one of those people who loves a beef burger, and thinks turkey burger are dry and gross (ahem…Steve), try these turkey burgers. I haven’t always loved the ones I’ve made at home (why do they never seem to turn out like the one at Zin Burger??), but I absolutely freaking love these. Like I can’t wait to make them every day for the rest of the summer my life kind of love.

Thai Peanut Turkey Burgers

yield 5 servings

  • 20 oz ground turkey breast
  • 1 tbs egg substitute
  • 1/2 cup diced onion + more for topping
  • 1/2 cup diced red bell pepper + more for topping
  • 2 tbs chopped fresh cilantro + more for topping
  • 1 tbs peanut butter
  • 1 tbs Better’n Peanut Butter (or pb2, or more regular peanut butter)
  • 1 tbs reduced sodium soy sauce (use gluten-free is applicable)
  • 1 1/2-2 tsp chili paste
  • 1 tbs fresh lime juice
  • 1/2 cup nonfat plain Greek yogurt
  • 1 tsp honey
  • 1/2-1 tbs Sriracha
  • 5 100% whole grain hamburger buns (whole wheat, brown rice, etc.), toasted
  • crushed peanuts, sliced scallions, and bean sprouts for topping

Directions:

  1. Preheat grill. In a large bowl, combine ground turkey breast, egg substitute, onion, bell pepper, and cilantro. Set aside.
  2. In a medium bowl, combine peanut butter, Better’n Peanut Butter, soy sauce, chili paste, lime juice, and honey. Pour 2 tsp of sauce mixture into turkey mixture, and set the rest aside.
  3. Thoroughly combine turkey mixture and sauce (I recommend getting in there with your hands!), and form into 5 even patties. Press lightly in the center of each patty with your thumb, so they are slightly thicker on the edges to ensure even cooking.
  4. Send your husband outside to Grill until cooked throughout (approx 5 minutes per side). Meanwhile, add Greek yogurt and Sriracha to leftover peanut sauce, and mix until well combined.
  5. Place cooked patties on toasted wheat buns, then top with yogurt peanut sauce, crushed peanuts, sliced scallions, bean sprouts, and extra onions, bell peppers and cilantro.

Filed Under: Dinner, Entree, Gluten-free, Lunch, Sandwiches, savory, Summer · Tagged: burger, clementine, dinner, grilling, recipe, summer, thai, winston

French Onion Pizza

May 22, 2012 · by Ari ·

Trader Joe’s whole wheat pizza crust, WHERE HAVE YOU BEEN ALL MY LIFE?!?!?!

Why, yes, I would like some of the most delicious pizza ever made by me at home in about 20 minutes. Thanks for the help TJ’s!

So a couple of weeks ago I told Steve that I wanted to make french onion grilled cheese sandwiches. I was so excited about this brilliant idea. Obviously no one has ever done that before. Then the next day pretty much every popular food blogger out there stole my idea. Not cool, people. They clearly read my mind, and took my brilliance to claim as there own. Suffice it to say, I didn’t make those sandwiches.

Instead, I made pizza. Delicious, sweet oniony, garlicy pizza that I wanted to scarf down in one sitting. I seriously can’t believe it’s taken me this long to make my own pizza! I already have approximately 500 more pizza ideas that I want to create now. I may have a problem, but once you try it, you will see! You will be hooked, and there is no turning back!

French Onion Pizza

yield 6 servings

  • 1 package refrigerated whole wheat pizza dough (I used the Trader Joe’s kind, and would highly recommend it!)
  • 2 medium red onions, chopped
  • 2 cloves garlic, finely chopped
  • 1 tbs + 1 tsp olive oil, divided
  • 3-4 tbs beef broth, divided (you could also sub veggie broth to make it vegetarian)
  • 1 tbs balsamic vinegar
  • 1/2 cup freshly grated part skim mozzarella cheese
  • 1/2 cup freshly grated gruyere cheese
  • freshly ground pepper

Directions:

  1. In a large pan over medium heat, cook onions and garlic in 1 tbs olive oil and 1 tbs beef broth. Season with pepper and cook until onions are browned and caramelized (about 15 minutes).
  2. Spray a medium cookie sheet with nonstick spray, then roll dough out using a rolling pin to fill out the sheet.
  3. In a small bowl, whisk together 1 tsp olive oil, 2-3 tbs beef broth, and 1 tbs balsamic vinegar. Brush onto rolled out dough, then top with cooked onions and garlic, and cheeses. Top with extra ground pepper if desired.
  4. Cook according to instructions on the prepared pizza dough package.

Filed Under: Entree, pizza · Tagged: dinner, easy recipe, french onion, pizza, recipe, whole grain

Buffalo Chicken Meatloaf

May 20, 2012 · by Ari ·

I am such a sucker for anything with buffalo sauce.

I guess I am just a person who loves strong flavors. Spicy food, sharp cheeses, anything really with bold flavors. I do not like plain pasta with olive oil. I am easily bored in life and food, so I need flavors that do a little performance for my taste buds. Is that weird?

Wait. Don’t answer that. I already know I’m weird. Anyway, I’ve never made meatloaf with chicken before. In fact, I’ve never even used ground chicken until now. It’s pretty awesome, and opens up a lot of flavor combinations! You know I love my ground turkey, but who ever heard of buffalo turkey? That doesn’t sound nearly as cool.

I made kale with it. I’m sure you’re shocked.

This meatloaf was full of bold buffalo flavor, and was different than any type I’ve ever tasted! I wonder just how many more foods I can put buffalo sauce in? 😉

Buffalo Chicken Meatloaf

yield 5 servings

  • 1 1/4 lb lean ground chicken
  • 1/2 cup egg substitute
  • 2/3 cup unsweetened almond milk
  • 1/4 cup buffalo sauce
  • 2/3 cup raw oats
  • 1/2 cup finely chopped onion
  • generous pinch ground pepper

For the buffalo ranch sauce:

  • 2/3 cup nonfat Greek yogurt
  • 1/3 cup buffalo sauce
  • 2 tsp ranch seasoning

Directions:

  1. Preheat oven to 400. Line a medium loaf pan with tin foil, and spray with nonstick cooking spray. Set aside.
  2. In a large bowl, whisk together egg substitute, almond milk, buffalo sauce, and pepper. Mix in onion and oats.
  3. Add meat **this is the fun part!!** and use your hands to thoroughly combine.
  4. Transfer meet to prepared loaf pan and bake for 1 hour, until cooked throughout.
  5. Meanwhile, in a small bowl, whisk together all sauce ingredients.
  6. Serve meatloaf topped with buffalo ranch sauce.

Filed Under: Entree, Gluten-free · Tagged: buffalo, chicken, dinner, meatloaf, recipe

Caramelized Onion Rosemary Biscuits

May 17, 2012 · by Ari ·

Soft and fluffy whole grain biscuits stuffed with caramelized onions and fresh rosemary.

I remember when I was living with Heather in Moscow, and she made roasted garlic and rosemary bread. It was pretty amazing. So amazing that when I was deciding what type of bread to make for Mother’s Day to go along side my Skinnified Fettucine Alfredo, it was the first thing that came to mind.

Let’s talk about these biscuits, because I really cannot get enough of them. You would expect a 100% whole wheat biscuit to be dense and heavy, right? Well these babies were fluffy while still full of hearty wheat flavor.

Aren’t they pretty with butter? Honestly though, they don’t need any.

I would eat them in a boat. I would eat them with a goat.

I will eat them here or there. I will eat them anywhere! Yes, I just quoted Dr. Seuss. Don’t judge. Okay, but seriously, carmelized onions, sauteed garlic, and fresh rosemary? You can’t go wrong. These biscuits are full of flavor, and taste like the bread basket from a fancy Italian restaurant. My mom was super impressed. She kept calling them professional. Thanks mom! 😉

Print
Caramelized Onion Rosemary Biscuits

Prep Time: 30 minutes

Cook Time: 40 minutes

Total Time: 4 hours

Yield: 1 dozen

Serving Size: 1 biscuit

Caramelized Onion Rosemary Biscuits

Soft and fluffy whole grain biscuits stuffed with caramelized onions and fresh rosemary.

Ingredients

  • 1 large sweet onion, chopped
  • 2 large cloves garlic, minced
  • 1 tbs light whipped butter
  • 1 1/2 cup warm water
  • 3 tsp active dry yeast
  • 1 tablespoon honey
  • 3 tablespoons olive oil, plus more for coating bowl
  • 2 cups whole wheat pastry flour
  • 2 cup white whole wheat flour
  • 2 teaspoons sea salt
  • leaves from 2 sprigs rosemary, finely chopped
  • 1 egg white, lightly beaten

Instructions

  1. Sauté onions and minced garlic in the butter over medium heat. Cook until brown and caramelized, about 15 to 20 minutes. Allow to cool for a few minutes.
  2. Pour warm water into a bowl. Sprinkle yeast on top. Add the honey and olive oil. Stir gently with a fork until combined. Set aside.
  3. In a medium bowl, combine flours and salt. Add cooked and cooled onions, rosemary, and water mixture, stirring gently until dough is combined.
  4. Knead in stand mixer using hook attachment (or by hand 15-20 times on a floured surface) until bread sticks together on the hook when lifted.
  5. Spray a separate bowl generously with nonstick spray, then add your ball of dough, turning to coat. Cover with a towel and place in a warm spot for 1 1/2 to 2 hours (I put it outside--it's 105 in Phoenix).
  6. Preheat oven to 400 degrees. Divide dough into twelve round biscuits. Place on a baking mat or parchment paper, then cover with a towel and allow to rise for 15 to 20 minutes. Bake for 18 to 20 minutes or until brown. Brush with beaten egg white halfway through.
3.1
https://arismenu.com/caramelized-onion-rosemary-biscuits/


Filed Under: Appetizers, Breads & Muffins, Fall, Holiday & Seasonal, savory, Side Dish · Tagged: baking, biscuit, bread, dinner, onions, recipe, rosemary, side dish, whole grain

Spaghetti & Spinach Avocado “Pesto”

May 7, 2012 · by Ari ·

I used to be a really picky eater. Okay, who am I kidding…I am a really picky eater, but now I’m picky differently. I actually do like almost everything, but there was a time where anything green was immediately vetoed.

These days, I see green things and I think GET IN MY BELLY!! Seriously. I freaking love vegetables. It’s kind of ridiculous. Sometimes Steve calls me a rabbit because I eat so many veggies. There are worse things to love, right?

I actually didn’t intend for this to be a pesto. The original recipe didn’t call it a pesto, but I was surprised that, at least in my weird-o taste buds, it tasted just like delicious, oily, cheesy pesto sauce!

You guys, I freaking love pesto sauce. I also used to think it was healthy. Because it was green and not alfredo sauce. But let’s be real friends, the main ingredient is olive oil. And yes, olive oil is good in moderation, but when you like your noodles like me–sauce with a side of pasta, it adds up real quick.

So I was happy and surprised when this dish tasted just like a creamy pesto sauce! I made it for Steve, my mom, Hank and Charlie, and everyone was a huge fun!

Spaghetti & Spinach Avocado “Pesto”

yield 5 servings

adapted from Perry’s Plate’s Creamy Spinach Avocado Pasta

  • 10 oz box whole grain spaghetti (whole wheat, brown rice, quinoa, etc.)
  • 1/2 tbs light whipped butter
  • 3 cloves garlic, minced
  • 6-8 oz baby spinach
  • salt and pepper to taste
  • 1/3 cup nonfat plain Greek yogurt
  • 1 avocado, peeled, pitted, and cubed
  • 1 tbs dried rosemary
  • 1 oz bleu cheese
  • 2 tbs freshly grated parmesan cheese

Directions:

  1. Cook pasta according to package instructions. When it’s finished, drain, setting aside 1 cup starchy cooking liquid. Set pasta and reserved liquid aside.
  2. In a large, high rimmed saucepan, melt the butter over medium heat. Add garlic and cook for about 1-2 minutes.
  3. Add salt, pepper, and spinach to the saucepan. Cover and reduce heat to medium-low. Cook 4-5 minutes or until the spinach is completely wilted.
  4. Transfer spinach and garlic to a medium mixing bowl. Add yogurt, avocado, dried rosemary, and 1/2 cup reserved pasta water. Stir lightly, then blend using an immersion blender (or transfer to full blender or food processor).
  5. Transfer sauce back to pan, and stir in cheeses. If sauce is too thick, add extra pasta water until is reaches your desired consistency.
  6. Add cooked pasta and toss thoroughly to combine. Serve and top with extra parmesan if desired.

Filed Under: Entree, Gluten-free, Pasta, Vegetarian · Tagged: avocado, dinner, pasta, pesto, spinach, whole grain

Spinach Artichoke Mac & Cheese

May 1, 2012 · by Ari ·

Honestly, is it ever too early to start carb-o loading?

I think not. I really can’t believe I didn’t think of this sooner. There aren’t many things I love more than mac & cheese and spinach artichoke dip. Or just anything including cheese 😉

In fact, when I was younger and I started to get full, I would just pick any remaining cheese out of whatever dish I was eating. Hey, I never said there wasn’t a reason  I was 80 lbs overweight. Clearly, I cannot give up cheese forever. I tried once, and I think I lasted 36 hours. Therefore, it is clearly necessary for me to create creamy, cheesey dishes like this baby.

This mac & cheese is creamy, filling and full of flavor, but doesn’t leave you feeling heavy and overly full at the end. Instead of tons of pasta, it’s packed with veggies!

Also, start to finish is about 15 minutes. Yes please.


Spinach Artichoke Mac & Cheese

yield 6-8 servings

  • 8 oz dry whole grain pasta of choice
  • 1/2 tbs light whipped butter
  • 3 cloves garlic, minced
  • 8 oz reduced fat cream cheese
  • 1 cup unsweetened almond milk
  • 1 oz herbed goat cheese
  • 1/4 cup freshly grated parmesan cheese
  • 2 tsp lemon pepper
  • salt to taste
  • 10 oz package frozen spinach, thawed (you could easily use fresh as well)
  • 2 cans artichoke hearts, chopped

Directions:

  1. Place butter and garlic in a large, high rimmed pan over medium heat. Cook until fragrant (about 2-3 minutes).
  2. Add cheeses, milk, salt and pepper and whisk together until everything melts together in a creamy sauce. When sauce has come together, stir in spinach and artichoke hearts.
  3. Meanwhile, cook pasta according to package instructions. When fully cooked, drain and transfer into sauce.
  4. Toss pasta and sauce until fully combined, and serve.


Filed Under: Entree, Gluten-free, Pasta, Vegetarian · Tagged: artichokes, dinner, mac and cheese, pasta, recipe, spinach

Skinnified Sunday: “Fettuccine” Alfredo

April 29, 2012 · by Ari ·

My family loves Italian food. In fact, our birthday celebration of choice happens every year at Avanti–the best Italian restaurant in Phoenix, in my humble opinion. They have a 3 way pasta combination that is ridiculous. There is always a set 3 things on it, but they always let us modify it and order it however we want. My pasta plate of choice: gnocchi cardinale, angel hair fried diablo, and of course fettuccine alfredo. Their alfredo sauce is thick, creamy and buttery. It sticks to the fettuccine perfectly so in every bite you get maximum sauce, and a little bit of heaven.

There are some things I just don’t eat these days, regardless of the occasion. And I’m not saying you shouldn’t. I’m just saying, for me, it doesn’t seem worth it. But you know what does seem worth it? Recreating my own that is just as delicious (seriously!) with a fraction of the calories.

Okay, seriously. I did not expect my first go at this to be a success. I kept tasting the sauce as I was cooking and shouting to Steve “Oh my gosh!!! It tastes like alfredo sauce!!!!!”

“Isn’t that the point?” He didn’t seem to get my amazement that it actually worked. I made legit tasting fettuccine alfredo. My days of drooling over creamy alfredo sauce are back my friends and they don’t leave me feeling the gross heaviness in my stomach!

Also, did I mention it’s gluten free? Carolyn, wanna come over for dinner?


Skinnified “Fettuccine” Alfredo’

yield 4 servings

  • 1 large spaghetti squash, split lengthwise and seeded
  • 2 tsp olive oil
  • 3-4 large cloves garlic, minced
  • 1/2-1 tbs light whipped butter
  • 8 oz reduced fat cream cheese
  • 3/4 cup unsweetened almond milk
  • 1/3 cup white wine (optional, otherwise sub more almond milk)
  • 1/3 cup freshly grated parmesan cheese
  • salt & pepper to taste
  • fresh parsley for garnish (optional)

Directions:

  1. Preheat oven to 400. Drizzle the center of each half of split and seeded spaghetti squash with 1 tsp olive oil. Using your fingers, rub oil evenly into squash. Season with salt and pepper.
  2. Place spaghetti squash in a large baking dish center down, and bake for 1 hour.
  3. About 40 minutes into baking, begin your sauce. Place minced garlic and butter in a large pan with fairly high edges over medium heat. Cook for 3 minutes until garlic is fragrant. Add cream cheese, milk, wine, and parmesan cheese. Using a whisk, stir constantly. Add salt and pepper.
  4. When spaghetti squash is finished (center should be tender and come apart when scraped lightly with a fork), use a fork to scrape out the insides. They will come out looking just like spaghetti.
  5. Make sure all sauce ingredients are thoroughly combined, and transfer the squash “noodles” to your sauce. Use cooking tongs to toss and coat squash thoroughly.
  6. When thoroughly combined, serve and top with fresh parsley.

Filed Under: Entree, Gluten-free, Low Carb, Pasta, Vegetarian · Tagged: dinner, fettuccine alfredo, gluten free, italian, recipe, skinnified, spaghetti squash, vegetarian

« Previous Page
Image Map

Popular Posts

Tart Cherry Margaritas: The perfect, refreshing margarita--lightly sweet with a punch of tequila

Tart Cherry Margaritas

90+ Healthy Recipes for Breakfast, Lunch, Dinner & Dessert

90+ Healthy Recipes for Breakfast, Lunch, Dinner & Dessert

The Ultimate Peanut Butter Cup Brownie Cookies: Rich, fudgy, brownie-like chocolate cookies stuffed with melty peanut butter cups!

Ultimate Peanut Butter Cup Brownie Cookies

Drink & Dish: Cafe Au Lait Cupcakes

Crockpot Chicken Enchilada Soup

Subscribe via Email:

Enter your email address:

Save an additional $30 on Blendtec Factory Recertified Blenders + Free Shipping

Featured Here

recipe redux
Certified Yummly Recipes on Yummly.com

Member Of…

FitFluential Is Fitness Found
AZ Bloggers Network
az 150 photo az150_zpsfb093d32.gif

Archives


Image Map

Copyright © 2025 | Innovative Child Theme by The Pixelista | Built on the Genesis Framework


Loading Comments...