Have you ever met those people that say they don’t like spicy food? I don’t understand them. Maybe it’s because I live in Arizona, and Mexican restaurants are more prominent than Starbucks.

Or maybe it’s because I’m one of those people who needs food with a LOT of flavor. I have friends that like their food plain as can be. No sauces, no condiments. I just don’t get it! I’m that person in the kitchen grabbing every spice off the rack, and then still adding more once I plate my food. I love bold flavors, and I’m easily bored by foods other people seem to love.

Like mozzarella sticks. I just don’t get it. They just taste like frying oil and cheese, and while I love cheese, I think mozzarella (unless you buy the really good stuff) is pretty boring. Now a fried goat cheese stick would be an other story. Or bleu cheese. mmmmmm. I know most people hate bleu cheese, but it is the most flavorful cheese! Strong, bold and delicious–just the way I like it!

Okay, but back to this “spaghetti”. Let me tell you, I freaking LOVE spaghetti squash. It’s bordering on an obsession. Every time I think “I need to carb load, I’ll make pasta” the next thought that comes to mind is “OOOHH! I’ll use spaghetti squash!” Then I realize that kind of defeats the purpose. The thing is, pasta is really just a vehicle to get to sauce. You don’t really taste the pasta and think “MMMM this spaghetti is delicious and full of flavor! I could eat it by itself!” We just need something to get us to the sauce, like how you eat a carrot to get to the hummus! Spaghetti squash is the perfect vehicle, and cuts down the calories exponentially!

Honestly, if you’re on the fence, I dare you to try it. I promise you will never look back! Here, my favorite pasta vehicle takes you to a perfectly zesty and spicy meat sauce. I would choose this over an Italian restaurant any day of the week. I always leave pasta dinners feeling overly full or just kind of disappointed. This dinner is so filling and satisfying while still leaving you feeling awesome! And, it’s just lean protein and veggies, so it’s a great excuse to eat some garlic bread, or have dessert after 😉
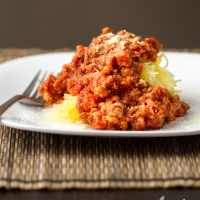
Spicy “Spaghetti” & Meat Sauce
yield 4-6 servings
- 1 large spaghetti squash
- 1 1/2 tbs olive oil, divided
- 1 onion, chopped
- 4 cloves garlic, chopped
- 20 oz 99% lean ground turkey breast (you can also use the 93-94% or 96% lean ground beef)
- 1 28oz can crushed tomatoes
- 1 tsp dried oregano
- 1 tsp fresh or dried basil
- 2 tsp crushed red pepper (more or less depending on desired spiciness)
- salt and pepper
- freshly grated parmesan cheese for serving (optional)
Directions:
- Preheat oven to 400. Slice spaghetti squash length wise and scrape out the seeds. Rub 1/2 tbs olive oil into squash and season with salt and pepper. Place spaghetti squash face down in a large baking dish and bake for approx 1 hour. Check at 40 minutes. When squash is done, middle will be tender and pull apart easily.
- In a large pan, sautee onion and garlic in 1 tbs olive oil over medium heat until fragrant. Add ground turkey. Season with salt and pepper and cook until browned. Add crushed tomato and remaining spices. When sauce starts to bubble, reduce heat to a simmer until thickened (about 3-4 minutes).
- When spaghetti squash is fully cooked, scrape out insides with a fork and serve topped with spicy meat sauce and parmesan cheese.