• Going Out
    • Phx Restaurants
    • How To Order At Starbucks
  • Running
    • My Running Story
    • Race Calendar
    • Race Recaps & Results
  • Blogroll
  • Bucket List
  • Video

Ari's Menu

Little changes making a big difference.

  • Home
  • Recipes
  • Weight Loss
    • My Story
    • Common Swaps
  • Who’s Who
  • Contact
    • Policies & Disclosure
  • Press

Peppermint Bark Cookies

December 3, 2013 · by Ari ·

Rich, chocolatey cookies overflowing with pieces of sweet, crunchy peppermint bark, topped with crushed candy canes–a chocolate and peppermint lover’s dream! Peppermint Bark Cookies 
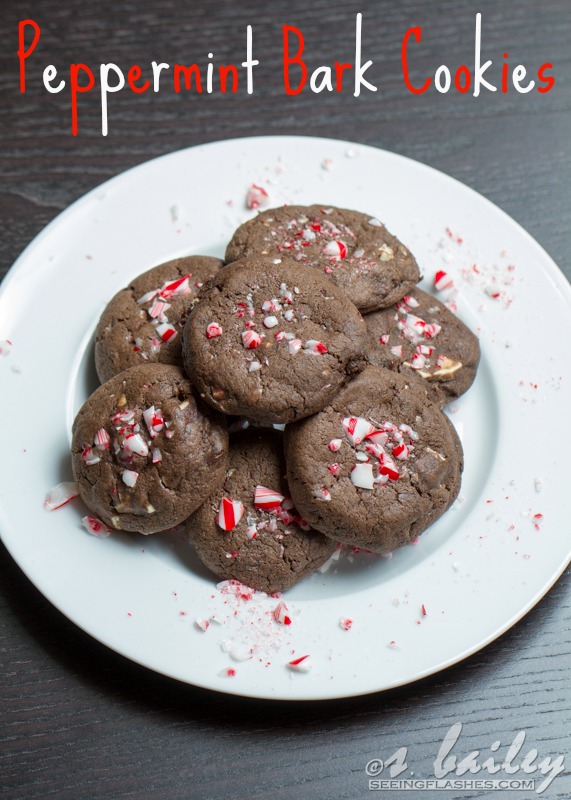
On a whim, I decided to buy a bag of peppermint bark baking bits at TJ’s. I knew it probably wasn’t the greatest idea. I took it out of my basket more than once, but I just kept imagining all of the wonderful things I could bake with it! Peppermint Bark Cookies 
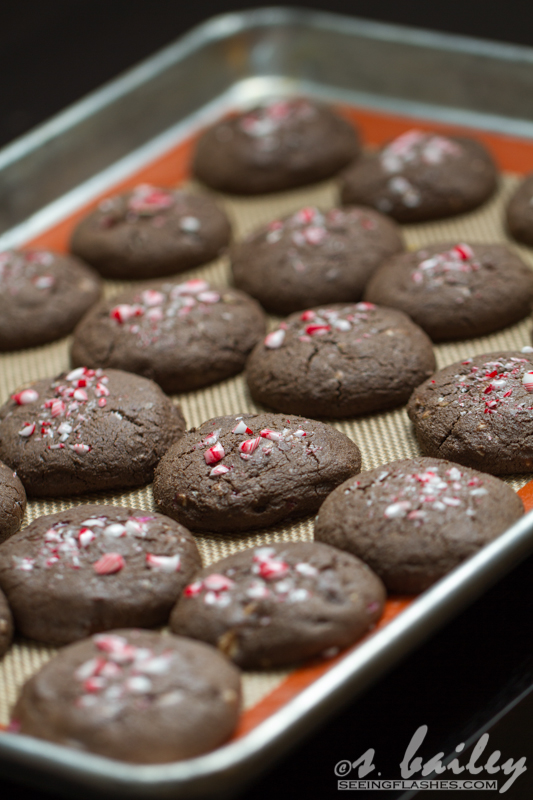
I LOVE peppermint bark. Every year, it’s pretty much the biggest act of willpower to stop myself from buying a bag of the Ghiradelli peppermint bark, and eating the whole thing in one sitting. Buying the bag to eat a few in “moderation” isn’t even an option. I figured at least these ones were chopped into reallllly tiny pieces. Plus, when I bake, I give things away. If I try to give away the store bought candy I just purchased, I feel a little silly. Peppermint Bark Cookies 
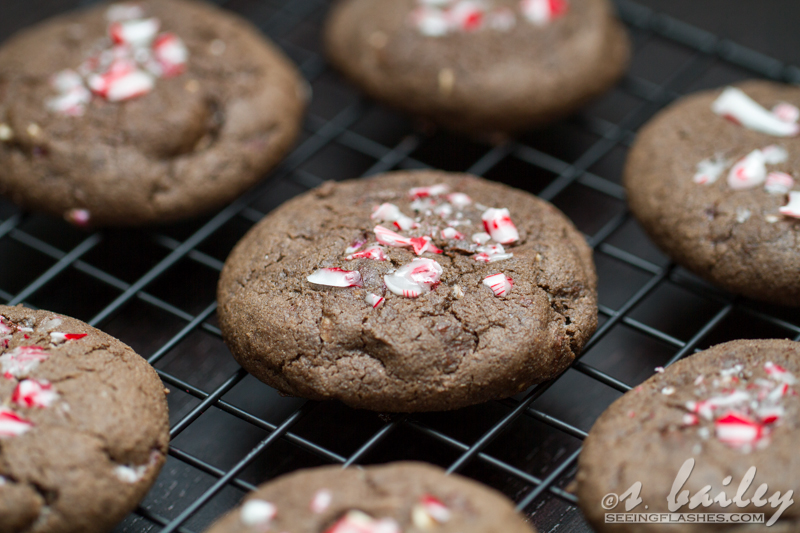
So I bought this bag of baking chips, and I was trying to decide what to do with it. Then I looked at the back of the bag, and there was a recipe. A recipe that called for use of the entire bag. Perfect. No bark left over means no pieces getting shoveled down my mouth by the handful. It’s a win-win situation. Peppermint Bark Cookies Especially when the cookies turn out ridiculous-stop-everything-I’ve-found-the-solution-for-all-the-world’s-problems-amazing. Peppermint Bark Cookies These cookies are soft, chewy and filled with delicious chocolate flavor, complemented by the bright refreshingly sweet peppermint, and topped with crunchy candy canes for some extra texture. To me, the secret to a perfect cookie comes in the texture combinations. A slight crunch on the outside with an extra soft, almost dough-like inside. Peppermint Bark Cookies And you know how I KNOW they were a success? I brought them to a showcase where a bunch of kiddos happily gobbled them down without any clue that they were eating health(ier) cookies. Kids are the best testers because they are ridiculously honest, and happy, chocolatey faces tell all. **Note: All photos on this post were taken by my husband. I made these last year before I was exclusively taking the photos for my site. I could make them again (they are so good), but his photos are gorgeous, so I decided to keep them. 🙂

Print
Peppermint Bark Cookies

Prep Time: 15 minutes

Cook Time: 10 minutes

Total Time: 25 minutes

Peppermint Bark Cookies

Rich, chocolatey cookies overflowing with pieces of sweet, crunchy peppermint bark, topped with crushed candy canes--a chocolate and peppermint lover's dream!

Ingredients

  • 1 and 3/4 cup white whole wheat flour (or gluten-free baking blend*
  • 1 tsp baking powder
  • dash salt
  • 1/4 cup cocoa powder (preferably Dutch process)
  • 1/2 cup light cream cheese
  • 1 and 1/3 cups brown sugar
  • 1/3 cup sugar
  • 2 eggs
  • 1 tsp vanilla extract
  • 1/2 tsp peppermint extract
  • 1 bag Trader Joe's peppermint bark baking bits
  • 1 candy cane, crushed

Instructions

  1. Preheat oven to 350. Prepare baking sheets with silpat or parchment paper. Set aside.
  2. In a medium bowl, whisk together flour, baking powder, salt and cocoa powder. Set aside.
  3. In a large bow, beat together cream cheese and sugars. Add eggs one at a time, beating until fully incorporated, then beat in extracts. Slowly beat in dry ingredients until fully incorporated. Fold in baking bits.
  4. Use a small cookie scoop to transfer dough onto prepared baking sheet. Press a pinch of crushed candy cane into the top of each dough ball. Bake for 10-14 minutes until set. Let stand for 5 minutes, then transfer to a wire rack to cool completely. Store fully cooled cookies in an airtight container for about 1 week.

Notes

*Recipe tested with white whole wheat flour, but I've subbed my gf blend in very similar recipes and it has worked great. You may need to reduce baking time, so check cookies around 7-8 minutes.

3.1
https://arismenu.com/peppermint-bark-cookies/

Filed Under: Cookies, Dessert, Gluten-free, Holiday & Seasonal · Tagged: chocolate, christmas, cookies, dessert, peppermint, recipe, seasonal, trader joe's, whole grain, winter

Dark Chocolate Sunflower Butter Truffles

December 2, 2013 · by Ari ·

Rich and intense dark chocolate sunflower butter truffles are perfect treat to bring to a Christmas party, and make a great edible gift! Vegan, gluten-free and filled with intense chocolate flavor!Dark Chocolate Sunflower Butter Truffles #vegan #glutenfree

I have a confession. After the first round of making these truffles, I officially swore off truffle making forever. Not because I wasn’t in love with them, but because I’m, um, a little…slow on the learning curve. At least with things like this. I don’t have that whole hand-eye-coordination thing, and tasks that require care and patients are realllllly not my thing.

Dark Chocolate Sunflower Butter Truffles #vegan #glutenfree

Then I tasted them. And I ate my words…in the form of an entire batch of truffles. Totally worth it. Dark Chocolate Sunflower Butter Truffles #vegan #glutenfree

So I did, in fact, make them again. andagainandagainandagain. Each time it got easier, and by the most recent batch, I even referred to it as “enjoyable” and “therapeutic”. WHO AM I???? It turns out, once you get the hang of it, they really don’t take that long. So pour yourself a glass of wine, put on your favorite holiday movie, and enjoy the process, because once you are finished and you take your first bite, I guarantee you will fall in love. Dark Chocolate Sunflower Butter Truffles #vegan #glutenfree

These truffles are so rich, and decadent. The deep flavor of dark chocolate mixed with creamy, nutty sunflower butter, topped with intense Dutch cocoa powder–it is a chocolate lover’s dream.

**Note: All photos on this post were taken by my husband. I made these last year before I was exclusively taking the photos for my site. I could make them again (they are so good), but his photos are gorgeous, so I decided to keep them. 🙂

Print
Dark Chocolate Sunflower Butter Truffles

Prep Time: 1 hour

Total Time: 2 hours

Yield: 3 1/2 dozen

Serving Size: 1 truffle

Dark Chocolate Sunflower Butter Truffles

Rich and intense dark chocolate sunflower butter truffles are perfect treat to bring to a Christmas party, and make a great edible gift! Vegan, gluten-free and filled with intense chocolate flavor!

Ingredients

  • 12 oz dark chocolate, melted
  • 1/3 cup sweetened condensed coconut milk, at room temperature (can sub regular sweetened condensed milk)
  • 1/3 cup sunflower butter
  • For coating:
  • 6 oz dark chocolate, melted
  • Approx 1 cup Dutch process cocoa powder for dusting (or Hershey's Special Dark)

Instructions

  1. In a large bowl, combine the 12oz melted dark chocolate, sweetened condensed coconut milk and sunflower butter until well combined. Refrigerate for 30 minutes.
  2. Line a large baking sheet with parchment paper, and use a small spoon or extra small cookie scoop to transfer chocolate mixture in approx 1/2" balls. If they don't look perfect and round right now, don't worry! Once all of the mixture has been transferred, refrigerate for 1 hour. You can stick them in the freezer as well.
  3. Once the truffles have chilled, roll each truffle in your hands until round and smooth. Melt 6 oz dark chocolate in a wide shallow bowl. Pour 1 cup cocoa powder in a similar wide and shallow bowl. Use a fork to roll each truffle in melted chocolate until fully coated then in cocoa powder. Once truffle is fully coated, use your fork to gently place it back onto lined baking sheet. Store in an airtight container in refrigerator or freezer.
3.1
https://arismenu.com/dark-chocolate-sunflower-butter-truffles/

Filed Under: Dessert, Gluten-free, Holiday & Seasonal, Truffles & Cups, Vegan · Tagged: candy, chocolate, dessert, gluten free, recipe, sunflower butter, truffles, vegan

DIY Brownie Mix Jars {gluten-free}

November 21, 2013 · by Ari ·

A simple, easy, DIY gift idea for rich and fudgey gluten-free brownie mix. So easy to make, and a perfect gift for anyone in your life who loves chocolate! Includes dairy-free & vegan options.

DIY Brownie Mix Jars #glutenfree

Every year I do a huge holiday baking day. I usually invite hermano to “help”, and he’ll mix a few things, and then he just lays around…that is until I need a taste tester. 😉

DIY Brownie Mix Jars #glutenfree

I do enjoy it, but I usually end the day totally exhausted and swearing off ever stepping foot in my kitchen again. And don’t even think about getting me to cook dinner. It always ends up being a Chipotle night, even though all I really ever want at the end is greasy, cheesy pizza. But let’s be honest, all I ever want is greasy, cheesy pizza. And chocolate. And fro-yo.

DIY Brownie Mix Jars #glutenfree

The truth is, DIY mixes are so expensive at places like Starbucks or the Hallmark store, and they seem like a novelty item, but they are really easy to put together, far less time consuming than huge batch baking, and really inexpensive. The biggest expense ends up being the jars, but if you go to the dollar store, a thrift store, or hit the clearance section of your craft store, you can get them very reasonably.

DIY Brownie Mix Jars #glutenfree

Not to mention, the store-bought mixes are loaded with refined flours, and often times lots of weird preservatives. By making them yourself, you can control what goes in, and that includes changing things up, and adding your own mix-ins. If you know the person you’re giving it to loves chocolate and peanut butter, you could add some mini peanut butter cups, or Reese’s Pieces.

DIY Brownie Mix Jars #glutenfree

I just joined The Recipe ReDux which is a challenge hosted by dietitians to create unique and delicious recipes that are also healthy. While brownies are still somewhat indulgent, it is the holidays, and these are 100% whole grain, and the butter is replaced with nonfat yogurt. So you can have your cake brownie and eat it too. 😉

I just took my favorite brownie recipe, and layered the dry ingredients in a jar–it literally took less than 5 minutes, and you can easily do the same thing with any of your favorite recipes. I use my gluten-free baking blend, but you could use white whole wheat flour, or almond meal, or any blend of your own. All you need to add are eggs and some nonfat vanilla yogurt–everything else is included. You could also keep it dairy-free by using coconut oil instead of yogurt, or vegan by replacing the eggs with 2 tbsp cornstarch and 1/3 cup almond milk–so it can work for anyone in your life!

Print
DIY Brownie Mix Jars {gluten-free}

Prep Time: 5 minutes

Total Time: 5 minutes

Yield: 16

Serving Size: 1 brownie

DIY Brownie Mix Jars {gluten-free}

A simple, easy, DIY gift idea for rich and fudgey gluten-free brownie mix. So easy to make, and a perfect gift for anyone in your life who loves chocolate!

Ingredients

  • 1 cup + 2 tbsp gluten-free baking blend (or white whole wheat flour
  • dash salt
  • 2/3 cup granulated sugar
  • 2 tbsp brown sugar
  • 2 tbsp cocoa powder, preferably Dutch process
  • 1/2 tsp espresso powder
  • 5 1/2 oz dark chocolate, about 1 scant cup
  • To make brownies:
  • 1/2 cup nonfat vanilla yogurt
  • 2 eggs

Instructions

  1. In a medium bowl, whisk flour and salt together. In a 3.5-4 cup jar, layer ingredients in order listed. You may change the order as long as you leave the chocolate chips on top. Use a tablespoon to smooth down after each layer for the best visual effect.
  2. To make brownies, preheat oven to 350. Line a 9" square pan with aluminum foil and spray with nonstick spray. Set aside.
  3. In a large bowl, melt the chocolate and let cool. Stir in yogurt, whisk eggs in one at a time. Gently fold in remaining ingredients until just combined.
  4. Transfer to prepared baking tin and bake until a toothpick inserted in the center comes out mostly clean with a few crumbs, about 30 minutes. Cool completely in pan then serve. Store in an airtight container for up to 5 days.

Notes

Recipe easily doubled in a larger jar. Feel free to add mix ins of your choosing.

For dairy-free brownies, replace yogurt with melted coconut oil For vegan brownies, also replace egg with 2 tbsp cornstarch and 1/3 cup almond milk.

3.1
https://arismenu.com/diy-brownie-mix-jars-gluten-free/


Filed Under: Brownies & Bars, Dessert, DIY/How To, Gluten-free, Holiday & Seasonal, Vegan · Tagged: brownies, chocolate, christmas, dessert, diy, gifts, gluten free, recipe, vegan

Pumpkin Chocolate Chunk Cookies

November 17, 2013 · by Ari ·

Vegan & gluten-free ultra soft pumpkin cookies filled with chunks of bold dark chocolate. Perfect cookie (not cakey) texture without a single ounce of butter–something even I thought was impossible!

Pumpkin Chocolate Chunk Cookies #vegan #glutenfree.jpg

I  get a little sad every year around this time. The end of pumpkin season. The day after Thanksgiving, I spend the next 10 months waiting for September 1st so I can start posting pumpkin recipes again. Every year, without fail, I’m left with a handful of recipes that never made it to the blog before the season ended.

Pumpkin Chocolate Chunk Cookies #vegan #glutenfree

I had just about given up on pumpkin cookies. I loooove pumpkin muffins, pumpkin bread, pumpkin cupcakes–anything that is supposed to be light and cakey, the pumpkin basically works like a dream, but cookies? I don’t like my cookies cakey, and especially while trying to avoid using butter, I just thought that pumpkin cookies were an impossible task.

Pumpkin Chocolate Chunk Cookies #vegan #glutenfree

After seeing my girl Sally’s recipe for her pumpkin chocolate chip cookies, I was inspired to try again. It was the first pumpkin cookie recipe I’d seen where you could see just from the photos that the texture was perfect. I did a little more research and saw this recipe on Baked by Rachel. They also looked ridiculously good–and again, with that perfect cookie texture.

Pumpkin Chocolate Chunk Cookies #vegan #glutenfree

I was pretty sure once I got rid of the butter, there was no way I’d be satisfied, but it turns out I couldn’t have been more wrong. The texture was absolutely spot on. The edges got ever so slightly crisp, and the middle was soft, gooey, and everything I’ve ever wanted in a cookie. The pumpkin flavor shines through, and the huge chunks of dark chocolate are the perfect finishing touch. I used a sea salt dark chocolate which I would highly recommend, but any good quality dark chocolate will do. I also made a batch with bits of Heath toffee thrown in, and let me tell you, that was magnificent. You could use white chocolate, add cranberries, anything really–the dough is the perfect container for all your favorite add ins!

Print
Pumpkin Chocolate Chunk Cookies

Prep Time: 15 minutes

Cook Time: 10 minutes

Total Time: 25 minutes

Yield: approx 2 1/2 dozen

Serving Size: 1 cookie

Pumpkin Chocolate Chunk Cookies

Vegan & gluten-free ultra soft pumpkin cookies filled with chunks of bold dark chocolate. Perfect cookie (not cakey) texture without a single ounce of butter--something even I thought was impossible!

Ingredients

  • 2 1/2 cups gluten-free baking blend (or white whole wheat flour)
  • 1/2 tsp baking powder
  • 1/2 tsp baking soda
  • 2 tsp pumpkin pie spice
  • 1 tbsp cornstarch
  • dash salt
  • 1/2 cup sugar
  • 1/2 cup brown sugar
  • 1/4 cup coconut oil, melted
  • 6 tbsp apple butter
  • 6 tbsp pumpkin
  • 2 tsp vanilla extract
  • 6 oz good quality dark chocolate, roughly chopped

Instructions

  1. In a medium bowl, whisk together flour, baking powder, baking soda, pumpkin pie spice, cornstarch, and salt until combined. Set aside.
  2. In a large bowl, beat together sugars, coconut oil, apple butter, pumpkin and vanilla until combined. Add dry ingredients and mix until combined. Gently, stir in chocolate. Cover and refrigerate for 1 hour. If you leave it in longer (ie: several hours to overnight), you may need to let it sit at room temperature for a few minutes before scooping and baking.
  3. Preheat oven to 350. Line two large baking sheets with silpat of parchment papers. Use a small cookie scoop to transfer dough to baking sheet.
  4. Bake until edges are lightly golden and cookies are just set, about 10-12 minutes. Cool completely on baking sheet. Store leftovers in an airtight container for up to one week.

Notes

Recipe adapted from Baked by Rachel and Sally's Baking Addiction

3.1
https://arismenu.com/pumpkin-chocolate-chunk-cookies/

Filed Under: Cookies, Dessert, Gluten-free, Holiday & Seasonal, Vegan · Tagged: baking, chocolate, cookies, dessert, fall, gluten free, pumpkin, recipe, vegan

Peanut Butter Cup Macarons

October 2, 2013 · by Ari ·

Before we jump in to these macarons, I have been meaning to tell you guys that my amazing, wonderful and talented friend Kammie just published her first e-cookbook! It’s filled with healthy single serving recipes breakfasts, snacks and desserts. It’s really great, with tons of great, simple recipes, and some really smart healthy substitutions. And even better, she is offering you guys a discount through the month of October! You can receive 25% off by using the code BLOG25. I highly recommend checking it out and showing her some love!

Peanut Butter Cup Macarons #glutenfreeOkay, so I have been dying to put one of those egg white pictures on my blog for a very long time. Meringue (OMG I spelled it right on the first try–who am I??) is just so…prettttty. Macarons are notoriously challenging, fussy, and easy to mess up. I have a bad history with recipes like that, and to be honest, I usually don’t like any recipe that I can’t save if I make a mistake, but these really weren’t that hard, and I’m here to tell you that if I can make them, anyone can!

Peanut Butter Cup Macarons #glutenfree

Trust me, my macarons are not perfect. They don’t have perfectly flat tops, and they don’t all look exactly the same. I toyed with whether or not I should post them for months, but I decided that in the end, food comes down to tastes and textures, and on those accounts, these babies hit it out of the park. So I bring you some imperfection, to inspire you to make macarons, and be fabulously imperfect all the time. It’s so much more fun.

Peanut Butter Cup Macarons #glutenfree

I started out with an incredibly helpful tutorial on Oh Sweet Day. I knew I didn’t want to use any food colorings in my recipe (I’m sure it will happen one day, but it’s just not really my thing), and I knew I wanted a chocolate cookie, because, well…duh. Anyway, I followed her recipe almost exactly, just swapping out some cocoa powder for some of the almond flour. I made them twice to make sure there was no fluke, and sure enough it worked like a charm! I added a creamy peanut butter filling to make it taste like a Reese’s cup, and voila! Challenging dessert success!

Print
Peanut Butter Cup Macarons

Prep Time: 20 minutes

Cook Time: 10 minutes

Total Time: 1 hour

Yield: 12 macarons

Serving Size: 1 macaron

Peanut Butter Cup Macarons

Chocolate macarons with a creamy peanut butter filling

Ingredients

    For the macarons:
  • 1 cup powdered sugar
  • 1/2 cup almond flour
  • 1/4 cup unsweetened cocoa powder (preferably Dutch process)
  • 2 egg whites
  • 1/4 cup sugar
  • For the peanut butter filling:
  • 1/2 cup creamy peanut butter
  • 6 tbsp powdered sugar
  • 1 tbsp coconut oil, melted
  • 1 tbsp unsweetened almond milk (if needed)

Instructions

  1. Preheat oven to 325. Line two large baking sheets with parchment paper. Set aside.
  2. In your food processor, combine powdered sugar, almond flour and unsweetened cocoa powder. Process until very fine. Sift mixture into a large bowl. You may need to reprocess any large chunks that can't make it through the sifter.
  3. In a stand mixer, beat egg whites using the whisk on medium speed until light and frothy. Reduce speed to low and slowly add sugar. Increase speed to high and beat until stiff peaks form. Be patient, it will take a few minutes. They should look like the top photo when you take the whisk out.
  4. Add the dry ingredients to egg whites and gently fold together using a spatula. Once ingredients are combined, fold for just an other few turns of the wrist--this is where you need to be very careful! Under-mix and you will have pointy shells, under-mix and you will have a soupy mess. You want the batter to just barely stream off the spatula when you remove it. I err on the side of caution and smooth out points later if they arise.
  5. Transfer batter to a pastry bag fitted with a 1/2" round tip. Carefully pipe mixture into circles about 1 1/2" in size. If tops are pointy, you may run your finger under water and gently smooth them. Let them stand for 30 minutes until tops are glossy and smooth to the touch.
  6. Bake until just set, about 10-12 minutes.Place baking sheets on wire racks and allow to cool completely.
  7. To make filling, beat peanut butter, powdered sugar, and coconut oil together in a medium mixing bowl or stand mixer until combined. If needed, add almond milk and beat until combined.
  8. Gently remove macarons from baking sheet and place a small spoonful of filling on one macaron. Top with a second macaron. Repeat with the rest of the batch. Store refrigerated in an airtight container for up to one week.
3.1
https://arismenu.com/peanut-butter-cup-macarons/


Filed Under: Cookies, Dessert, Gluten-free · Tagged: chocolate, cookies, dessert, gluten free, grain free, macarons, peanut butter, recipe

Chocolate Peanut Butter Banana Shake

September 8, 2013 · by Ari ·

Chocolate Peanut Butter Banana Shake #vegan #glutenfree

I know, I know….It’s September and we’re supposed to be talking about crockpots, pumpkin, and cinnamon. And this weekend, I can’t even complain about the temperatures here. We’ve had highs in the 90s, and yesterday we even got rain! I mean,  being rained on for a good 3 hours of my bike ride was not ideal, but I will never complain about rain in this city!

Chocolate Peanut Butter Banana Shake #vegan #glutenfree

And honestly, I don’t care if it’s 100 degrees or 50, I still always want ice cream. My friends think I’m crazy when I crave fro-yo in the winter, but it just is, and always will be, my favorite dessert. Cookies are a close second.

Chocolate Peanut Butter Banana Shake #vegan #glutenfree

The other day, my little sister (in-law–ps I hate the term “in-law”) was over after just having her braces tightened and was having trouble chewing on any solid food. I am of strong belief that any mouth or throat pain means ice cream is a necessity. If you’re going to be miserable, there should at least be ice cream.

Chocolate Peanut Butter Banana Shake #vegan #glutenfree

I decided to use up the last of my chocolate fro-yo, throw in a banana, and of course I had to add in peanut butter. I tasted a sip, and it was dangerously good. I knew I wanted to remake it at least a tiny bit healthier for myself, so I put some extra ripe bananas in the freezer for a day when I would need a little pick-me-up.

Chocolate Peanut Butter Banana Shake #vegan #glutenfree

I love milkshakes because they literally require 3 minutes of your time (and then an other 30 as you stress out trying to photograph them before they turn into a melty puddle of mess), and they are a total comfort dessert for me! I ended up using a combination of chocolate peanut butter and chocolate chips to get the chocolate flavor in there, and the blended up chips added just the right amount of texture.

Print
Chocolate Peanut Butter Banana Shake

Prep Time: 3 minutes

Total Time: 3 minutes

Yield: 2 servings

Chocolate Peanut Butter Banana Shake

This chocolate peanut butter banana milkshake is ridiculously simple and comes together in minutes.

Ingredients

  • 3 bananas, sliced and frozen
  • 2 tbsp chocolate peanut butter
  • 1/2 cup dark chocolate chips
  • 1 tsp vanilla extract
  • 3/4 cup unsweetened almond milk
  • whipped cream or whipped coconut cream and sprinkles for serving, optional

Instructions

  1. Combine bananas, peanut butter, chocolate chips, vanilla and 1/2 cup of your almond milk in a high-quality blender. Blend until smooth (you will likely need to stop and stir--it will be very thick). Slowly, add more milk until milkshake has reached your desired consistency. Serve immediately. Top with whipped cream/whipped coconut cream and sprinkles if desired.
3.1
https://arismenu.com/chocolate-peanut-butter-banana-shake/

Filed Under: Breakfast, Dessert, Drinks, Gluten-free, Smoothies & Shakes, Summer, Vegan · Tagged: banana, chocolate, chocolate peanut butter banana milkshake, dessert, gluten free, milkshake, peanut butter, recipe, vegan

Bourbon Cherry Dark Chocolate Brownies

July 25, 2013 · by Ari ·

Bourbon Cherry Dark Chocolate Brownies

Do you know how many years of my life I wasted believing I didn’t like bourbon? It’s a damn shame.

Bourbon Cherry Dark Chocolate Brownies

I promise, I didn’t mean to put alcohol in my brownies. They started out as just regular chocolate brownies with cherries and dark chocolate for my dad’s birthday. He loves a black forrest cake, but he loves brownies more than cake, and so I wanted a similar flavor profile in brownie form.

Bourbon Cherry Dark Chocolate Brownies

But then I remembered these cookies, and made a game time decision to soak the cherries in bourbon. Of course, if you don’t like bourbon (who are you????), you can totally skip this step and still have some rich and gooey cherry and dark chocolate brownies, but I really feel like the bourbon takes them to the next level.

Bourbon Cherry Dark Chocolate Brownies

One of the secrets to perfect brownies is to just ever so slightly under-bake them. They will continue to bake when you let them cool in your pan. My problem is that I am impatient and I never wait long enough to cut into them. Oh and also that I often over estimate the amount of unbaked that is ideal and end up eating brownie batter because I pulled them from the oven a good 10 minutes too early. These were totally still hot and gooey when I photographed them, but I just couldn’t wait. They firm up a bit as they cool making them easier to serve, but still soft and fudgy.

Bourbon Cherry Dark Chocolate Brownies

I love the crisp brownie top (my favorite thing about brownies and sometimes hard to achieve with no butter!) and the extra melty chunks of dark chocolate with the bold flavor of the bourbon soaked cherries. These were a huge hit, and the entire pan was gone in one evening!

Print
Bourbon Cherry Dark Chocolate Brownies

Prep Time: 10 minutes

Cook Time: 30 minutes

Total Time: 40 minutes

Yield: 9 large or 16 small brownies

Serving Size: 1 brownie

Bourbon Cherry Dark Chocolate Brownies

Ingredients

  • 3/4 cup cherries, pitted
  • Approx 1/2 cup bourbon
  • 5.5 ounces dark chocolate, melted
  • 1/2 cup nonfat coffee yogurt*
  • 3/4 cup sugar
  • 2 eggs
  • 1 tsp vanilla extract
  • 2/3 cup white whole wheat flour
  • 1/2 cup dark chocolate covered cherries**

Instructions

  1. Place cherries in a wide shallow bowl. Cover with bourbon and soak for 1 hour.
  2. Preheat oven to 350. Line a 9" square pan with aluminum foil and spray with nonstick spray. Set aside.
  3. In a large bowl, slowly stir yogurt into melted chocolate. Whisk in sugar, then whisk in eggs one at a time. Add vanilla. Gently fold in flour until just combined. Strain soaked cherries (save the extra liquid and make yourself a drink!) and fold in soaked cherries and dark chocolate covered cherries.
  4. Transfer to prepared baking tin and bake until a toothpick inserted in the center comes out mostly clean with a few crumbs, about 30 minutes. Cool completely in pan then serve. Store in an airtight container for up to 5 days.

Notes

*Vanilla yogurt may be substituted. The coffee enhances the chocolate flavor. I suggest adding 1 tsp espresso powder if you use vanilla yogurt. **I found dark chocolate covered cherries at Trader Joe's. You can always use dark chocolate chunks instead, or add more fresh cherries.

3.1
https://arismenu.com/bourbon-cherry-dark-chocolate-brownies/

Filed Under: Brownies & Bars, Dessert, Holiday & Seasonal · Tagged: bourbon.bars, brownies, cherry, chocolate, dessert, recipe

Magic Shell Cups

July 7, 2013 · by Ari ·

Magic Shell Cups #vegan #glutenfree

Remember Dibs? They were so popular when they first came out. Dangerously good, and finally brought ice cream as a “snack” to movie theaters. I was pretty obsessed, but as I’ve mentioned, I’m pretty obsessed with anything that includes ice cream. 😉

Magic Shell Cups #vegan #glutenfree

I tried to make you Dibs. I tried to many ways. I made a mess of my kitchen. Chocolate and fro-yo everywhere. And I’m not one of those roll with the punches people who keeps it cool when things don’t work out. No. I work in an embarrassingly fragile state in the kitchen where I am known to have legit freak out when things don’t turn out the way I want them to. It’s really fun being married to me. 😉

Magic Shell Cups #vegan #glutenfree

Anyway, after several failed attempts, I decided to change things up a little. Last year I was obsessed with making these cups. Then after selling hundreds of them for fundraising and spending pretty much every weekend making them, I decided I never wanted to make a single candy cup again for the rest of my life. Good thing these are ice cream cups instead. They did bring back some painful memories, but man were they worth it in the end!

Magic Shell Cups #vegan #glutenfree

These cups are everything you love about a magic shell ice cream cone in tiny, bite-sized cups that are perfect for when you just want a little bit of sweetness. They are also extremely versatile. You could put rice krispies in the chocolate for some added crunch, you can use any type of ice cream/fro-yo you like (I like it best with nonfat vanilla fro-yo or coconut milk ice cream), you can add sprinkles (no brainer for me!) for color and crunch, and you could even put in some peanut butter, granola or pretzels to add some variety!

Print
Magic Shell Cups

Prep Time: 20 minutes

Total Time: 20 minutes

Yield: 26-30 cups

Serving Size: 2 cups

Magic Shell Cups

Ingredients

  • 20 oz dark chocolate, roughly chopped (or dark chocolate chips)
  • 1 tbsp coconut oil
  • Approx 1 cup ice cream/frozen yogurt of choice (I used coconut milk ice cream and nonfat vanilla fro-yo. If vegan, use coconut milk or other nondairy ice cream.)
  • Sprinkles for topping, optional

Instructions

  1. Line mini muffin tins with paper liners.
  2. In a medium bowl, heat chocolate and coconut oil in the microwave in 20 second intervals, stirring after each, until melted.
  3. Spoon enough chocolate to cover the bottom of each baking cup. Add scant tablespoon fro-yo or ice cream. Cover with more chocolate. Add sprinkles if desired.
  4. Freeze for at least one hour or until set. Cups will stay kept in the refrigerator for up to one month.
3.1
https://arismenu.com/magic-shell-cups/

Filed Under: Dessert, Gluten-free, Holiday & Seasonal, Ice Cream & Fro-yo, Snacks · Tagged: candy, chocolate, cups, dessert, fro yo, gluten free, ice cream, magic shell, recipe, sprinkles, vegan

Chocolate Chip Zucchini Almond Meal Muffins

June 18, 2013 · by Ari ·

Soft & fluffy zucchini muffins stuffed with dark chocolate chips. Grain-free, refined sugar-free, vegan & paleo!

Chocolate Chip Zucchini Almond Meal Muffins #vegan #glutenfree

Did I ever tell you about the time I ate 3 zucchinis in one sitting because I wanted a snack and was trying to be healthy? I called up one of my best friends and said “I think I just over ate zucchinis. Is that even a thing?” I love them. Sauteed, roasted, grilled, BAKED!

zucchinimuffins-19Chocolate Chip Zucchini Almond Meal Muffins #vegan #glutenfree

Okay, these muffins taste nothing like zucchinis. Just like carrot cake doesn’t actually taste like carrots. But the zucchinis add some extra veggie goodness, and also produce some of the softest, (insert gross word) and tender muffins I have ever tasted.

Chocolate Chip Zucchini Almond Meal Muffins #vegan #glutenfree

As soon as I decided I wanted to make zucchini almond meal muffins, I hit up my girl Gina’s blog for some inspiration. She has the best paleo recipes, and although I don’t eat paleo, I love baking with nut flours, and her blog is always a great place to start. She made some ridiculously good looking zucchini bread that I used as a guideline, but ended up with muffins with chocolate chips inside. Shocking, right?

Chocolate Chip Zucchini Almond Meal Muffins #vegan #glutenfree

The muffins tasted EXACTLY like I wanted–lightly sweet, hearty and filling without being heavy. They didn’t last long, and whether you normally use grain-free flours or not, you will absolutely love them!

Print
Chocolate Chip Zucchini Almond Meal Muffins

Prep Time: 10 minutes

Cook Time: 25 minutes

Total Time: 35 minutes

Yield: 1 dozen

Serving Size: 1 muffin

Chocolate Chip Zucchini Almond Meal Muffins

Soft & fluffy zucchini muffins stuffed with dark chocolate chips. Grain-free, refined sugar-free, vegan & paleo!

Ingredients

  • 3/4 cup unsweetened vanilla almond milk
  • 1/2 tsp apple cider vinegar
  • 1 1/2 cups almond meal
  • 1 1/2 tsp baking soda
  • dash salt
  • 1 tsp cinnamon
  • 1 ripe banana, mashed
  • 3 tbsp natural liquid sweetener of choice (honey, agave, maple syrup, etc.)
  • 1 tbsp coconut oil, melted
  • 1 tsp vanilla extract
  • 1 cup finely grated zucchini, squeezed dry
  • heaping 1/2 cup mini dark chocolate chips

Instructions

  1. Preheat oven to 350. Line muffin tins with paper liners. Set aside.
  2. Measure milk in your measuring cup. Add apple cider vinegar and whisk lightly. Set aside.
  3. In a large bowl, whisk together almond meal, baking soda, salt and cinnamon. Add almond milk mixture, banana, sweetener, coconut oil, and vanilla. Mix until just combined. Fold in zucchini and chocolate chips.
  4. Evenly divide batter between between 12 prepared muffin molds.
  5. Bake until golden and a toothpick inserted in the center comes out clean, about 20-25 minutes.

Notes

Adapted from Running to the Kitchen

3.1
https://arismenu.com/chocolate-chip-zucchini-almond-meal-muffins/

Filed Under: Breads & Muffins, Breakfast, Dessert, Gluten-free, Holiday & Seasonal, Paleo, Summer, Vegan · Tagged: almond meal, breakfast, chocolate, dessert, gluten free, grain free, muffin, recipe, vegan, zucchini

“Nutella” Granola {vegan + gluten-free}

May 7, 2013 · by Ari ·

"Nutella" Granola #vegan #glutenfree via arismenu.comOnce upon a time, I discovered the peanut butter & Nutella sandwich. Then, I discovered the Nutella + spoon combination. And sometimes the spoon never even came to join the party. Shameless.

"Nutella" Granola #vegan #glutenfree via arismenu.com

I can’t even have Nutella in the house these days. It’s just too tempting. Occasionally, I’ll buy it for a recipe (and then eat my oatmeal out of the empty jar and feel like I’ve died and gone to heaven), but I think it’s about time that I get to eat chocolate hazelnutty goodness for breakfast every single day. Does that not just sound like perfection?

"Nutella" Granola #vegan #glutenfree via arismenu.com

The best part? You don’t even have to buy Nutella for this recipe, but the taste is uncanny. I took one bite after it finished cooking and quickly exclaimed “It tastes like NUTELLA!!!” Just simple granola loaded with hazelnuts with some cocoa powder added to the mix. It is not overpoweringly sweet, and it doesn’t taste like dessert. I think the sweetness is perfect, but if you want a sweeter granola, you can absolutely add some extra brown sugar, or honey, or agave.

"Nutella" Granola #vegan #glutenfree via arismenu.com

I also discovered the secret to the biggest, fattest granola clusters–check those monsters out!! I’m always looking for the big, chunky clusters, and this time I got it right. I did not stir this granola once while it cooked. I just let it do it’s thing, flipped it around half way through, and ya know what? Everything cooked evenly, nothing burned, and I had granola clusters the size of my hand! What??? Now the problem is not eating those clusters every time I step into the pantry. It’s kind of a problem…

Print
“Nutella” Granola

Prep Time: 15 minutes

Cook Time: 1 hour

Total Time: 1 hour, 45 minutes

Yield: Approx 10 cups

Serving Size: 1/2 cup

“Nutella” Granola

Simple and easy chocolate hazelnut granola tastes remarkably like Nutella! The big clusters and bold flavors are totally addicting and will have you constantly reaching back for more.

Ingredients

  • 5 cups rolled oats (use gluten-free if that’s important to you)
  • 2 cups hazelnuts, roughly chopped
  • 1 cup slivered almonds
  • heavy pinch sea salt
  • 3/4 cup unsweetened applesauce
  • 1/2 cup brown sugar
  • 1/3 cup honey or agave
  • 2/3 cup cocoa powder (I used Hershey's special dark)
  • 2 tbsp coconut oil

Instructions

  1. Preheat oven to 300. In a very large bowl, mix together the oats, nuts and salt.
  2. In a small saucepan, warm the applesauce, brown sugar, honey/agave, cocoa powder and coconut oil until well combined, whisking constantly. Add the applesauce mixture into the dry ingredients and toss to combine. Evenly divide granola in an even layer between two large baking sheets.
  3. Bake until browned and crispy, about 50 minutes-1 hour, turning half way through.
  4. Cool completely, then store in an airtight container at room temperature. The granola will stay fresh for at least one month. I've never made a batch last any longer than that, but it's still great a month in and probably for longer.

Notes

If you'd like, you may gently stir the granola every 20 minutes while cooking. This will lead to less clusters and a finer granola. I prefer to be able to break the clusters up myself afterwards, but if you like a finer granola, then stirring will help.

3.1
https://arismenu.com/nutella-granola-vegan-gluten-free/


Filed Under: Breakfast, Gluten-free, Granola, Special Diet, Vegan · Tagged: breakfast, brunch, chocolate, gluten free, granola, hazelnut, nutella, recipe, vegan

Buckeye Brownies

April 25, 2013 · by Ari ·

Buckeye Brownies via arismenu.com

My favorite (and best) cooking inspiration has always been making things for the people I love. Especially birthdays. Birthdays are my favorite thing in the world, and nothing brings me more happiness than making the perfect treat to show my love.

Buckeye Brownies via arismenu.com

In fact, to date my favorite recipe I’ve ever made was for Steve’s birthday last year. I have to tell you, though–these give them a run for their money!

buckeyebrownies-10Buckeye Brownies via arismenu.com

When I saw this post on Brown Eyed Baker a couple of months ago, I immediately sent it to Nicole–the idea is genius, the photos are absolutely gorgeous, and I wanted to jump through my screen and lick every crumb.

Buckeye Brownies via arismenu.com

So when I was deciding what to make Nicole for her birthday this year, I knew exactly where I wanted to start. Of course, I changed a few things to make these a little less indulgent, but they still tasted rich and decadent. The brownie layer is the fudgiest brownie I have ever tasted, and the peanut butter tastes like the inside of a Reese’s cup, and then that perfectly glossy glaze? I diiiieeee.

Buckeye Brownies via arismenu.com

The good thing about cooking for your BBF (best blog friend–I know, we’re totally, like tweens) is they don’t mind that you cut into their birthday dessert to photograph it, and maybe sneak a tiny bite so that you can make sure it’s perfect before you give it to them. 😉 Thanks for taking one for the team blog, Nicole!

Buckeye Brownies via arismenu.com

Print
Buckeye Brownies

Prep Time: 30 minutes

Cook Time: 30 minutes

Total Time: 3 hours

Yield: 32

Serving Size: 1 brownie

Buckeye Brownies

Rich and fudgy brownies topped with creamy sweetened peanut butter, followed by a chocolate peanut butter glaze--these brownies are to-die-for!

Ingredients

    For the brownies:
  • 1/3 cup Dutch-processed cocoa
  • 1 1/2 tsp espresso powder
  • 1/2 cup + 2 tbsp boiling water
  • 2 ounces unsweetened chocolate, finely chopped
  • 2 tbsp coconut oil, melted
  • 3 eggs
  • 1 tbsp vanilla extract
  • 2 1/4 cups sugar
  • 1 3/4 cups white whole wheat flour
  • dash salt
  • 3/4 cup nonfat vanilla yogurt
  • For the peanut butter layer:
  • 1 1/2 cups creamy peanut butter
  • 1 1/3 cups powdered sugar
  • 3 tbsp coconut oil, melted
  • 2-3 tbsp unsweetened almond milk
  • For the chocolate peanut butter glaze:
  • 1 1/2 cups dark chocolate chips
  • 1/3 cup creamy peanut butter

Instructions

  1. To make the brownies, preheat the oven to 350. Line a 9x13 pan with aluminum foil and spray lightly with nonstick spray. Set aside.
  2. In a large bowl, whisk together cocoa powder, espresso powder and water. Add unsweetened chocolate and whisk until combined. Beat in eggs one at a time, then beat in vanilla and sugar. Stir in flour, salt and yogurt until combined. Do not overmix.
  3. Transfer batter to prepared baking dish. Bake set and until a toothpick inserted a couple of inches from the edge comes out with a few crumbs, about 30 minutes. Cool completely on wire rack.
  4. To make the peanut butter layer, beat together peanut butter, coconut oil and powdered sugar until smooth. Add milk 1 tbsp at a time until you reach a smooth, spreadable texture. Spread evenly onto cooled brownies.
  5. To make the glaze, place chocolate and peanut butter in a medium microwave-safe bowl. Heat in 20 second increments, stirring between each, until melted. Spread glaze evenly over peanut butter layer. Cool in the refrigerator for 30 minutes, then serve. Store in an airtight container for up to one week.

Notes

Recipe adapted from Brown Eyed Baked

3.1
https://arismenu.com/buckeye-brownies/

Filed Under: Brownies & Bars, Dessert · Tagged: birthdays, brownies, buckeye, chocolate, dessert, peanut butter, recipe, whole grain

Plain Ol’ Chocolate Chip Cookies {vegan}

April 17, 2013 · by Ari ·

Chocolate Chip Cookies #vegan via arismenu.com


Sometimes you just need plain, simple, classic comfort food. This is one of those times.

Chocolate Chip Cookies #vegan via arismenu.com

Would you believe I didn’t have a chocolate chip cookie recipe on here? I’m actually more intimidated by simple, well-known recipes. I feel like it has to be *perfect* and I don’t want to post it, until I know I’ve gotten it right.

Chocolate Chip Cookies #vegan via arismenu.com

Chocolate chip cookies with no butter is not an easy feat, my friends. You see, with peanut butter cookies, it’s easy–the fat in the peanut butter works perfectly, and you don’t realize you’re missing the butter, but in a plain ol’ chocolate chip cookie? The flavors I associate are butter, brown sugar and, well, chocolate! But honestly, butter is probably number one.

Chocolate Chip Cookies #vegan via arismenu.com

The secret? It’s the combination of apple butter, which gives the perfect texture (far superior to applesauce or yogurt in cookies) and the tiniest bit of butter extract. That stuff is magical. Using cornstarch in place of an egg not only makes them vegan, but helps keep them thick and chewy, and the massive amount of chocolate chips is 100% necessary. Also, a tiny sprinkle of salt on your dough just before it goes into the oven will take your cookie flavor to the next level! Not quite salted, but it evens out the sweetness.

Chocolate Chip Cookies #vegan via arismenu.com

The result is healthier chocolate chip cookies that taste like the real deal. Thick, chewy, with a slight crunch on the outside, and that perfect soft, gooey, and extra chocolatey inside. I am finally ready to share my chocolate chip cookies with you, because I finally got it right.

Print
Chocolate Chip Cookies

Prep Time: 40 minutes

Cook Time: 10 minutes

Total Time: 50 minutes

Yield: 1 1/2 dozen

Serving Size: 1 cookie

Chocolate Chip Cookies

Simple, classic, vegan and whole grain chocolate chip cookies that taste just like the real deal.

Ingredients

  • 1 1/4 cups white whole wheat flour
  • 1 tbsp cornstarch
  • 1/2 teaspoon baking soda
  • dash salt
  • 1/2 cup apple butter
  • 1/2 cup brown sugar
  • 1/4 cup sugar
  • 1/4 cup unsweetened almond milk
  • 1 tsp vanilla extract
  • 1/8 tsp butter flavoring (optional, but recommended)
  • 1 heaping cup dark chocolate chips
  • sea salt for sprinkling

Instructions

  1. In a medium bowl, whisk together flour, cornstarch, baking soda and salt. Set aside.
  2. In a large bowl or stand mixer, beat together apple butter and sugars until combined. Beat in almond milk, vanilla and butter flavoring. Slowly add in dry ingredients, beating until just combined. Beat in chocolate chips. Cover and chill dough for 30 minutes, or up to overnight.
  3. Preheat oven to 375. Line a large baking sheet with silpat or parchment paper.Use a small cookie scoop, or roll dough into 1" balls. Add a tiny pinch (or more if you want them to have the "salted" taste) of sea salt to the top of each cookie dough ball.
  4. Bake for 10-12 minutes until golden and just set. Do not over bake. Allow to cool completely on cookie sheet. Store in a loosely covered container for 5-7 days.
3.1
https://arismenu.com/chocolate-chip-cookies/

Filed Under: Cookies, Dessert, Vegan · Tagged: baking, chocolate, chocolate chip cookies, cookies, dessert, recipe, vegan, whole grain

« Previous Page
Next Page »
Image Map

Popular Posts

Tart Cherry Margaritas: The perfect, refreshing margarita--lightly sweet with a punch of tequila

Tart Cherry Margaritas

90+ Healthy Recipes for Breakfast, Lunch, Dinner & Dessert

90+ Healthy Recipes for Breakfast, Lunch, Dinner & Dessert

The Ultimate Peanut Butter Cup Brownie Cookies: Rich, fudgy, brownie-like chocolate cookies stuffed with melty peanut butter cups!

Ultimate Peanut Butter Cup Brownie Cookies

Drink & Dish: Cafe Au Lait Cupcakes

Crockpot Chicken Enchilada Soup

Subscribe via Email:

Enter your email address:

Save an additional $30 on Blendtec Factory Recertified Blenders + Free Shipping

Featured Here

recipe redux
Certified Yummly Recipes on Yummly.com

Member Of…

FitFluential Is Fitness Found
AZ Bloggers Network
az 150 photo az150_zpsfb093d32.gif

Archives


Image Map

Copyright © 2025 | Innovative Child Theme by The Pixelista | Built on the Genesis Framework


Loading Comments...