• Going Out
    • Phx Restaurants
    • How To Order At Starbucks
  • Running
    • My Running Story
    • Race Calendar
    • Race Recaps & Results
  • Blogroll
  • Bucket List
  • Video

Ari's Menu

Little changes making a big difference.

  • Home
  • Recipes
  • Weight Loss
    • My Story
    • Common Swaps
  • Who’s Who
  • Contact
    • Policies & Disclosure
  • Press

Caramel Macchiato Almond Butter

March 5, 2014 · by Ari ·

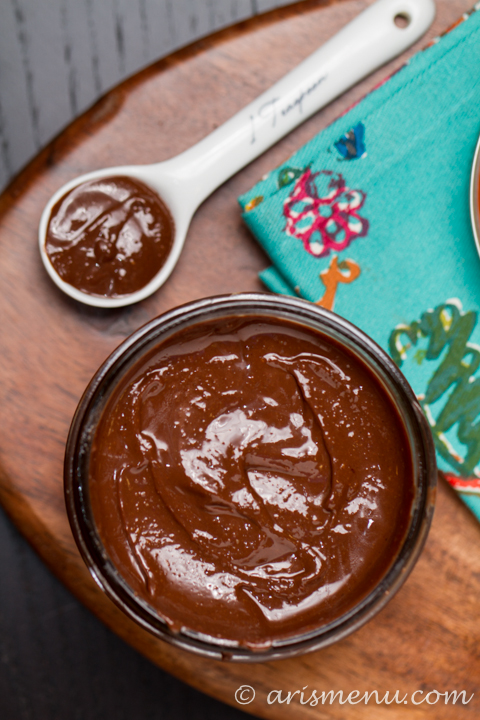
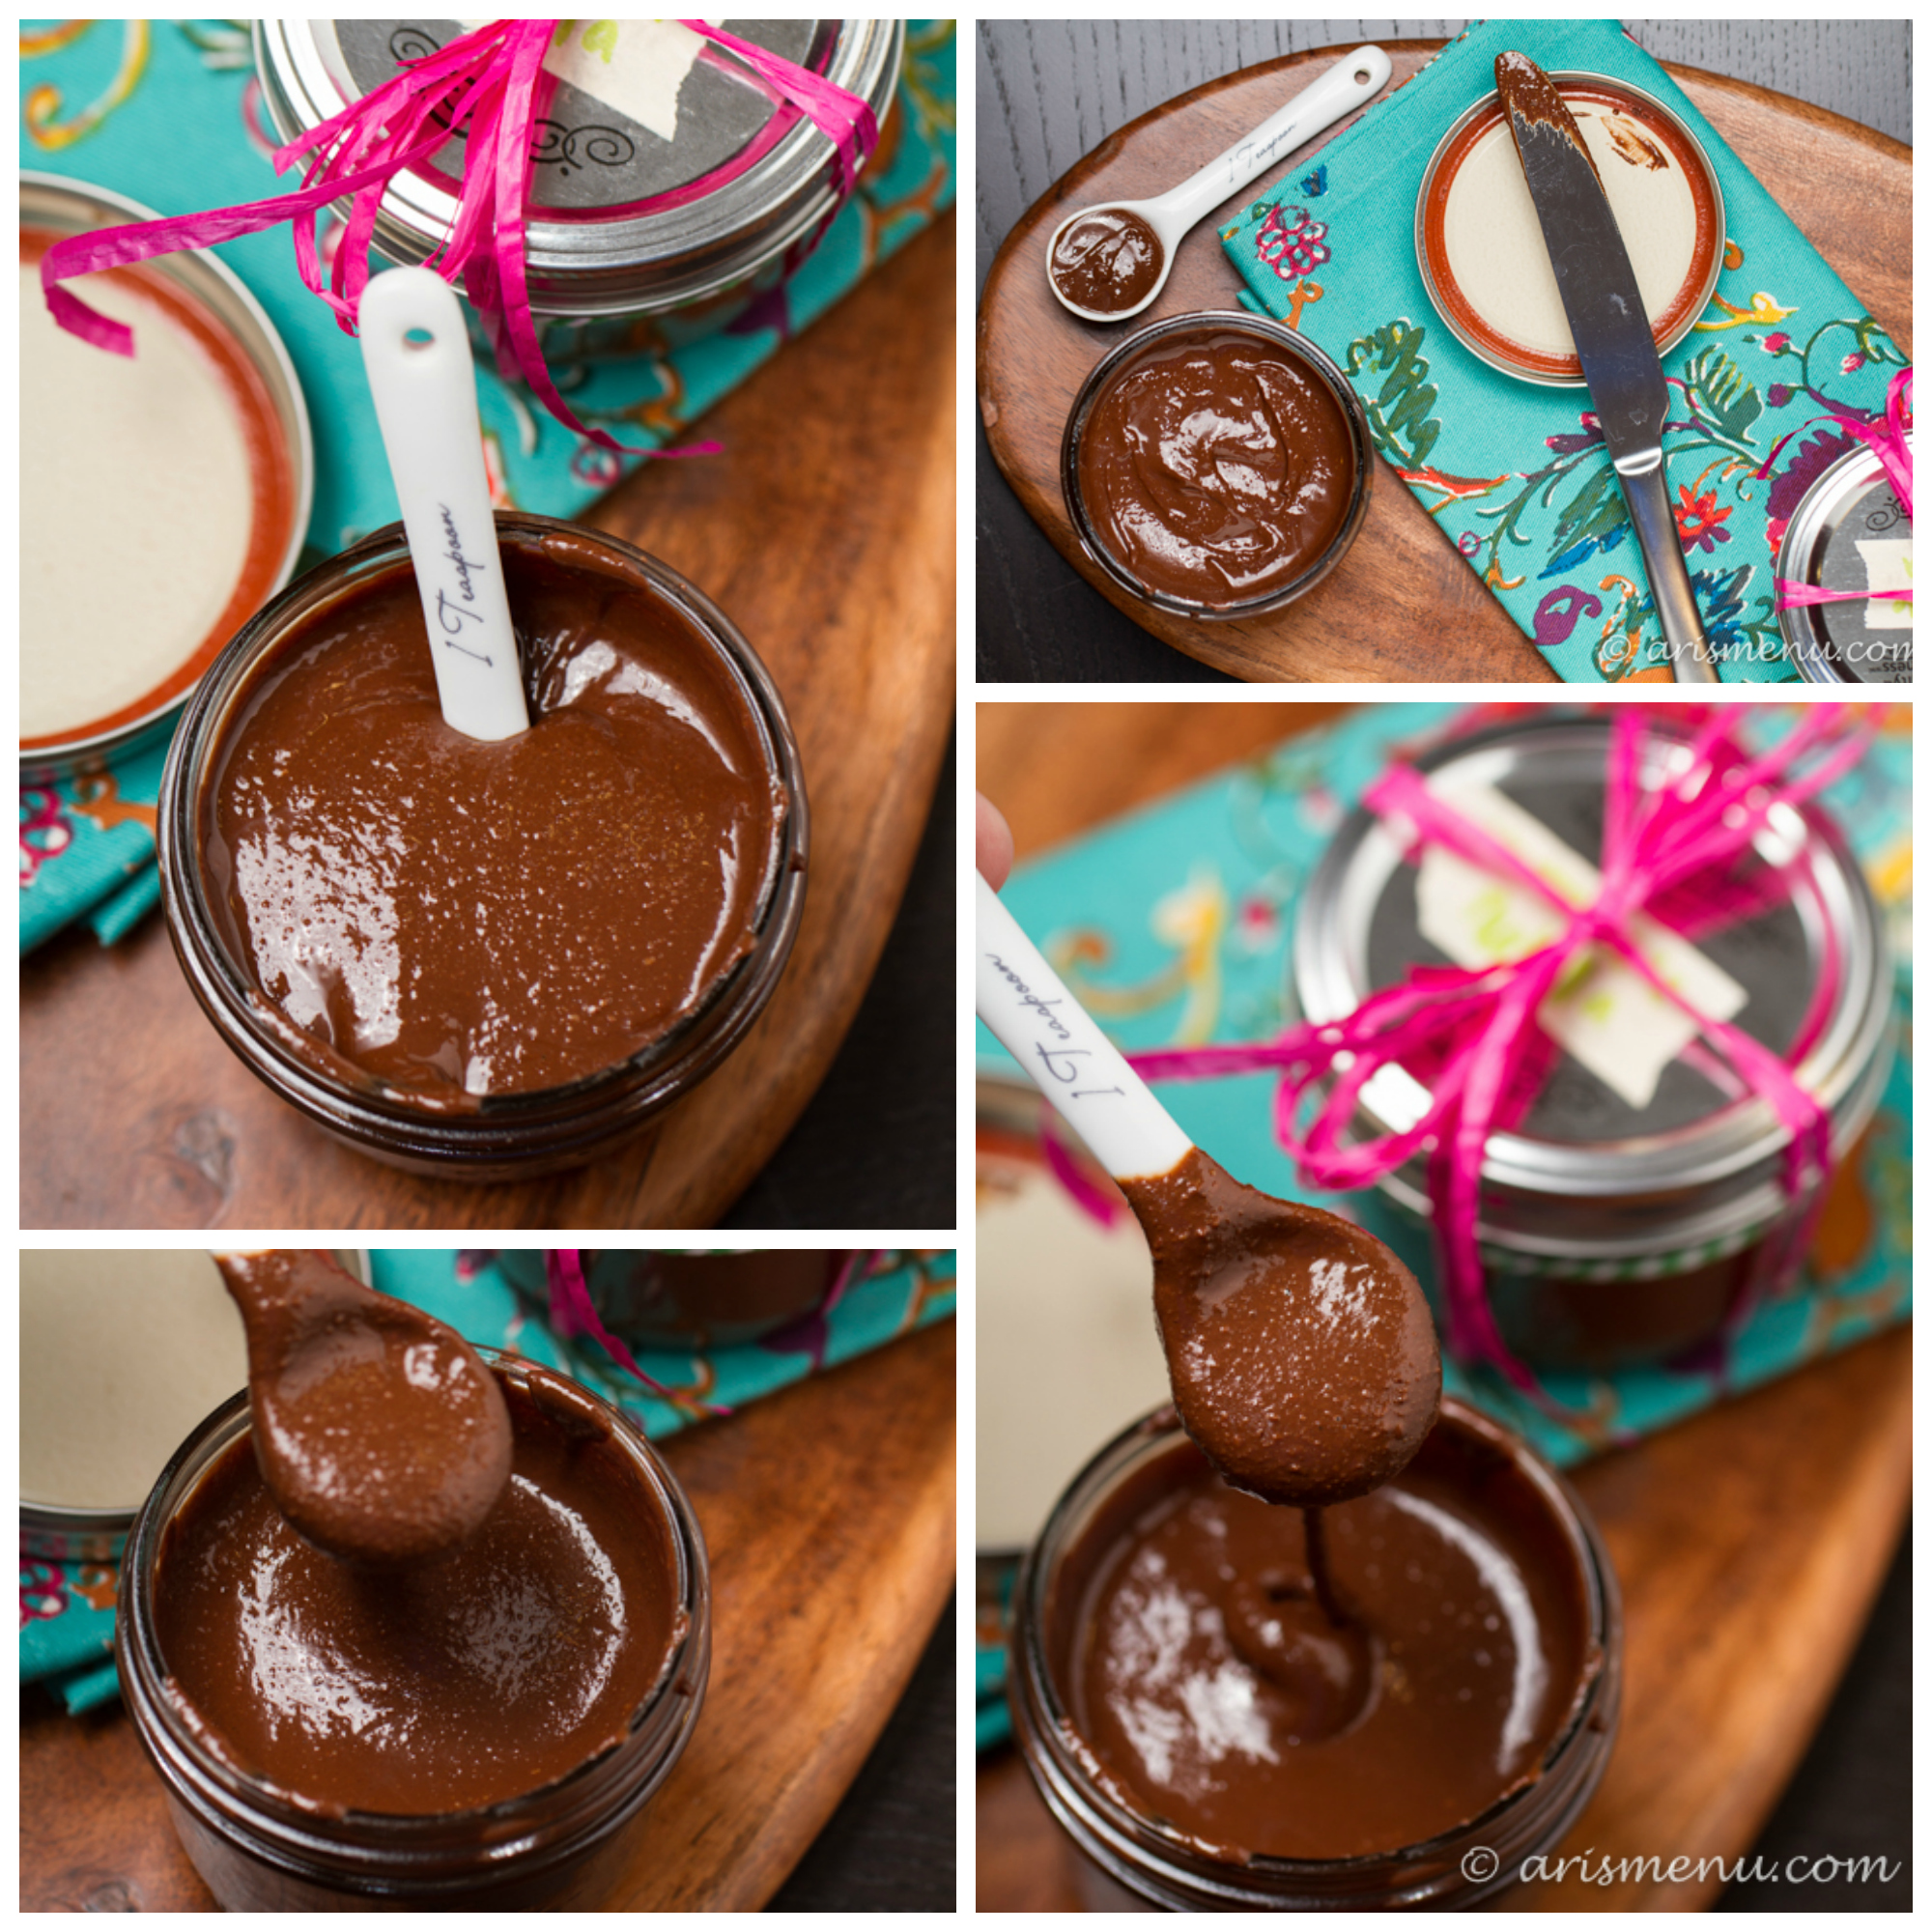
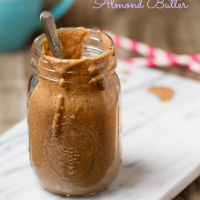
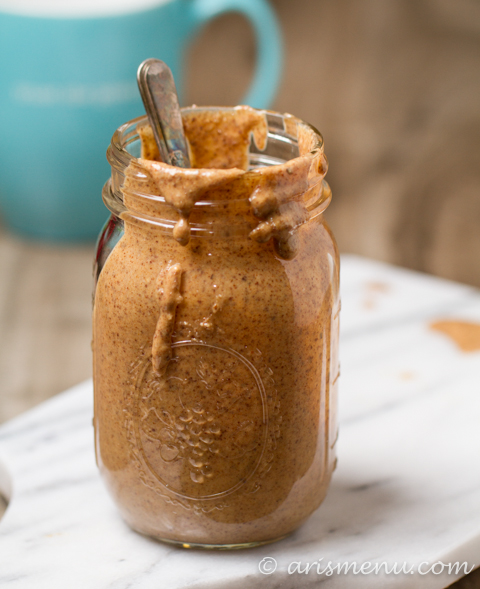
A delicious spread made simply with just one ingredient in less than 10 minutes. All the flavor of your favorite coffee drink in sweet and drippy almond butter form.

Caramel Macchiato Almond Butter: 1 ingredient & 10 minutes!

Embarrassing story time. So we all know that I am not the most observant person in the world. In fact, if there were an award for least observant person, I think I’d have a pretty good shot at it.

Caramel Macchiato Almond Butter: 1 ingredient & 10 minutes!

This is my best friend Jason’s favorite story to tell everyone we meet. He refers to it as “The Tootsie Roll Story”. I was 15 or 16 and we went to the grocery store together. When we came out, there was a man handing out tootsie rolls, and he asked if we’d like one. My immediate response was to ask if it was free. When Jason tells this story, he does a totally unrealistic portrayal of how I sounded. Jerk.

Caramel Macchiato Almond Butter: 1 ingredient & 10 minutes!

The way I remember it, the man said yes. In Jason’s version he says “I guess…”. So I took a tootsie roll (never mind the fact that I totally went against everything my mom taught me and took candy from a stranger…), and as we were walking away Jason tells me the guy was taking donations.

Caramel Macchiato Almond Butter: 1 ingredient & 10 minutes!

I was so embarrassed, and I asked if I should go back and apologize, but Jason was even more embarrassed by me and rushed me into the car. Hahaha…oyyyyy. The point is, I am totally unaware of my surroundings, and also I really love free things.

Caramel Macchiato Almond Butter: 1 ingredient & 10 minutes!

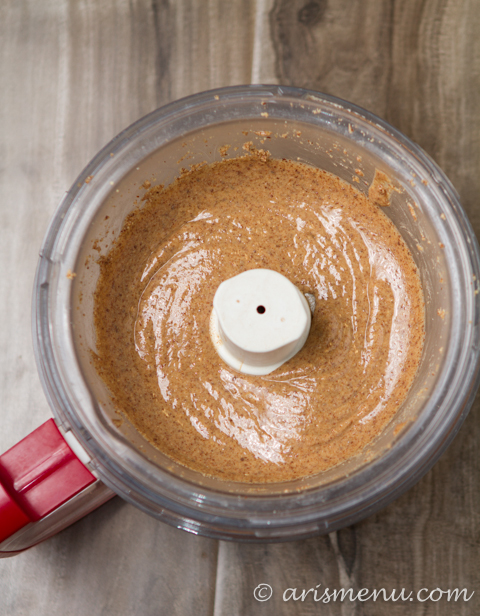
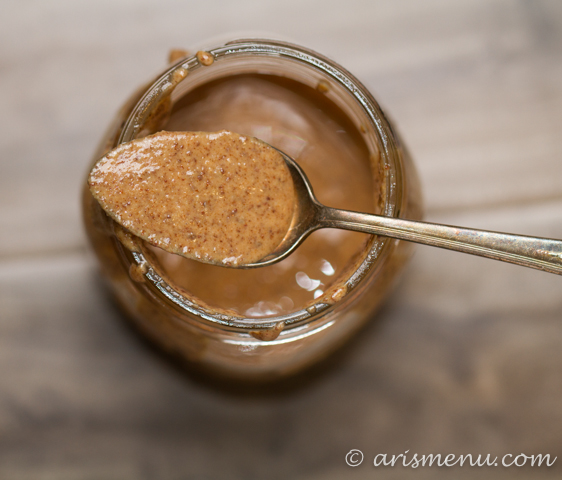
So when the awesome people at Blue Diamond were giving out actually free samples at Healthy Living Summit, I took, um…quite a few. I knew I wanted to use them to make some unique flavored nut butters, and I finally got around to putting them to use–specifically the caramel macchiato flavor. Just like when making honey roasted peanut butter (or honey roasted macadamia butter–my favorite!), all you have to do is throw in the one ingredient, scrape down the sides a few times, and let your food processor do the work! The result is a creamy, drippy, sweet almond butter with the bold flavors of caramel and espresso. Totally addicting.

Print
Caramel Macchiato Almond Butter

Prep Time: 10 minutes

Total Time: 10 minutes

Yield: about 1 1/2 cups

Serving Size: 2 tablespoons

Caramel Macchiato Almond Butter

A delicious spread made simply with just one ingredient in only than 10 minutes. All the flavor of your favorite coffee drink in sweet and drippy almond butter form.

Ingredients

  • 16 oz Caramel Macchiato Almonds

Instructions

  1. Place almonds in your food processor. Blend until a smooth nut butter forms. First, almonds will break down to a flour, then form a big ball. This will take about 5-7 minutes. Scrape down the sides and give food processor a break as necessary. Continue to blend until smooth and creamy, about an other 3-5 minutes. Store in an airtight container for up to one month, or in a cool, dry place for 2-3 weeks.
3.1
https://arismenu.com/caramel-macchiato-almond-butter/

Filed Under: DIY/How To, Gluten-free, Low Carb, Sauces & Spreads, Snacks, Vegan ·

Spinach Caprese Omelet {+ $100 Visa Gift Card Giveaway!}

March 3, 2014 · by Ari ·

The following post is sponsored by AllWhites® egg whites & BlogHer. Recipe and opinions are my own.A simple, healthy, protein and veggie packed breakfast, lunch or dinner with all the flavor of a classic caprese salad. Spinach Caprese Omelet: A quick, easy, veggie & protein packed breakfast, lunch or dinner Okay, so things have been crazy around these parts. Back in January I bought a groupon for crossfit. I’d been wanting to try it for over a year, and I always had some excuse about why it was a bad time, but I finally bit the bullet and signed up. Oh, and I totally love it. Also, I signed up for my first triathlon! I’m ridiculously nervous because up until my first swimming lesson at the end of January, I literally only knew how to not drown, and I didn’t even do that very well. Training has been going pretty well, but it is definitely challenging me and pushing me in new ways. Spinach Caprese Omelet: A quick, easy, veggie & protein packed breakfast, lunch or dinnerSo as you can imagine, I am hungry literally all the time. Between crossfit and tri training, I am working out 2-3 times most days, and it’s been really fun, but I’ve definitely had to change the way I eat a little bit. My body needs way more protein, and way less of the junk so that the majority of my calories are actually useable. Spinach Caprese Omelet: A quick, easy, veggie & protein packed breakfast, lunch or dinner
I’m not a big fan of cooking meat. I don’t know…the texture of raw meat…I just…don’t like it. Also, when I get home at 8pm covered in pool water and ultra-hungry, I just want the fastest thing possible, so I have been eating a lot of eggs. I’ve always been a mostly whites person, but I started to be totally over separating eggs for 20 minutes before I started cooking, so I jumped at the opportunity to give AllWhites® egg whites a try! Spinach Caprese Omelet: A quick, easy, veggie & protein packed breakfast, lunch or dinner

We all know egg whites are a great source of lean protein–in fact, some say it is the purest kind! And with 25 calories, 0 grams of fat and 5 grams of protein per serving, AllWhites delivers on every account! For those of you that enjoy Weight Watchers will also be glad to know that AllWhites have ZERO points +! Spinach Caprese Omelet: A quick, easy, veggie & protein packed breakfast, lunch or dinner

I’ve been making lots of different scrambles and omelets, but this caprese omelet has probably become my new favorite. I love all the added vitamins from the spinach, and you guys know I am a sucker for the caprese flavor combination, and I love that balsamic glaze so freaking much. It takes a little extra time, but it’s worth it in the end. Plus the high protein content from the AllWhites make this a perfect post-workout breakfast, lunch or dinner. Seriously, omelets for dinner. You need to.

Print
Caprese Spinach Omelet

Prep Time: 5 minutes

Cook Time: 25 minutes

Total Time: 30 minutes

Yield: 1 omelet

Caprese Spinach Omelet

A simple, healthy, protein and veggie packed breakfast, lunch or dinner with all the flavor of a classic caprese salad.

Ingredients

  • 1/2 tbsp olive oil
  • big handful fresh baby spinach
  • salt and pepper
  • 3/4 cup AllWhites liquid egg whites
  • 1/2 roma tomato, thinly sliced
  • 1-2 ounces fresh mozzarella, thinly sliced
  • 1 basil leaf, thinly sliced
  • 1/3 cup good quality balsamic vinegar

Instructions

  1. Begin with the balsamic glaze by pouring balsamic vinegar into a small sauce pan over high heat. Bring to a boil and reduce to medium-medium high to simmer. Stir occasionally until sauce has reached desired thickness., about 20-30. Once desired consistency is reached, remove from heat immediately.
  2. Heat olive oil in a small nonstick pan over medium heat. Add spinach and season with salt and pepper. Cook until spinach softens and cooks down slightly. Pour AllWhites on top and season with additional salt and pepper if desired. Cook until egg whites are fully set and bottom is lightly golden, about 5 minutes.
  3. Carefully slip eggs and top one half with sliced tomato and cheese. Cook until bottom is fully cooked, about 2-3 minutes. Fold the omelet in half and top with additional cheese if desired. Remove from heat and top with fresh basil and drizzle with balsamic glaze.
3.1
https://arismenu.com/spinach-caprese-omelet/

Interested in trying out AllWhites? Check them out on Twitter and Facebook! And for recipe purposes: • 3 tbsp. of AllWhites = Approx. 1 large egg • 1/3 cup of AllWhites = Approx. 2 large eggs • 3/4 cup of AllWhites = Approx. 4 large eggs

Also, BlogHer is giving one lucky reader a $100 Visa gift card!! All you have to do is leave a comment below, so tell me: How do you fuel the way to a healthier you?

Sweepstakes Rules:
No duplicate comments. You may receive (2) total entries by selecting from the following entry methods:
Leave a comment in response to the sweepstakes prompt on this post.
Tweet (public message) about this promotion; including exactly the following unique term in your tweet message: “#SweepstakesEntry”; and leave the URL to that tweet in a comment on this post.
Blog about this promotion, including a disclosure that you are receiving a sweepstakes entry in exchange for writing the blog post, and leave the URL to that post in a comment on this post.
For those with no Twitter or blog, read the official rules to learn about an alternate form of entry.
This giveaway is open to US Residents age 18 or older. Winners will be selected via random draw, and will be notified by e-mail. The notification email will come directly from BlogHer via the sweeps@blogher email address. You will have 72 hours to respond, otherwise a new winner will be selected.
The Official Rules are available here.
This sweepstakes runs from 3/3/2014-3/31/2014.
Be sure to visit the AllWhites® egg whites brand page on BlogHer.com where you can read other bloggers’ posts!


Filed Under: Breakfast, Dinner, Entree, Gluten-free, Low Carb, Lunch, savory, Summer, Vegetarian ·

Drink & Dish: Cafe Au Lait Cupcakes

February 28, 2014 · by Ari ·

Ultra soft gluten-free cafe au lait cupcakes–espresso cupcakes with a to die for cream filling. A classic cafe au lait re-invented as a fun, festive and delicious cupcake.

Cafe Au Lait Cupcakes: Ultra soft espresso cupcakes with a to die for cream filling

Have any of you guys ever been to New Orleans for Mardi Gras? Personally, it sounds about as appealing as being in times square on New Years. Meaning…not…

Cafe Au Lait Cupcakes Ultra soft espresso cupcakes with a to die for cream filling

I’ve actually only been to New Orleans once, but I fell so in love with it. Steve and I took an anniversary trip there about a year ago and we had such an amazing time. It is probably one of my favorite vacations of all time, and I can’t wait to go back.

Cafe Au Lait Cupcakes Ultra soft espresso cupcakes with a to die for cream filling

In fact, I’m already planning to go back. Next year I turn *gulp* 30, and I’m already planning to meet with this girl to meet up in New Orleans to celebrate both of our birthdays. There is so much to do. Especially if you love food, which…ummmm obviously.

Cafe Au Lait Cupcakes Ultra soft espresso cupcakes with a to die for cream filling

As far as Mardi Gras, though? I think I prefer to celebrate from afar. I’ve become that old person that actually rolls their eyes at drunk college kids. I know. I’ve very quickly become one of those crotchety old folk types that goes to bed at 9pm and gets annoyed with people who are sloppy drunk. Who am I kidding? I am pretty sure I’ve always been that person inside.

Cafe Au Lait Cupcakes Ultra soft espresso cupcakes with a to die for cream filling

So after a little break, Drink & Dish is back! If you hadn’t noticed, the theme is MARDI GRAS! A cafe au lait is probably the most famous non alcoholic drink in New Orleans, and a must have to go alongside a freshly friend beignet. And you must have the beignets. Covered with so much powdered sugar that your entire outfit ends up in a covered in sugary dust. You can’t leave without that combination, I promise you. Also, you have to have a hurricane! It is pretty much the official drink of New Orleans, and Nicole’s totally lives up to the fame!


I wasn’t sure how the flavor would translate to a cupcake, but these babies exceeded all of my expectations! I’m not usually a cupcake person, but I kept finding myself eating the few I left behind at my house, and regretting (well, only partially…) all the extras I brought to work.

Cafe Au Lait Cupcakes Ultra soft espresso cupcakes with a to die for cream filling

The cupcakes are so soft. The texture is so perfect that I even surprised myself, but it’s that filling that really takes them to the next level! Filled cupcakes are great because they seem so difficult, but really it’s easy to do, and I show you exactly how I fill them in the video, so make sure to check it out!

Print
Drink & Dish: Cafe Au Lait Cupcakes

Prep Time: 45 minutes

Cook Time: 20 minutes

Total Time: 1 hour, 5 minutes

Yield: 2 dozen regular cupcakes, or approx 60 minis

Serving Size: 1 cupcake, or 2 minis

Drink & Dish: Cafe Au Lait Cupcakes

Ultra soft gluten-free espresso cupcakes with a to die for cream filling. A classic cafe au lait re-invented as a fun, festive and delicious cupcake.

Ingredients

    For the cupcakes:
  • 2 2/3 cups gluten-free baking blend (or white whole wheat flour)
  • 2/3 cup unsweetened cocoa powder (not Dutch process)
  • 1 1/2 tablespoons espresso powder
  • 2 teaspoons baking soda
  • 1 teaspoon baking powder
  • dash salt
  • 3/4 cup unsweetened applesauce
  • 1/4 cup coconut oil, melted
  • 1 cup brown sugar
  • 1/3 cup sugar
  • 1 1/2 teaspoons vanilla extract
  • 2 eggs
  • 1 cup reduced fat buttermilk
  • 1 cup strong brewed coffee
  • powdered sugar for dusting, optional
  • For the filling:
  • 8 ounces heavy whipping cream
  • 8 ounces reduced fat cream cheese, softened
  • 2 cups powdered sugar
  • 1 teaspoon vanilla extract

Instructions

  1. Preheat oven to 350. Line 2 muffin tins with paper liners. Either stand or mini muffin tins will work. Set aside.
  2. In a large bowl, combine baking blend, cocoa powder, espresso powder, baking soda, baking powder and salt. In a separate large bowl or stand mixer, beat together applesauce, coconut oil, sugars and vanilla until well combined. Add eggs one at a time and mix until combined.
  3. To the applesauce mixture add approximately (eyeball it) 1/3 of your dry mixture, followed by buttermilk. Add an other 1/3 of dry ingredients, then coffee, and finish with remaining third of dry ingredients mixing until just combined. Do not over mix.
  4. Fill muffin tins 3/4 full. Bake until a toothpick inserted in the center comes out with just a few crumbs, 20-25 minutes for full size cupcakes; 10-13 minutes for minis. Cool completely.
  5. To make the filling, whip cream in a stand mixer or using a handheld mixer until soft peaks form and it turns into whipped cream. In a large bowl, beat cream cheese until smooth. Add powdered sugar one cup at a time beating until well combined. Beat in vanilla. Fold in whipped cream.
  6. Transfer filling to a pastry bag fitted with a narrow ended tip. Plunge tip into the center of each cupcake and squeeze filling into the center until the top of the cupcake starts to expand slightly. Remove, and repeat with remaining cupcakes. Dust with powdered sugar if desired. Store refrigerated in an airtight container for up to one week.
3.1
https://arismenu.com/drink-dish-cafe-au-lait-cupcakes/

Filed Under: Cupcakes, Dessert, Drink & Dish, Gluten-free, Holiday & Seasonal, Popular Posts · Tagged: cafe au lait, cupcake video, cupcakes, dessert, drink and dish, gluten free, gluten free mardi gras, mardi gras, mardi gras cupcakes

Peanut Butter Oatmeal Chocolate Chip Cookies

February 24, 2014 · by Ari ·

Flourless vegan & gluten-free peanut butter oatmeal cookies stuffed with dark chocolate chips.

Peanut Butter Oatmeal Chocolate Chip Cookies No flour, butter or oil!

You know what question I hate? “What’s new?” Does anyone actually know what to say when people ask what’s new in your life? I mean, that doesn’t stop me from asking everyone else. In fact, the first thing I say when talking to someone is “So…what’s going on with you???” I think it’s mostly so that they will be the one who has to do the talking, and I can avoid trying to think of something to say.

Peanut Butter Oatmeal Chocolate Chip Cookies No flour, butter or oil!

Because my usual response goes along the lines of “Oh well, ya know, work is crazy and I’m doing ____ workout or training for _____” and I realize this makes me totally, completely, 100% uninteresting. So I prefer to put everyone else on the spot and make them tell me all about their lives hoping that by the end they will forget to ask me the same question in return.

Peanut Butter Oatmeal Chocolate Chip Cookies No flour, butter or oil!

So….what’s new with you? ……………..

Peanut Butter Oatmeal Chocolate Chip Cookies No flour, butter or oil!

Cookies? That sounds good. Especially the super (I just tried to use the word uber. I’m a little disappointed in myself.) soft, peanut buttery chocolate chip cookies where the chocolate stays the perfect amount of melty because you eat the entire batch like an hour after they come out of the oven. Yeah…that’s what’s new with me too. Cookies.

Print
Peanut Butter Oatmeal Chocolate Chip Cookies

Prep Time: 15 minutes

Cook Time: 10 minutes

Total Time: 30 minutes

Yield: approx 4 dozen

Serving Size: 1 cookie

Peanut Butter Oatmeal Chocolate Chip Cookies

Flourless vegan & gluten-free peanut butter oatmeal cookies stuffed with dark chocolate chips.

Ingredients

  • 1 cup peanut butter
  • 1/4 cup apple butter
  • 1 cup brown sugar
  • 1/3 cup sugar
  • 1/2 cup unsweetened almond milk
  • 1 and 1/2 teaspoons vanilla extract
  • 1 and 1/4 teaspoons baking soda
  • 2 tablespoons cornstarch
  • dash salt
  • 3 cups quick cook oats*
  • 6 ounces dark chocolate chips

Instructions

  1. Preheat oven to 350. Line a large baking sheet with silpat or parchment paper. Set aside.
  2. In a large bowl, beat together peanut butter, apple butter and sugars until smooth. Add almond milk, vanilla, baking soda, cornstarch and salt. Mix until well combined. Stir in oats, then fold in chocolate chips.
  3. Use a small cookie scoop to transfer dough to prepared baking sheet. Bake for 10-12 minutes until just set. Do not over bake. Cool completely on baking sheet. Store in an airtight container for 5-7 days.

Notes

*To make your own quick oats, take rolled oats (gluten-free if necessary) and pulse for 10-20 seconds in food processor.

3.1
https://arismenu.com/peanut-butter-oatmea/

Filed Under: Cookies, Dessert, Gluten-free, Vegan ·

S’mores Hot Cocoa {The Recipe ReDux}

February 22, 2014 · by Ari ·

Rich, hot, comforting hot chocolate with toasty marshmallows and graham cracker crumbs. Everything you love about s’mores in a lightened up, gluten-free and dairy-free hot chocolate {with vegan option}.

S'mores Hot Cocoa: Looks decadent, but healthier than you'd think!

Is it still cold where you are? The high here today is 79*. Please don’t hate me. It’s actually been absolutely gorgeous out lately, and I am trying to live it up because I know it’s only a matter of time until the low is 95 and I’m waking up to run in the middle of the night so I can at least beat the sunlight.

S'mores Hot Cocoa: lightened up, gluten-free & dairy-free..

And it’s still chilly enough in the morning and evening to cozy up with a hot drink. In fact, it’s the perfect dessert for a night in with Netflix. And the puppies. Obviously.

S'mores Hot Cocoa: lightened up, gluten-free & dairy-free

I’m usually a fro yo for dessert person. Even in the cold months. Something about drinking my dessert (even if it’s a milkshake!) seems like I’m being cheated. However, this is a whole different story.

S'mores Hot Cocoa: lightened up, gluten-free & dairy-free

With warm, toasty marshmallows and crushed graham cracker crumbs, this hot cocoa feels like the best of both worlds–eating dessert and drinking hot cocoa.

S'mores Hot Cocoa: lightened up, gluten-free & dairy-free

This drink is pretty decadent, but it comes in right at about 200 calories, which really isn’t that bad for dessert in my opinion. Especially a dessert that has this much going on. It also comes together in less than 10 minutes and includes a very short list of ingredients which, if you’re anything like me, you probably have sitting around anyway.

S'mores Hot Cocoa: lightened up, gluten-free & dairy-free

The almond milk and chocolate chips are responsible for the thick, rich cocoa, but the bruleed marshmallows, bits of graham cracker in every sip, and last minute decision to drizzle it with extra chocolate syrup is what truly takes it to the next level!

Print
S’mores Hot Cocoa {The Recipe ReDux}

Prep Time: 5 minutes

Cook Time: 5 minutes

Total Time: 10 minutes

Yield: 1

Serving Size: 1 cup

S’mores Hot Cocoa {The Recipe ReDux}

Rich, hot, comforting hot chocolate with toasty marshmallows and graham cracker crumbs. Everything you love about s'mores in a lightened up, gluten-free and dairy-free hot chocolate {with vegan option}.

Ingredients

  • 1 cup unsweetened almond milk
  • 1/4 cup dark chocolate chips
  • 1 teaspoon vanilla extract
  • 1 teaspoon honey or other liquid sweetener
  • 1 tablespoon graham cracker crumbs (I used gluten-free)
  • mini marshmallows*
  • light chocolate syrup for drizzling, optional

Instructions

  1. In a small pot, heat milk, chocolate and vanilla over medium heat until chocolate is melted and milk is hot and steaming, whisking constantly.
  2. Drizzle honey on a small plate and roll the top of your mug in honey so it is just coated. Place graham cracker crumbs on a separate plate, and then roll the glass in graham cracker.
  3. Pour in cocoa and top with marshmallows. Heat marshmallows with a brulee torch until browned. Top with remaining graham cracker crumbs and drizzle with chocolate syrup.

Notes

*To make vegan, use vegan marshmallows and agave/maplesyrup/simple syrup in place of honey.

3.1
https://arismenu.com/smores-hot-cocoa/


Filed Under: Dessert, Drinks, Gluten-free, Holiday & Seasonal, Vegan ·

Rosemary, Olive Oil & Sea Salt Mashed Sweet Potatoes

February 17, 2014 · by Ari ·

Simple, easy roasted and mashed sweet potatoes with bold rosemary flavor and no cream or butter! A perfect healthy side dish to accompany any meal.

Rosemary, Olive Oil & Sea Salt Mashed Sweet Potatoes: Simple, healthy, vegan, gluten-free & paleo!

Okay, so first of all, I am a total freak. Pretty much every single time I try a new recipe, I immediately freak out about how it’s not good enough and tell my poor, poor husband that we need to toss it because there is no way I can possibly serve it.

Rosemary, Olive Oil & Sea Salt Mashed Sweet Potatoes: Simple, healthy, vegan, gluten-free & paleo!

Then after the crazy wears off I try it again and realize that I kinda like it. Then I decide to test it out on some guests who inevitably end up loving it, and only then do I decide that I actually did ok.

Rosemary, Olive Oil & Sea Salt Mashed Sweet Potatoes: Simple, healthy, vegan, gluten-free & paleo!

I mean, I guess sometimes it’s love at first bite, but usually there is a whole series of doubt before I decide a recipe is awesome. And to be honest, the first go around of this recipe was good, but it wasn’t great.

Rosemary, Olive Oil & Sea Salt Mashed Sweet Potatoes: Simple, healthy, vegan, gluten-free & paleo!

I was in a hurry and I just threw a big handful of rosemary in there haphazardly without taste testing along the way. It ended up being fixable (a little more salt, and a little of my picking out rosemary like a psycho), but I knew the flavor combination wasn’t quite right yet. But, I mean it’s sweet potatoes. They are pretty much error proof.

Rosemary, Olive Oil & Sea Salt Mashed Sweet Potatoes: Simple, healthy, vegan, gluten-free & paleo!

And don’t worry. I’ve got this little side dish all figured out now. 😉 That being said, rosemary (and salt!) is a very strong flavor, and what tastes good to me may be too strong for you. Doubtful that it won’t be strong enough because I have a super heavy hand, but if you really love one of the flavors more than the others, then ya never know!

Rosemary, Olive Oil & Sea Salt Mashed Sweet Potatoes: Simple, healthy, vegan, gluten-free & paleo!

The good news is that the recipe is so easy to adapt to your own tastes. Add extra rosemary, less salt, add goat cheese (because we all know how I feel about that stuff!), or incorporate anything you’d like really! It’s just one of those things where you can be all individual and make it your own. And also? It is so so so good.

Print
Rosemary, Olive Oil & Sea Salt Mashed Sweet Potatoes

Prep Time: 10 minutes

Cook Time: 1 hour

Total Time: 1 hour, 10 minutes

Yield: 4-6 servings

Rosemary, Olive Oil & Sea Salt Mashed Sweet Potatoes

Simple, easy roasted and mashed sweet potatoes with bold rosemary flavor and no cream or butter! A perfect healthy side dish to accompany any meal.

Ingredients

  • 2 medium sweet potatoes
  • 2 tablespoons olive oil (preferably a good quality extra virgin olive oil)
  • coarse sea salt
  • 1-3 sprigs rosemary, stems removed, finely minced
  • pinch pepper

Instructions

  1. Preheat oven to 400. Brush sweet potatoes with olive oil and sprinkle with sea salt. Roast until fork tender, about 1 hour.
  2. Cut off the ends of each sweet potato. You may remove the skin if desired; I did not. Transfer to a large bowl, add a tablespoon of olive oil and mash with a fork or masher, or use a mixer or immersion blender. Add 1 sprig rosemary and a pinch of pepper, and taste. Add extra rosemary and/or salt small amounts at a time until desired taste is achieved.
3.1
https://arismenu.com/rosemary-olive-oil-sea-salt-mashed-sw/

Filed Under: Dinner, Gluten-free, Holiday & Seasonal, Paleo, Side Dish, Vegan, Vegetarian ·

Chocolate Peanut Butter Cup Cupcakes

February 12, 2014 · by Ari ·

Ultra soft and fluffy chocolate cupcakes stuffed with a Reese’s peanut butter cup and topped with a thick dark chocolate peanut butter frosting.

Chocolate Peanut Butter Cup Cupcakes

Hi friends! I made it back from the big apple, and an incredible whirlwind weekend! My brother made 2nd chair in his international orchestra, and I got to see him play in CARNEGIE HALL. Can we talk about how all my life I’ve dreamed of going to Carnegie Hall, and my very first time I got to watch my brother have the time of his life??

Chocolate Peanut Butter Cup CupcakesChocolate Peanut Butter Cup Cupcakes

I also got to spend the weekend catching up with some of my friends in the city, seeing Matilda (OMG I’m obsessed–I never wanted it to end!), and eating so much amazing food. I’m totally not ready to go back to real life.

Chocolate Peanut Butter Cup Cupcakes

Although, this month has been so busy already that I am looking forward to doing a whole lot of nothing next weekend. After traveling two weekends in a row, I miss my puppies, and my couch, and umm you guys! I have practically disappeared on social media because I’ve been doing that thing where I try to live in real life. It’s really great and all, but I miss you people.

Chocolate Peanut Butter Cup Cupcakes

Oh, and also…I made you cupcakes. Maybe my favorite ones ever? The chocolate cupcake itself is just SO GOOD. Like I didn’t know I could make one that good without butter. It was kind of a pat myself on the back and sing my own praises kind of moment.

Chocolate Peanut Butter Cup Cupcakes

Then I can hardly even talk about the joy that is a peanut butter cup inside of your cupcake. Especially straight out of the oven when it’s still warm and melty….

Chocolate Peanut Butter Cup Cupcakes

Then you see that thick chocolatey frosting? Well, it’s actually chocolate and peanut butter and it is so thick that you have to spread it super carefully, but don’t worry because it ends up being 100% worth it when you take your first bite. The extra peanut butter cups on top are optional; edible glitter is mandatory. 😉

Print
Chocolate Peanut Butter Cup Cupcakes

Prep Time: 30 minutes

Cook Time: 20 minutes

Total Time: 1 hour, 30 minutes

Yield: 1 dozen

Serving Size: 1 cupcake

Chocolate Peanut Butter Cup Cupcakes

Ultra soft and fluffy chocolate cupcakes stuffed with a Reese's peanut butter cup and topped with a thick dark chocolate peanut butter frosting.

Ingredients

    For the cupcakes:
  • 1 cup + 2 tablespoons gluten-free baking blend (or white whole wheat flour)
  • 1/4 cup cocoa powder (I used Dutch process)
  • 2 tablespoons cornstarch
  • 1 1/2 teaspoons baking soda
  • dash salt
  • 1/2 cup applesauce
  • 1/4 cup coconut oil, melted
  • 3/4 cup sugar
  • 1 egg
  • 1 teaspoon vanilla
  • 1/2 cup buttermilk
  • 12 mini peanut butter cups + extra for topping
  • For the Dark Chocolate Peanut Butter Frosting:
  • 24 ounces reduced fat cream cheese, softened
  • 2.5 ounces dark chocolate, melted and cooled
  • 3/4 cup cocoa powder (I used Dutch process)
  • 3/4 cup peanut butter
  • 2 cups powdered sugar
  • 2 teaspoons vanilla extract

Instructions

  1. Preheat oven to 350. Line 12 muffin tin with paper liners. Set aside.
  2. In a medium bowl, whisk together baking blend, cocoa powder, cornstarch, baking soda and salt. In a large bowl or stand mixer, mix together applesauce, coconut oil and sugar until well combined. Add egg and vanilla and mix to combine. Stir in half the dry ingredients, followed by buttermilk and finishing with the remaining dry ingredients. Mix until just combined; do not over mix.
  3. Evenly divide batter between cupcake tins. Each tin should be about 2/3 full. Gently press a mini peanut butter cup into the center of each cupcake. Bake for 18-22 minutes until a toothpick inserted in the cake part of the cupcake comes out with just a few crumbs. Cool completely.
  4. To make frosting beat together cream cheese and peanut butter in a large bowl on medium speed until smooth. Add vanilla extract and mix to combine, Add in powdered sugar 1/2 cup at a time, beating on low speed, followed by cocoa powder. Increase to medium speed and add melted chocolate. Beat until smooth, scraping down sides of bowl often. Frosting will be very thick. To thin, you may add a tablespoon at a time of milk if desired. I used none.
  5. Spread frosting on completely cooled cupcakes and top with chopped peanut butter cups and edible glitter or sprinkles if desired. Serve immediately. Store refrigerated in an airtight container for 5-7 days.
3.1
https://arismenu.com/chocolate-peanut-butter-cup-cupcakes/

Filed Under: Cupcakes, Dessert, Gluten-free, Holiday & Seasonal ·

Homemade Vegan Nutella

February 5, 2014 · by Ari ·

Smooth and creamy dark chocolate hazelnut spread made easily at home. Vegan, gluten-free and even more delicious than the store bought kind!

Homemade Nutella: Vegan, gluten-free and even more delicious than the store bought kind!

GUESS WHAT????? IT’S MY BIRTHDAY!!!!!!

Homemade Nutella: Vegan, gluten-free and even more delicious than the store bought kind!

Okay, so maybe it’s a little narcissistic, but I freaking love birthdays. Not just mine, but everyone’s. We all need a day to celebrate our lives, the people in it, and all that jazz. That’s what birthdays are to me, anyway. A chance to celebrate the fact that I have a freaking awesome life filled with freaking awesome people who make me feel like a million bucks.

Homemade Nutella: Vegan, gluten-free and even more delicious than the store bought kind!

So to celebrate, I made you guys Nutella. It’s one of my very favorite things, so i just figured you guys would feel the same way. I’ve been obsessed with Nutella since the first time I tasted it, and ya know what? I am even more obsessed with this homemade variety. I’m pretty sure it’s the dark chocolate. It just makes it richer and even more chocolatey!

Homemade Nutella: Vegan, gluten-free and even more delicious than the store bought kind!

It’s actually super simple, and when you make your own you get to be the one controlling what goes in. Just real ingredients here with a slightly heavy hand on the dark chocolate because, let’s be honest, Nutella is totally, 100% dessert. It’s not a “healthy” spread–it’s made to be a treat, and it delivers!

Print
Homemade Vegan Nutella

Prep Time: 10 minutes

Total Time: 10 minutes

Yield: approx 2 cups

Serving Size: 1 tablespoon

Homemade Vegan Nutella

Smooth and creamy dark chocolate hazelnut spread made easily at home. Vegan, gluten-free and even more delicious than the store bought kind!

Ingredients

  • 1 cup toasted hazelnuts
  • 2-3 tablespoons coconut oil, melted
  • 12 ounces dark chocolate, melted and cooled
  • 1 teaspoon vanilla extract
  • pinch sea salt

Instructions

  1. Place hazelnuts in food processor or Vitamix and blend until broken down and nuts start to form a big mound. Continue to blend and stream in coconut oil 1 tablespoon at a time until nut butter consistency. Add melted chocolate, vanilla and sea salt and blend until well combined. Store in an airtight container for 2-3 weeks.
3.1
https://arismenu.com/homemade-vegan-nutella/

Filed Under: Dessert, DIY/How To, Gluten-free, Holiday & Seasonal, Sauces & Spreads, Snacks, Vegan ·

Coconut Cashew Chocolate Chip Cookie Dough Bites

February 2, 2014 · by Ari ·

Healthy, simple, gluten-free & vegan dessert bites that taste like cookie dough, but made from wholesome ingredients with no grains or refined sugars.

Coconut Cashew Chocolate Chip Cookie Dough Bites: Healthy, gluten-free & vegan dessert bites

I am the world’s biggest procrastinator. No matter what it is on my to do list, I will find something else to do. When I should be working for my real job I will find any excuse to edit photos or write a blog post, but this morning when I sat down to write, I spent an hour singing Let it Go from Frozen while playing on the ukulele instead.

Coconut Cashew Chocolate Chip Cookie Dough Bites: Healthy, gluten-free & vegan dessert bites

I’m still not very good at the ukulele, but it doesn’t stop me from playing along and singing my little heart out. I’m sure my husband really appreciated my lackluster attempt while he tried to catch up on Modern Family. Especially after I made him listen to the Frozen soundtrack (with me singing along) for about 3 hours of our road trip to California.

Coconut Cashew Chocolate Chip Cookie Dough Bites: Healthy, gluten-free & vegan dessert bites

So anyway, let’s talk about the food. I have the world’s biggest sweet tooth. Like, seriously I could be in that world records book. It’s bad news and I try really hard to curb it,  but I am not a person who can give up dessert.

Coconut Cashew Chocolate Chip Cookie Dough Bites: Healthy, gluten-free & vegan dessert bites

I’ve been really making an effort since holiday cookie palooza to be a bit more mindful of my dessert habit, and really just my food choices in general. I’ve only baked one batch of cookies in 2014! Who am I?? The sad thing is they didn’t even turn out good enough to take pictures of. Womp womp. They were cakey, and I just don’t do cakey cookies

Coconut Cashew Chocolate Chip Cookie Dough Bites: Healthy, gluten-free & vegan dessert bites

So in an attempt to make a little healthier treat, I threw a bunch of things in my food processor one day, and these babies popped out! Well, by “popped out”, I mean I rolled them into cute little balls, but I didn’t want to call them balls because it makes me giggle, so I called them bites which I probably subconsciously stole from my friend Lindsay who makes all sorts of amazing treats like these!

Coconut Cashew Chocolate Chip Cookie Dough Bites: Healthy, gluten-free & vegan dessert bites

These little guys seriously taste just like cookie dough, but only have a handful of healthy ingredients. They’re perfect pre/post work out, as a snack, or as dessert. And trust me, they are so delicious that they taste like dessert and no one will have any idea that they’re actually healthy!

Print
Coconut Cashew Chocolate Chip Cookie Dough Bites

Prep Time: 20 minutes

Total Time: 20 minutes

Yield: Approx 2 dozen

Serving Size: 1

Coconut Cashew Chocolate Chip Cookie Dough Bites

Healthy, simple, gluten-free & vegan dessert bites that taste like cookie dough, but made from wholesome ingredients with no grains or refined sugars.

Ingredients

  • 2 cups unsweetened shredded coconut
  • 1 scant cup cashew flour
  • 3-5 tablespoons maple syrup*
  • 1/4 teaspoon vanilla extract
  • 1/8 teaspoon almond extract
  • pinch sea salt
  • 1/3 cup mini dark chocolate chips (or cacao nibs)

Instructions

  1. Blend coconut in food processor or Vitamix until it breaks down and becomes coconut butter. This can take up to 10 minutes, so be patient and give the food processor a break every few minutes to prevent burning out. Add cashew flour, maple syrup, extracts and salt. Blend until all ingredients are combined and form a big dough ball.
  2. Transfer dough to a large bowl and stir in chocolate chips. Roll into small balls. Store in an airtight container for 7-10 days.

Notes

*Amount of maple syrup can vary based on desired sweetness. I used 4 tbsp, but if you like things less sweet, I recommend starting with 3 and adding more to taste at the end.

3.1
https://arismenu.com/coconut-cashew-chocolate-chip-cookie-dough-bites/

Filed Under: Breakfast, Dessert, Gluten-free, Paleo, Snacks, Vegan ·

Vanilla Bean Cashew Macarons

January 27, 2014 · by Ari ·

Cashew macarons bursting with vanilla flavor and filled with vanilla bean buttercream. The cashew base allows the vanilla flavor to shine and become the star of the show!

Vanilla Bean Cashew Macarons

I’m sorry. Actually, that’s a lie. I’m totally not. This is not a healthy recipe by any means, and I’m not even a little bit sorry. I haven’t posted a single dessert recipe in 2014, and that is kind of a problem. I mean, we’re only a month in, but let’s be honest, I’ve missed cookies. A lot.

Vanilla Bean Cashew Macarons

Can I tell you one of the best stories of my life? I made these to bring to a cookie swap. The problem with going to a cookie swap when everyone knows you have a food blog is that you feel like you have to be super impressive. Okay, maybe only I feel that way, but I spent a lot of time figuring out the perfect thing to make. Macarons are always a good party trick. 😉

Vanilla Bean Cashew Macarons

After a failed batch where the feet weirdly went off to one side (over whipped egg whites, and under mixed batter), I got it right, and showed up with these (and a nutella variety that I’ll be sharing with you sometime soon). Halfway through the party, my coach came up to me with a fellow runner who found her and said she “had to find the person who made the macarons”.

Vanilla Bean Cashew Macarons

Elena went on to tell me how perfect these macarons were, and she even said that she spent time in France eating macarons all the time, and that these were some of the best she’s ever tasted! I mentioned the macarons at Essence (I love them!) and she said mine were even BETTER! I couldn’t get over it. I promised her I’d share the recipe on here, but I spent most of January focusing on healthy dinners (ya know, tryin’ to give the people what they want 😉 ), and I got a message from her on facebook asking about the recipe! Well I’m so proud to share them with you guys today because they were so dang popular!

Vanilla Bean Cashew Macarons

The cashew base provides a more neutral flavor that let’s the vanilla just do its thang. I, personally, am a vanilla lover. Like, sometimes (often) more than chocolate. There are few things more perfect than bright, intense vanilla flavor, and that is what these babies are all about. Vanilla bean in the shell, vanilla bean in the frosting, vanilla bean all up in your business. I’m telling ya, if you want a cookie that will really impress everyone, this baby is for you. And I promise they’re not as hard as you think!

Print
Vanilla Bean Cashew Macarons

Prep Time: 20 minutes

Cook Time: 10 minutes

Total Time: 1 hour

Yield: 12 macarons

Serving Size: 1 macaron

Vanilla Bean Cashew Macarons

Cashew macarons bursting with vanilla flavor and filled with vanilla bean buttercream. The cashew base allows the vanilla flavor to shine and become the star of the show!

Ingredients

    For the shells:
  • 1 cup powdered sugar
  • 3/4 cup cashew flour*
  • seeds from 1/2 vanilla bean
  • 2 egg whites
  • 1/4 cup sugar
  • For the filling:
  • 1 stick butter
  • 1 cup powdered sugar
  • seeds from 1/2 vanilla bean
  • 1/2 tsp vanilla extract
  • 1 tbsp milk

Instructions

  1. Preheat oven to 325. Line two large baking sheets with parchment paper. Set aside.
  2. In your food processor, combine powdered sugar, cashew flour, and vanilla bean seeds. Process until very fine. Sift mixture into a large bowl. You may need to reprocess any large chunks that can't make it through the sifter.
  3. In a stand mixer, beat egg whites using the whisk on medium speed until light and frothy. Reduce speed to low and slowly add sugar. Increase speed to high and beat until stiff peaks form. Be patient, it will take a few minutes.
  4. Add the dry ingredients to egg whites and gently fold together using a spatula. Once ingredients are combined, fold for just an other few turns of the wrist--this is where you need to be very careful! Under-mix and you will have pointy shells and weird feet; under-mix and you will have a soupy mess. You want the batter to just barely stream off the spatula when you remove it. I err on the side of caution and smooth out points later if they arise.
  5. Transfer batter to a pastry bag fitted with a 1/2" round tip. Carefully pipe mixture into circles about 1 1/2" in size. If tops are pointy, you may run your finger under water and gently smooth them. Let them stand for 30 minutes until tops are glossy and smooth to the touch.
  6. Bake until just set, about 10-12 minutes.Place baking sheets on wire racks and allow to cool completely.
  7. To make the buttercream, beat butter until smooth. Add powdered sugar and vanilla bean seeds and beat until well combined. Add vanilla extract and milk if necessary (if the texture seems good, leave out the milk) and beat for an other minute. If you prefer a thinner buttercream, add addition milk 1/2 tbsp at a time until desired consistency is reached.
  8. Gently remove macarons from baking sheet and place a small spoonful of filling on half of the shells, then top with remaining halves. Store refrigerated in an airtight container for up to one week.

Notes

*If you cannot find cashew flour, you can make your own in the food processor or using a nut grinder, or you may sub almond flour. *Macarons are best the next day. Make 24 hours in advance if possible. *Adapted from Oh Sweet Day

3.1
https://arismenu.com/vanilla-bean-cashew-macarons/


Filed Under: Cookies, Dessert, Gluten-free, Holiday & Seasonal, Vegetarian ·

Caprese Stuffed Chicken

January 26, 2014 · by Ari ·

A simple, healthy dinner with smooth & melty mozzarella, sweet roasted tomatoes, and a decadent balsamic glaze. Looks impressive, but it’s so easy anyone could make it!

Pssssst….Stick around for a sweet giveaway at the end of this post!

Caprese Stuffed Chicken: Simple, healthy, delicious and elegant with melty mozzarella, roasted tomatoes and a sweet balsamic glaze

Can you believe it’s almost February? I always forget how quickly February comes after the holidays. I feel like I’ve just finished celebrating Christmas and New Years, and before I know it everyone is asking what the plan is for my birthday, and I have no idea because February feels sooooo faaaaarrrr awaaaayyy.

Caprese Stuffed Chicken: Simple, healthy, delicious and elegant with melty mozzarella, roasted tomatoes and a sweet balsamic glaze

It’s okay though because Target refuses to let you forget. I swear someone comes in at midnight on Christmas day and explodes sappy Valentine’s Day pink and chocolate all over the place.

Caprese Stuffed Chicken: Simple, healthy, delicious and elegant with melty mozzarella, roasted tomatoes and a sweet balsamic glaze

You know what I do miss? Valentine’s Day at school. Like, in elementary school. You know when you were forced to make them for the entire class, and the day was so fun because you’d have parties in all of your classes, and you went home feeling totally sick after eating nothing but chocolate for 7 straight hours? I miss that.

Caprese Stuffed Chicken: Simple, healthy, delicious and elegant with melty mozzarella, roasted tomatoes and a sweet balsamic glaze

Usually these days we keep things pretty low key, and make dinner at home because we are both kind of anti social and avoid crowds at all costs. Plus, I love making something healthier and fancy at home where I can control what goes into it and get exactly what I want.

Caprese Stuffed Chicken: Simple, healthy, delicious and elegant with melty mozzarella, roasted tomatoes and a sweet balsamic glaze

Like this chicken! It’s seriously so healthy, but so impressive and it beats the pants off your average steakhouse dish. With melty mozzarella cheese and roasted tomato coming out in every bite, and the ridiculously good balsamic glaze drizzled on top, this dish will win anyone over for any occasion.

Print
Caprese Stuffed Chicken

Prep Time: 10 minutes

Cook Time: 45 minutes

Total Time: 1 hour

Yield: 2 servings

Serving Size: 1 chicken breast

Caprese Stuffed Chicken

A simple, healthy dinner with smooth & melty mozzarella, sweet roasted tomatoes, and a decadent balsamic glaze. Looks impressive, but it's so easy anyone could make it!

Ingredients

  • 2 x 6 oz chicken breasts
  • 1 roma tomato, thinly sliced
  • 1-2 tbsp olive oil
  • salt and pepper
  • 1-2 oz mozzarella, thinly sliced
  • 2 fresh basil leaves, chopped*
  • 1/2 cup good quality balsamic vinegar

Instructions

  1. Preheat oven to 400. Spray a small baking sheet with nonstick spray. Lay tomato slices in a single layer. Lightly drizzle with olive oil and season with salt and pepper. Roast until tomatoes start to bubble and brown, about 15-20 minutes.
  2. Reduce heat to 375. Season both sides of chicken with salt and pepper, then either butterfly the chicken or pound out until thin. Fill each chicken breast with cheese and tomatoes. If you butterflied the chicken, then fold the top over and secure with toothpicks. If you pounded it out, then roll the chicken around fillings length-wise and secure with toothpicks. Lightly drizzle with olive oil and bake until chicken is fully cooked and juices run clean, about 25 minutes.
  3. Meanwhile make the balsamic glaze by pouring balsamic vinegar into a small sauce pan over high heat. Bring to a boil and reduce to medium-medium high to simmer. Stir occasionally until sauce approaches desired thickness (it will continue to thicken when removed from heat). This took me about 30 minutes for a very syrupy glaze. 20-30 minutes should be all you need.
  4. Once chicken is finished cooking, top with fresh basil and balsamic glaze. You want to time the glaze so that it is ready when the chicken is cooked so it doesn't harden while you wait. Serve immediately. Leftovers can be refrigerated in an airtight container for up to 5 days.

Notes

*To chop fresh basil, roll tightly then thinly slice just before serving. It wilts very quickly, so you want to save it until the last minute.

3.1
https://arismenu.com/caprese-stuffed-chicken/

So to celebrate Valentine’s Day (or just celebrate our love for jewelry 😉 ), I’ve teamed up with some of my favorite food bloggers to give away a $500 Tiffany’s gift card giveaway! This giveaway is furnished by, well, US! As a special gift for you guys to say I LOVE YOU!


Giveaway details:
The giveaway will be open from Monday January 27th, 2014 until Sunday February 2nd, 2014 (@ 11:59pm EST). You must be 18 years old to enter and you must live in the USA. One winner will receive a $500 Tiffany’s gift card.

Please check out my fellow recipe blogging buddies that are also hosting! They all have amazing recipe, beautiful photos, and lots of greatness to share with you!

Sponsored by: The Marvelous Misadventures of a Foodie – Ari’s Menu – The Wanderlust Kitchen – Country Cleaver – Around My Family Table – Crazy for Crust – Macaroni and Cheesecake – Healthy Seasonal Recipes – Yankee Kitchen Ninja – Eat. Drink. Love. – Peanut Butter and Peppers – Cookie Monster Cooking – The Messy Baker – Fabtastic Eats

Filed Under: Dinner, Entree, Gluten-free, Holiday & Seasonal, Low Carb ·

Weekend Ramblings

January 26, 2014 · by Ari ·

1. Yesterday I checked out this new-to-me place called The Main Event in Tempe. Apparently they have a bunch of locations in Texas also? Anyway, they have bowling, arcade games, laser tag, and pretty much everything else you could think of. We went bowling and had a blast! The best part was that after your turn, a little face pops up with the number of pins you got, and they were ridiculous.

2. Today I’m going to a food truck festival! I can’t wait to eat all sorts of creative food truck deliciousness.

3. All my favorite tv shows ended, so I’ve started re-watching Desperate Housewives. Okay, so what you want, but I freaking LOVE that show. I love how every single episode is named after a song from a Stephen Sondheim musical (#musicaltheatrenerd alert…), I love the drama, and I really freaking love Lynette’s character. I just feel like I get her, and the only other character I remember feeling that strongly about is Princess Anna from Frozen.

4. Speaking about Frozen, I can’t get enough. I’ve seen it 3 times, and would pay money to see it again. I think it might be my favorite Disney movie. I cried a little inside when I realized the sheet music wasn’t available yet. At least not in choral arrangements. When it is, you better believe ALL my kids will be singing it.

5. So I guess every endurance junkie gets to a point where this happens.

photo (33)

There was a big bang/crash/etc. I asked my husband what happened, to which he responded “You have too many f**king medals”. He’s so eloquent.

6. I have a really sweet giveaway coming your way tomorrow. It’s Valentine’s Day themed. I actually kind of think Valentine’s Day is stupid, but it doesn’t keep me from enjoying all the sappy love crap. To be honest, I’d rather just treat it like any other day with a cute little quirky gift and funny card. I usually get Steve things that are dachshund and bicycle themed.

photo (32)

7. I’m kinda in love with Vine right now. Last weekend I made 4 videos that are probably only funny to me, and these two.

8. I have kind of a crazy couple of weeks coming up. Next weekend we head out to Huntington Beach for the Surf City 1/2 Marathon which leads right into Birthday-week (okay, I basically celebrate the entire MONTH of February–I freaking LOVE birthdays!), and then the day after my birthday (which is February 6th in case you’re curious 😉 ) we leave for NYC!! My brother got accepted into an international orchestra (out of tens of thousands of people!) and will be playing at CARNEGIE HALL!

9. That means I get to spend my birthday with this guy for the first time ever. So freaking stoked.

10. A couple of weeks ago I had the opportunity to work with personal trainer and pain specialist Cecilia Ticktin. Full disclosure: she offered me three sessions to share about my experience. Anyway, she has a truly amazing and inspirational story, and I absolutely loved my sessions with her! Here’s a little bit about her:

Health and Human Performance Coach Cecelia Ticktin Uses Lessons Learned in Her Personal Rehabilitation Experience to Teach YOU to Alleviate Chronic Pain, Overcome Injury, Optimize Athletic Performance, and Lose Weight / Keep It Off For Good.

 Call (609) 658-5551 today and mention offer code ARISMENU for a $37 evaluation!

Visit The Studio, Read Some Testimonials or Inquire About Out Corporate Fit Program

“I am exceptional at what I do because I stayed purposefully tuned in through 8 years of severe chronic pain caused by a devastating car accident and the development of Complex Regional Pain Syndrome (formerly known as Reflex Sympathetic Dystrophy), so that I could have emotional access to experiences that allow me to genuinely identify with and appreciate many of the difficult experiences my clients bring to me. I learned everything the hard way so you don’t have to.” – Cecelia


And that’s all for this weekend folks. So tell me, what show do you watch reruns of over and over and over?

Filed Under: Uncategorized ·

« Previous Page
Next Page »
Image Map

Popular Posts

Tart Cherry Margaritas: The perfect, refreshing margarita--lightly sweet with a punch of tequila

Tart Cherry Margaritas

90+ Healthy Recipes for Breakfast, Lunch, Dinner & Dessert

90+ Healthy Recipes for Breakfast, Lunch, Dinner & Dessert

The Ultimate Peanut Butter Cup Brownie Cookies: Rich, fudgy, brownie-like chocolate cookies stuffed with melty peanut butter cups!

Ultimate Peanut Butter Cup Brownie Cookies

Drink & Dish: Cafe Au Lait Cupcakes

Crockpot Chicken Enchilada Soup

Subscribe via Email:

Enter your email address:

Save an additional $30 on Blendtec Factory Recertified Blenders + Free Shipping

Featured Here

recipe redux
Certified Yummly Recipes on Yummly.com

Member Of…

FitFluential Is Fitness Found
AZ Bloggers Network
az 150 photo az150_zpsfb093d32.gif

Archives


Image Map

Copyright © 2025 | Innovative Child Theme by The Pixelista | Built on the Genesis Framework


Loading Comments...